JeepParts
My Garage
My Account
Cart
OEM Chrysler Aspen Piston
Engine Pistons- Select Vehicle by Model
- Select Vehicle by VIN
Select Vehicle by Model
orMake
Model
Year
Select Vehicle by VIN
For the most accurate results, select vehicle by your VIN (Vehicle Identification Number).
6 Pistons found


Chrysler Aspen Piston Part Number: 53021539AD


Chrysler Aspen Piston Part Number: 53021538AD


Chrysler Aspen Piston Part Number: 68233351AA

Chrysler Aspen Piston Part Number: 68031605AD
$173.35 MSRP: $255.00You Save: $81.65 (33%)
Chrysler Aspen Piston Part Number: 53022257AC
Chrysler Aspen Piston Part Number: 53022258AC
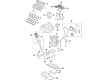
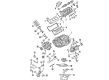
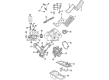
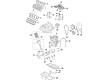
Chrysler Aspen Piston
Choose OEM Piston that meet Chrysler factory standards. Chrysler designs and tests every component for precision and durability. Each Piston follows strict manufacturing steps to lock in quality and fit. If your Chrysler Aspen matters to you, OEM parts make the smart choice. You'll get the exact look, feel, and performance you expect. Shop genuine Aspen parts at the highly competitive prices online. Enjoy a manufacturer's warranty, a hassle-free return policy, and rapid delivery. No more guesswork with off brands. Get genuine parts with exact fit and true factory performance. Shop with confidence today at JeepPartsDeal.com.
The Chrysler Aspen Piston is one of the components that determines the performance, efficiency and durability of all Chrysler Aspen Automobiles with specific function of allowing the internal combustion engine to take place. This Piston effectively translates combustion power into kinetic power thus making sure that the Chrysler Aspen drives like a beast. Made from strong aluminium alloy, piston is light in weight yet very strong and it comes with such features as the gas-tight piston rings that help in improving the performance and the durability of the engine. Some of the Piston styles that have been used in the Chrysler Aspen are the trunk pistons for the side force and high RPM racing pistons. The design of these Pistons with aspects like cooling cavities enhances the performance of Chrysler Aspen and is a factor towards the safety of this vehicle. The ability of this Piston to provide compatibility with various Aspen models guarantees that the drivers will be able to harness the latter aspect that arises from its reliability here, all in a bid to improve efficiency while also boosting the vehicle's performance. These are some of the characteristics that have earned Chrysler Aspen its reputation in the market because of the great pulling power and interior room needed for travel and family vacation purposes. Moreover, the other generation of the Chrysler Aspen, with Astonishment, is a flexible hybrid version installed with a unique Piston that marks the vehicle's efficiency in using as much fuel as possible and keeping electric mode during low speeds. In conclusion, Chrysler Aspen Piston is undoubtedly reliable, has impressive performance and is of great value to drivers.
Chrysler Aspen Piston Parts and Q&A
- Q: How to Install Piston and Connecting Rod Assemblies on Chrysler Aspen?A:Install the piston rings first, then immerse the piston head and rings in fresh clean engine oil before putting on the piston and connecting rod assemblies. Place a ring compressor on top of the piston and rings and tighten it slowly, so the rings are not moved out of place. Install the bearing right side up on the connecting rod, line up the bearing hole with the rod and wipe the bearing with clean engine oil. Place Special Tool 8507 Connecting Rod Guides inside the connecting rod bolt threads before assembling. On each piston, an "F" must be visible when looking down the cylinder; both pistons should also show the connecting rod oil slinger facing forward. Clean out the inside of the cylinder, apply a thin coat of engine oil and turn the Crankshaft until the connecting rod journal sits right inside the cylinder. Lower the rod and piston through the bore, push the connecting rod guides over the crankshaft journal, tap the piston and lead the connecting rod into its proper spot. Remember that connecting rod bolts are Torque to Yield Bolts that should not be used again; take care to always replace them when you loosen or remove them. Grease the rod bolts and where the bearing will go with engine oil, then put the cap and the bearing on and tighten them to 27 Nm (20 ft. lbs.) plus 90°. Next, set in the cylinder head(s), fit the Timing Chain and cover, seal the cylinder head covers and secure the Oil Pan with gasket or windage tray. After that, add the proper oil to the crankcase and link the negative battery cable.
- Q: How to Remove and Replace a Piston and Connecting Rod on Chrysler Aspen?A:First, take out the negative terminal from the battery to detach the cables before moving the piston and connecting rod. After that, take out the Oil Pan and gasket/windage tray, cylinder head covers, timing chain cover and cylinder head(s). If the cylinder bores need it, use a good ridge reamer to remove the top ridge and then take out the pistons with the tops of them still covered. The pistons and connecting rods on top of the cylinder block should be taken out and the Crankshaft must be rotated, so the connecting rods are in the center of the bore. Don't use a number punch or stamp on the connecting rods or their caps to prevent damage. Place marks on the positions of the connecting rods and bearing caps using an indelible marker or scribe, but do not scrape or ruin the joint surfaces still intact. Take off the cap on the connecting rod, place Special Tool 8507 Connecting Rod Guides inside the removed rod and take the piston out of the cylinder bore, repeating the steps for every 1 piston. Be careful not to cut the bore works while installing. Right after removing the piston and connecting rod, set the bearing cap over the mating connecting rod to prevent damage to the broken cap and rod pieces. You should carefully removed the piston rings from the pistons, starting with the ring that fits the piston head first.


Related Chrysler Aspen Parts
 Chrysler Aspen Camshaft
 Chrysler Aspen Crankshaft Gear
 Chrysler Aspen Cylinder Head
 Chrysler Aspen Engine Mount Bracket
 Chrysler Aspen Exhaust Valve
 Chrysler Aspen Harmonic Balancer
 Chrysler Aspen Piston Ring Set
 Chrysler Aspen Pushrod
 Chrysler Aspen Rod Bearing
 Chrysler Aspen Timing Chain Tensioner
 Chrysler Aspen Timing Cover Gasket
 Chrysler Aspen Transmission Mount