JeepParts
My Garage
My Account
Cart
OEM Chrysler LHS Timing Cover
Engine Timing Cover- Select Vehicle by Model
- Select Vehicle by VIN
Select Vehicle by Model
orMake
Model
Year
Select Vehicle by VIN
For the most accurate results, select vehicle by your VIN (Vehicle Identification Number).
8 Timing Covers found

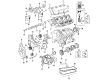
Chrysler LHS Oil Pump Part Number: 4591102AB

Chrysler LHS Front Cover, Inner Part Number: 4897748AB

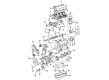
Chrysler LHS Timing Cover, Inner Passenger Side Part Number: 4663818

Chrysler LHS Timing Cover, Inner Driver Side Part Number: 4663817
Chrysler LHS Front Cover, Rear Part Number: 4573503
Chrysler LHS Front Cover Part Number: 4556537

Chrysler LHS Timing Cover, Upper Driver Side Part Number: 4556535

Chrysler LHS Timing Cover, Outer Passenger Side Part Number: 4792335AD
Chrysler LHS Timing Cover
Choose OEM Timing Cover that meet Chrysler factory standards. Chrysler designs and tests every component for precision and durability. Each Timing Cover follows strict manufacturing steps to lock in quality and fit. If your Chrysler LHS matters to you, OEM parts make the smart choice. You'll get the exact look, feel, and performance you expect. Shop genuine LHS parts at the highly competitive prices online. Enjoy a manufacturer's warranty, a hassle-free return policy, and rapid delivery. No more guesswork with off brands. Get genuine parts with exact fit and true factory performance. Shop with confidence today at JeepPartsDeal.com.
The Chrysler LHS Timing Cover is widely used part that is critically important for the efficient and successful operation of the vehicles of Chrysler LHS make. Located over the engine to shield the timing mechanism, which could be the timing belt, timing chain or cam belt, the Timing Cover is built using metal including aluminum, plastic and steel. Designing the LHS in this way of course protects other less hard wearing parts of the engine from being chocked by debris thus making Chrysler LHS a smooth run car. That the Timing Cover can fit different LHS models only adds to its importance because it not only optimizes the performance of the engine but also guarantees the level of safety in automobiles in the series. One should ensure that the Timing Cover is well maintained and replaced at the right time as this may cause serious problems to an engine. It is important to note that a large number of Chrysler LHS Timing Covers have been developed with top gaskets incorporated to the timing belt's protection making them even more reliable. The Chrysler LHS Sedan sold between 1994 and 2001 is particularly noteworthy for its fairly luxurious characteristics and sound handling, and it is complemented by the Timing Cover that assists in the correct operation of the engine. Thus, Chrysler LHS is still popular as a car of the '90s and its powerful model and stylish Timeline cover is evidence that Chrysler still holds its activities in the automotive market. To sum up, there is no mere shield that is the Chrysler LHS Timing Cover, it is a significant component which can be considered as fundamental for the car's efficient and long-term operation, therefore, it is crucial for any owner of the Chrysler LHS.
Chrysler LHS Timing Cover Parts and Q&A
- Q: How to Service and Repair a Timing Cover on Chrysler LHS?A:First, unplug the negative cable on the remote jumper terminal and after that, remove the upper radiator crossmember when servicing or repairing the timing cover. After that, remove the cooling fan module and the accessory Drive Belts. To remove the center bolt, grab the crankshaft damper with Special Tool 8191 and then get rid of the damper using Special Tools 1023 and C-4685-C2. After finishing, take off the lower belt cover, then remove the A/C belt guide/lift bracket and the stamped steel cover, without touching the reusable sealer; put in new Mopar Engine RTV GEN II if the sealer isn't available. Carefully take off the left cast cover. You should start the installation by fitting the left cast cover with the generator/power steering tensioner pulley and bracket, before putting in the right stamped steel cover and additionally the A/C belt guide/lift bracket. Following this, place the lower cover into its position with the crankshaft damper using the special bolts 5.9 and 6792-1. Put in the center bolt, hold the damper with Special Tool 8191 and fasten it to 115 Nm (85 ft. lbs.). Install the accessory belt and any other drive belt and connect the upper radiator crossmember. Last, attach the negative cable to the remote jumper terminal.
- Q: How to Maintain and Fix a Timing Cover on Chrysler LHS?A:Before working on the timing belt cover, disconnect the negative cable at the remote jumper terminal, remove the upper radiator crossmember, radiator fan, accessory Drive Belts, crankshaft vibration damper, lower belt cover located behind the crankshaft vibration damper, the A/C belt guide/lift bracket and the stamped steel cover. After that, remove the cast cover from your left foot. Install the left cast cover and the generator/power steering belt tensioner in the beginning, next the right stamped steel cover and A/C belt guide/lift bracket, then assemble the lower cover and crankshaft vibration damper, next install the accessory drive belts, radiator fan and finish with the upper crossmember for the radiator, as well as reattaching the negative cable to the remote jumper terminal. To remove the rear timing belt cover, remove the camshaft sprocket(s), its bolts and then the rear cover from the right side. Be aware that the o-rings from this cover can only be used once. Examine the foam seals at the back of the case and change them if you notice any damage or wear. Wipe the right rear timing belt cover O-ring sealing surfaces and grooves, coat the new O-rings with Mopar Dielectric Grease or a similar grease and set the O-rings onto the cover. Install the rear timing belt covers and fasten the bolts to the given torque numbers of M8 - 28 Nm, M6 - 12 Nm and M10 - 54 Nm. Afterward, put in the camshaft sprockets, then reconnect each part.


Related Chrysler LHS Parts
 Chrysler LHS Camshaft
 Chrysler LHS Engine Mount
 Chrysler LHS Engine Mount Bracket
 Chrysler LHS Motor And Transmission Mount
 Chrysler LHS Oil Pan
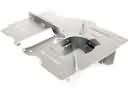 Chrysler LHS Oil Pan Baffle
 Chrysler LHS Oil Pump
 Chrysler LHS Oil Pump Gasket
 Chrysler LHS Timing Belt Tensioner
 Chrysler LHS Timing Cover Gasket
 Chrysler LHS Valve Stem Seal
 Chrysler LHS Variable Timing Sprocket