JeepParts
My Garage
My Account
Cart
OEM Chrysler Pacifica Timing Belt
Engine Timing Belt- Select Vehicle by Model
- Select Vehicle by VIN
Select Vehicle by Model
orMake
Model
Year
Select Vehicle by VIN
For the most accurate results, select vehicle by your VIN (Vehicle Identification Number).
1 Timing Belt found


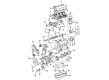
Chrysler Pacifica Timing Belt Part Number: 4792353
$85.20 MSRP: $127.00You Save: $41.80 (33%)
Chrysler Pacifica Timing Belt
Choose OEM Timing Belt that meet Chrysler factory standards. Chrysler designs and tests every component for precision and durability. Each Timing Belt follows strict manufacturing steps to lock in quality and fit. If your Chrysler Pacifica matters to you, OEM parts make the smart choice. You'll get the exact look, feel, and performance you expect. Shop genuine Pacifica parts at the highly competitive prices online. Enjoy a manufacturer's warranty, a hassle-free return policy, and rapid delivery. No more guesswork with off brands. Get genuine parts with exact fit and true factory performance. Shop with confidence today at JeepPartsDeal.com.
The Chrysler Pacifica Timing Belt is an essential part to look at when reviewing the reliability and performance of the Chrysler minivan products. Known for managing the rotation of the crankshaft and the camshaft, the Timing Belt guarantees proper timing of engine valves' operations in synergy with piston movements to keep the Pacifica running efficiently. This is especially important for the gasoline and the plug-in hybrid variants of Chrysler Pacifica, which have received many praises for their drive and safety systems. The actual construction of the Timing Belt involves the use of a strong rubber material that is generally strengthened by the use of fibers, particularity has new characteristics like the presence of curved teeth that increases its durability while minimizing noise; thus it has a competitive advantage in the automobile industry. The necessity of inspecting the Timing Belt and replacing it or associated parts like tensioners and water pumps do require regular attention and do not harm the Pacifica in the slightest as they simply prevent costly engine issues. The Chrysler Pacifica has been noted as one of the most suitable for families given the plentiful interior space as well as on-board safety measures, so the condition of the Timing Belt must not be disregarded. Being suitable for a range of PACIFICA models, Chrysler Timing Belt is one of the vital components that help the drivers have a comfortable and safe trip. All in all, the Chrysler Pacifica Timing Belt represents a perfect example of the brand's devotion to the premium service, increasing the car's performance, as well as safety, of this six-time winner of the acclaimed Quality 100 Award.
Chrysler Pacifica Timing Belt Parts and Q&A
- Q: How to Service and Repair a Timing Belt on Chrysler Pacifica?A:Remove the outer Timing Covers and turn the Crankshaft so the pointer points at the TDC mark on the oil pump, letting the camshaft sprocket timing lines line up with the inner timing cover marks which might mean another round crankshaft rotation. Take off the valve train rocker before you move on and follow the fuel pressure release process. Unhook the negative cable from the battery, remove both covers for the cylinder heads and slightly loosen the rocker assemblies. Take out the front timing belt cover and mark the way the belt runs if you plan to put it back on. Keep rotating the engine until the number on the crankshaft lines up with the TDC mark on the oil pump and the marks on both sprockets are over the marks on the cover. Take out the Timing Belt Tensioner and the belt, check the tensioner for signs of oil leakage and rotate both the pivot and bolt while they are out, doing this step. Index the tensioner plunger in a vise as you depress it into the body of the mechanism. To remove the camshaft sprocket, first release the fuel pressure, open the front timing belt cover and turn the crankshaft sprocket to the top dead center mark on the oil pump housing. To locate TDC, use a dial indicator in the number 1 cylinder. Next, take off the camshaft retainer/thrust plate from the rear of the right cylinder head, then take off the cover and rocker arm for that side. Disconnect the timing belt tensioner and timing belt, moving the right camshaft rearward roughly 3 1/2 inches to find the bolt that holds the camshaft gear in place and do not let the camshaft or journals on the cylinder head get scratched. Hold each camshaft sprocket with an adjustable 36 mm wrench, undo and remove the camshaft gear retaining bolts and then remove the sprockets. After you remove the crankshaft sprocket using Special Tool L-4407-A, check the timing belt for toughness, cracks, peeled areas, missing teeth or unusual wear. If there is any damage, replace the belt. Use Special Tool 6641 to check the depth as you install the crankshaft sprocket and then the timing belt. Screw on the camshaft sprockets onto the camshafts using new bolts so that the right side receives the right type, but do not tighten them first. Place the proper camshaft thrust plate and seal and tighten their bolts to 28 Nm. The timing belt goes on the crankshaft sprocket and is fixed around the tensioner pulley sufficiently tight while the installation is still moving counterclockwise. Install the reset timing belt tensioner, use a torque wrench set to 28 Nm tighten the bolts and remove the tensioner retaining pin. Place the number one Piston at TDC, hold the camshaft sprocket hex with a 36 mm wrench and tighten all the camshaft bolts to the correct amounts indicated. Take out the dial indicator, install the spark plug next, remove Special Tool 6642 and add the cam retainer/thrust plates and O-rings. After that, place the front timing belt cover, tighten the rocker arm assemblies, connect the cylinder head covers and reattach the black negative Battery Cable.

Related Chrysler Pacifica Parts
 Chrysler Pacifica Valve Cover Gasket
 Chrysler Pacifica Camshaft
 Chrysler Pacifica Crankshaft Seal
 Chrysler Pacifica Dipstick Tube
 Chrysler Pacifica Engine Mount Bracket
 Chrysler Pacifica Exhaust Valve
 Chrysler Pacifica Lash Adjuster
 Chrysler Pacifica Oil Filler Cap
 Chrysler Pacifica Oil Pump Gasket
 Chrysler Pacifica Piston Ring Set
 Chrysler Pacifica Timing Chain Guide
 Chrysler Pacifica Timing Cover