JeepParts
My Garage
My Account
Cart
OEM Chrysler PT Cruiser Brake Booster
Brake Power Booster- Select Vehicle by Model
- Select Vehicle by VIN
Select Vehicle by Model
orMake
Model
Year
Select Vehicle by VIN
For the most accurate results, select vehicle by your VIN (Vehicle Identification Number).
2 Brake Boosters found


Chrysler PT Cruiser Brake Booster Part Number: 5142499AA

Chrysler PT Cruiser Brake Booster Part Number: 5072833AA
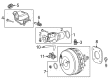
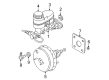
Chrysler PT Cruiser Brake Booster
Choose OEM Brake Booster that meet Chrysler factory standards. Chrysler designs and tests every component for precision and durability. Each Brake Booster follows strict manufacturing steps to lock in quality and fit. If your Chrysler PT Cruiser matters to you, OEM parts make the smart choice. You'll get the exact look, feel, and performance you expect. Shop genuine PT Cruiser parts at the highly competitive prices online. Enjoy a manufacturer's warranty, a hassle-free return policy, and rapid delivery. No more guesswork with off brands. Get genuine parts with exact fit and true factory performance. Shop with confidence today at JeepPartsDeal.com.
Chrysler PT Cruiser cars have a part called the Brake Booster, this component lessens the amount of force a driver is required to apply on the brake pedal. Located between the brake pedal and the master cylinder is the Brake Booster which assists in increasing the pressure via vacuum or hydraulic power from the driver. The vacuum boosters work by applying the pressure difference between the engine vacuum and the atmospheric pressure; the hydraulic boosters on the other use hydraulic pressure. Chrysler PT Cruiser vehicles may have vacuum power boosters that are usually effective but sometimes have issues. In addition to performance brake boosters, power brake conversion kits for cars and racing vehicles are also available and are available as one or two diaphragm with different diameter and can be in different types of finish. The greater the diameter of the booster, the greater the power assist though in hot rods where space is a premium, a smaller diameter dual diaphragm boosters can provide as much assist as a large single diaphragm booster.
Chrysler PT Cruiser Brake Booster Parts and Q&A
- Q: How to Service and Repair a Vacuum Brake Booster on a Left-Hand Drive on Chrysler PT Cruiser?A:Before servicing or repairing the vacuum brake booster on a vehicle facing the left, open and put aside the air cleaner cover. First, pull out the battery negative cable and then remove the master cylinder. Should ABS be installed, be sure to also unplug the integrated control unit. Remove the vacuum lines from the check valve attached to the brake booster, but don't take the check valve off. Remove the silencer in the vehicle from under the knee blocker and fold down and remove the blocker itself. To eliminate the stop lamp switch, first rotate it opposite the direction of the hands on the clock by 30 degrees and then pull it out toward you. At this point, unplug the wiring from the switch and discard it. Use a little screwdriver to take out the retaining clip that joins the brake booster push rod to the brake pedal and next slide off the push rod from the brake pedal pin. Accessible from under the instrument panel next to the brake pedal bracket, remove the four bolts holding the power brake booster to the system. Slide the power brake booster as far forward as possible and only after its mounting studs have cleared the instrument panel, take it out of the engine compartment. Before attaching the new power brake booster, put in place a new dash seal over the booster studs. Push the push rod and studs through the dash panel and fix the power brake booster in place, then tighten the four mounting nuts to 34 Nm. Apply Mopar Lubriplate or its substitute to the surface of the brake pedal pin, insert the push rod from the power brake booster and secure it with a fresh retaining clip. Do not use the old stop lamp switch; get a new one and secure it by installing the plunger side into the mounting bracket, turning clockwise to hold it and adjusting it when your foot rests completely on the brake pedal. Reattach the knee blocker and the silencer pad so that the vacuum lines don't touch the Exhaust Manifold. Join up the vacuum hoses you took off earlier, insert the ICU back in place if needed and put in the master cylinder. First, link the battery negative cable together, secure the air cleaner cover, empty air from the braking system and ABS if there is and finally test the brakes on a road test.
- Q: How to Remove and Install a Vacuum Brake Booster in a Left-Hand Drive on Chrysler PT Cruiser?A:Remove the air cleaner cover and hose to the throttle body as your first step and after that remove the air cleaner housing. Loosen the negative Battery Cable, then move it aside and isolate it, later unlatch the power distribution and move it out of the way. If you have an ABS vehicle, remove the master cylinder and then the ICU and the three bracket bolts that are on the frame rail. Take out the vacuum hoses from the check valve on the power brake booster, but do not detach the check valve. Once inside the car, lift up the silencer pad next to the shifter and lower and remove the knee saver. Get under the instrument panel and find where the input rod attaches to the brake pedal-to-power brake booster; remove its retaining clip with a small screwdriver and toss the old clip. Get rid of the four nuts where the booster is mounted to the instrument panel and then slide the booster and uninstall it from the automobile. Be sure the dash seal is fitted on the studs, then use the booster studs to lower the power brake booster. Add and tighten the four nuts so that each is turned to 34 Nm (25 ft. lbs.). Apply Mopar Lubriplate or its equivalent to the brake pedal pin, join the power brake booster input rod to the pin and install a new retaining clip. Take out the old brake lamp switch and put in a new one, because you cannot reuse the original. Fit the knee blocker and silencer pad, join the vacuum hoses to the vacuum check valve and (if you have ABS) install the ICU and bracket with 23 Nm (200 in. lb) of tightening force. Set up the master cylinder and distribution center, then reconnect the cable for the negative battery. Next, attach the air cleaner housing, put the air cleaner cover in place and run the hose to the throttle body, remove the air to check the brake system and perform a road test.


Related Chrysler PT Cruiser Parts
 Chrysler PT Cruiser ABS Pump And Motor Assembly
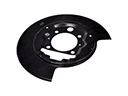 Chrysler PT Cruiser Backing Plate
 Chrysler PT Cruiser Brake Caliper
 Chrysler PT Cruiser Brake Caliper Bolt
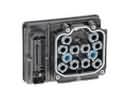 Chrysler PT Cruiser Brake Controller
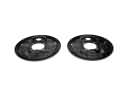 Chrysler PT Cruiser Brake Dust Shields
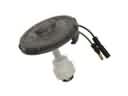 Chrysler PT Cruiser Brake Fluid Level Sensor
 Chrysler PT Cruiser Brake Master Cylinder
 Chrysler PT Cruiser Brake Proportioning Valve
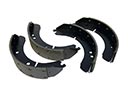 Chrysler PT Cruiser Brake Shoe Set
 Chrysler PT Cruiser Wheel Bearing Dust Cap
 Chrysler PT Cruiser Wheel Stud