JeepParts
My Garage
My Account
Cart
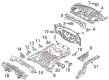
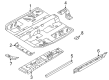
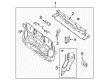
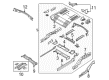
OEM Chrysler Rear Crossmember
Rear Suspension Crossmember- Select Vehicle by Model
- Select Vehicle by VIN
Select Vehicle by Model
orMake
Model
Year
Select Vehicle by VIN
For the most accurate results, select vehicle by your VIN (Vehicle Identification Number).
36 Rear Crossmembers found


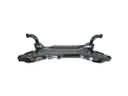
Chrysler Rear Crossmember Part Number: 4780812AD
$324.95 MSRP: $580.00You Save: $255.05 (44%)Ships in 1-3 Business DaysProduct Specifications- Other Name: Crossmember - Rear Suspension; Floor Pan Crossmember, Rear; Crossmember Rear Suspension Rear; Crossmember Rear Suspension
- Position: Rear
- Replaces: 4780812AC

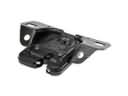
Chrysler Upper Crossmember, Rear Part Number: 4780806AF
$46.03 MSRP: $264.00You Save: $217.97 (83%)Ships in 1-2 Business DaysProduct Specifications- Other Name: Crossmember - Rear Suspension; Floor Pan Crossmember, Rear Upper; Crossmember Rear Suspension Front; Crossmember Rear Suspension
- Position: Rear Upper
- Replaces: 4780806AD, 4780806AE, 4780806AC

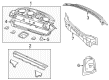
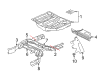
Chrysler Package Tray Lower Reinforcement, Rear Part Number: 68045533AD
$82.48 MSRP: $123.00You Save: $40.52 (33%)Ships in 1-3 Business DaysProduct Specifications- Other Name: Crossmember - Rear Shelf Panel; Package Tray Reinforcement, Rear Lower; Package Tray Support; Reinforcement Rear Shelf Panel
- Position: Rear Lower
- Replaces: 68045533AC

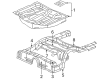
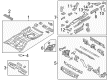
Chrysler Front Crossmember, Rear Upper Part Number: 68030677AG
$140.49 MSRP: $208.00You Save: $67.51 (33%)Ships in 1-3 Business DaysProduct Specifications- Other Name: Crossmember - Rear Suspension; Suspension Subframe Crossmember, Rear; Floor Pan Crossmember, Rear Upper; Suspension Crossmember; Upper Crossmember; Crossmember Rear Suspension Front
- Position: Rear Upper
- Replaces: 68030677AA, 68030677AF, 68030677AB, 68030677AD, 68030677AE, 68030677AC

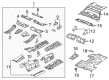
Chrysler Rear Crossmember Part Number: 4780800AA
$338.77 MSRP: $499.00You Save: $160.23 (33%)Ships in 1-3 Business DaysProduct Specifications- Other Name: Crossmember - Floor Pan; Floor Pan Crossmember, Rear; Floor Crossmember; Crossmember; Crossmember Floor Pan Rear Kick - Up; Crossmember Floor Pan
- Position: Rear

Chrysler Crossmember, Rear Part Number: 68269925AD
$739.67 MSRP: $1085.00You Save: $345.33 (32%)Product Specifications- Other Name: Crossmember - Rear Suspension
- Position: Rear
- Replaces: 68269925AB, 68269925AC, 68269925AA

Chrysler Floor Crossmember, Rear Part Number: 5115540AA
$170.42 MSRP: $240.00You Save: $69.58 (29%)Ships in 1-2 Business DaysProduct Specifications- Other Name: Crossmember - Rear Floor; Floor Pan Crossmember, Rear; Crossmember Rear Floor
- Position: Rear


Chrysler Suspension Crossmember, Rear Part Number: MR369145
Product Specifications- Other Name: Crossmember - Rear Suspension; Suspension Subframe Crossmember, Rear; Crossmember; Crossmember Rear Suspension
- Position: Rear

Chrysler Suspension Crossmember, Rear Part Number: MB948996
Product Specifications- Other Name: Crossmember - Rear Suspension; Crossmember; Crossmember, Rear Suspension; Crossmember Rear Suspension
- Position: Rear


Chrysler Suspension Crossmember, Rear Part Number: 4895262AC
Product Specifications- Other Name: Crossmember - Rear Suspension; Suspension Subframe Crossmember, Rear; Crossmember; Crossmember Rear Suspension
- Position: Rear

Chrysler Suspension Crossmember, Rear Part Number: 4584497
$70.70 MSRP: $104.00You Save: $33.30 (33%)Product Specifications- Other Name: Crossmember - Rear Suspension Painted; Crossmember; Crossmember, Rear Suspension; Crossmember Rear Suspension
- Position: Rear

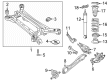
Chrysler Suspension Crossmember, Rear Part Number: 5151022AH
$421.36 MSRP: $614.00You Save: $192.64 (32%)Product Specifications- Other Name: Crossmember - Rear Suspension; Suspension Subframe Crossmember, Rear; Crossmember Rear Suspension
- Position: Rear
- Replaces: 5085330AD, 5151022AF, 5151022AC, 5085330AF, 5085330AG, 5085330AH, 5151022AE, 5085330AL, 5085330AJ, 5085330AK, 5151022AG, 5085330AI, 5085330AE, 5151022AD

Chrysler Suspension Crossmember, Rear Part Number: 5101378AB
$795.78 MSRP: $1160.00You Save: $364.22 (32%)Product Specifications- Other Name: Crossmember - Rear Suspension; Suspension Subframe Crossmember, Rear
- Position: Rear
- Replaces: 5101378AA

Chrysler Center Crossmember, Rear Part Number: MR414345
Product Specifications- Other Name: Crossmember - Rear Floor; Floor Pan Crossmember, Rear Center; Crossmember Rear Floor
- Position: Rear Center

Chrysler Rear Crossmember, Front Center Part Number: MR392653
Product Specifications- Other Name: Pan - Front Floor; Floor Pan Crossmember, Center; Crossmember Front Floor
- Position: Front Center

Chrysler Front Crossmember, Rear Center Part Number: MR392153
Product Specifications- Other Name: Crossmember - Rear Floor; Floor Pan Crossmember, Rear Center; Crossmember Rear Floor
- Position: Rear Center

Chrysler Rear Crossmember Part Number: MB959469
Product Specifications- Other Name: Crossmember - Rear Floor; Floor Pan Crossmember, Rear; Crossmember Rear Floor
- Position: Rear
Chrysler Suspension Crossmember, Rear Part Number: 5135498AA
Product Specifications- Other Name: Crossmember - Rear Suspension; Crossmember Rear Suspension
- Position: Rear

Chrysler Crossmember, Rear Part Number: 5114046AA
Product Specifications- Other Name: Crossmember - Rear Wall; Floor Pan Crossmember, Rear; Crossmember Rear Wall
- Position: Rear

Chrysler Rear Cross Bar Part Number: 5054606AA
Product Specifications- Other Name: Crossmember - Rear Suspension; Floor Pan Crossmember, Rear; Crossmember Rear Suspension
- Position: Rear
| Page 1 of 2 |Next >
1-20 of 36 Results
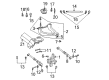
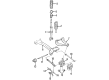
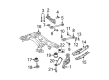
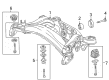
Chrysler Rear Crossmember
OEM parts sourced directly from Chrysler deliver superior quality, long lasting strength, and a precise fit you can trust. Each item goes through strict quality checks to ensure safety, toughness, and performance that matches your factory equipment. At JeepPartsDeal online shop, you'll get top-quality, budget-friendly OEM Chrysler Rear Crossmember for your vehicle. We focus on giving you a high standard without pushing up the price. Our full selection of genuine factory products comes backed by the original manufacturer's warranty. You'll love our fast delivery, seamless shopping experience, and convenient return policy, saving you all the hassle.
Chrysler Rear Crossmember stiffens the backbone of the car, which keeps everything square as you bang the potholes. Chrysler expanded out of the promise of solid rides of 1925 to become a habit of ingenious thinking like Floating Power, striking forms that sliced through the air like hairs, minivans that looked at swamped parking lots with disdain, a buying experience that average families could accomplish without glandular effort, the same unflinching attitude that called a the Rear Crossmember. Chrysler continues to refine the inside space, ride quality, and utility so that drivers and passengers get out better than they got in, and that emphasis on practical comfort over the glossies makes even the lowly Rear Crossmember receive the no-nonsense treatment of a cup holder, a can of paint, or even the pushing of a start button, since the badge will not put large items in tiny packages or vice versa. The Rear Crossmember in all Chrysler models supports the combined mass of engine and transmission, fixes their locations against lateral forces and binds up suspension pick-up points to a single inflexible zone, making the chassis alignment remain straight, the steering true and the unexpected switches of lanes not shake the vehicle into wobbly positions. Constructed of steel so strong it won't be bothered by salt, rain, or long miles, the Rear Crossmember keeps a Chrysler off-road, endures fatigue cracks that would add noise to the interior, and is accessible at the bolts allowing control arm and exhaust mounts to be removed, allowing the structure to extend its serviceable life by far.
Chrysler Rear Crossmember Parts and Q&A
- Q: How to Service a Rear Crossmember on Chrysler 300?A:For the rear cross-member service, pull out the battery negative cable from the car, set the battery aside, raise the car and support it using an appropriate stand. Remove the wheel mounting nuts and tire and wheel assembly from all sides of the rear. After applying brakes to secure the hub, remove the nut from the half shaft on both sides of the axle. Followed by this, take off both the rear exhaust and the axle differential and pull the half shafts off each side of the car from the hub and bearing. Unplug the right rear parking brake cable from the front parking brake cable and the left rear parking brake cable from the equalizer, but leave the equalizer with the front cable. Take out the screw holding the front parking brake cable routing bracket to the crossmember front flange and remove the J-nut from it. On cars using basic or superior brake discs, secure the tension pins so they do not move and remove the brake caliper bolt from the guide pins, guiding the brake caliper up via the suspension as you stow it above the rear suspension using a bungee wire or string. To keep caliper bores safe, insert pistons back with only a soft tool or trim stick. Between the SRT8 brake pad and the outer edge of the rotor, secure a trim stick, press against the brake pad to push the pistons down and support the spring link with a transmission jack to get at the caliper bolt. Remove both the upper and lower bolts holding the caliper, pull off the caliper with the brake pads and hang it out of your way. Disconnect both wheel speed sensor connectors from the body wiring harness connector in the floor pan of the luggage compartment, then remove the left wheel speed sensor from its routing clips behind the crossmember and above where the toe link is mounted. On each side, remove the shock absorber's lower bolts and nuts, mark out the four locations on the vehicle body where the rear crossmember fits and place jack stands under the front of the cradle to support it. Place a jack beneath the center of the rear crossmember, raise it to rest on the crossmember, lock it into place, but do not attach the stabilizer bar. Unhook the fuel filler tube and, if you own an AWD, do not misplace the spacers present between the crossmember mounts and the body as you remove the bolts. Disconnect the bolts on both the front and back mounts, let the crossmember sink gently and then work on the stop link and stabilizer bar when you can reach the bolts. Take off the bolts and nuts securely attaching the stabilizer bar to the stabilizer link. Then unscrew the bolts joining each stabilizer bar cushion retainer to the crossmember and remove them with the stabilizer bar cushions and retaining bolts together. Remove the coil springs and isolators from the spring links, then with a 13 mm 12-point box wrench, collapse each retainer's fingers and pull the brake cable out of its bracket. Untwist the screw holding the parking brake cable routing guide to the crossmember and release the J-nuts from there as well. Check which way the fasteners face before installation and then take out the bolts and nuts holding the spring link, toe link, tension link and camber link to the crossmember. Remove the crossmember from the jack last, lifting out the knuckle with links and parking brake cable connected to it from the rear suspension crossmember.
- Q: How to Service and Repair a Rear Crossmember on Chrysler Pacifica?A:To service and repair the rear crossmember, first disconnect and isolate the battery negative cable, remove the spare tire, and lock out the automatic adjuster in the parking brake lever. Raise and support the vehicle, positioning extra jack stands under the forward end of the engine cradle for stability. Remove both rear wheel and tire assemblies, then access and remove both rear hub and bearing assemblies, followed by the rear half of the exhaust system. It may be necessary to back off the parking brake shoe adjustment to allow sufficient slack for disengaging cable buttons from connectors. Slide the left rear parking brake cable button inboard and remove it from the equalizer, then secure the front cable connector with pliers while sliding the right rear parking brake cable button inboard to remove it. Remove the screws mounting the left and right rear brake hose routing brackets to the front of the rear crossmember, tying the brake hoses off to the side. If equipped with AWD, remove the rear driveline module and both rear half shafts. Mark the location of the rear crossmember on the body at all four mount locations using a marker. Position a jack under the center of the rear suspension crossmember, raise it to contact the crossmember, and secure it. Remove the lower mounting bolt and nut at each rear shock absorber, then remove both front and rear crossmember mounting bolts on the left side of the vehicle. Slowly lower the jack to allow the left side of the crossmember to drop just enough for coil spring removal, then remove the coil spring and isolator. Raise the left side of the crossmember back into position and install the previously removed mounting bolts without tightening them. Repeat the process for the right side of the crossmember, removing the mounting bolts and allowing the right side to drop for coil spring removal, then raising it back into position. Remove both front and rear crossmember mounting bolts on the left side again, lower the jack, and support the propeller shaft with a bungee or cord while continuing to lower the jack until the crossmember is at a comfortable working level. Remove the bolts and nuts fastening the stabilizer bar to each stabilizer link, then remove the bolts fastening each stabilizer bar cushion retainer to the crossmember and take out the stabilizer bar with cushions and retainers. For each side of the rear suspension, collapse the cable retainer fingers and remove the cable from the crossmember, then remove the bolt and nut fastening the spring link to the crossmember. While holding the toe adjustment cam bolt from rotating, remove the nut securing the toe link at the crossmember, then remove the link from the cam bolt and the cam bolt and washer from the crossmember. Remove the bolt and nut mounting the compression link to the crossmember, followed by the nut and bolt mounting the tension link to the crossmember, and finally the nut and bolt mounting the camber link to the crossmember. Carefully lift the knuckle with links and parking brake cable attached as an assembly from the rear suspension crossmember, and if necessary, remove ABS wheel speed sensor routing clips from the crossmember. Install the crossmember on the jack head in the same position it was removed and secure it. If necessary, install ABS wheel speed sensor routing clips in the crossmember. For each side of the rear suspension, carefully place the knuckle assembly into the mounting position on the rear suspension crossmember, then install the mounting bolts for the camber link, tension link, and compression link without tightening them. Slide the toe adjustment cam bolt through the rear crossmember from the front, place the cam washer over the threads, and install the toe link and nut while holding the cam bolt from rotating. Install the bolt and nut fastening the spring link to the crossmember without tightening. Set the current side of the rear suspension to curb height using the specified tools, then tighten the link fasteners at the crossmember to the specified torque values. Remove the special tools and install the end of the parking brake cable into the mounting hole in the crossmember, ensuring the cable retainer clicks into place. Install the stabilizer bar with cushions and retainers on the crossmember, then install the cushion retainer mounting bolts and the bolts fastening the stabilizer bar to each stabilizer link without tightening them. Tighten the cushion retainer mounting bolts to the specified torque, raise the crossmember to the body mounting points while aligning the shocks with the pockets in the spring links, and install the left side crossmember mounting bolts without tightening. Slowly lower the jack to allow the right side of the crossmember to drop just enough for spring installation, then install the coil spring and isolator, ensuring the lower end coil is correctly placed against the abutment. Carefully raise the jack, guiding the coil spring and lower end of the shock absorber into position, and install the lower shock mounting bolt without tightening. Raise the right side of the crossmember into position and install the right side mounting bolts without fully tightening them. Remove both front and rear crossmember mounting bolts on the left side, lower the jack to allow for spring installation, and install the coil spring and isolator, ensuring proper placement. Raise the jack, guiding the coil spring and lower end of the shock absorber into position, and install the lower shock mounting bolt without tightening. Raise the left side of the crossmember into position and install the previously removed mounting bolts without fully tightening. Shift the crossmember as necessary to line up the mounts with the location marks drawn before removal, and if proper location marks are unavailable, position the crossmember using the PLP points. Once aligned, tighten all four crossmember mounting bolts to the specified torque, followed by tightening the shock absorber lower mounting bolts to the specified torque. Remove the jack from under the crossmember, and if equipped with AWD, install the rear driveline module and both rear half shafts. Install the screws mounting the right and left rear brake hose routing brackets to the front of the rear crossmember, then secure the right rear cable button into the cable connector while holding it with pliers, followed by the left rear parking brake cable button into the equalizer. Install the rear half of the exhaust system, both hub and bearings with wheel speed sensors, and the tire and wheel assemblies, tightening the wheel mounting nuts to the specified torque. Lower the vehicle, unlock the automatic adjuster in the parking brake lever, connect the battery negative cable to the battery post, and install the spare tire under the vehicle. Position the vehicle on an alignment rack or drive-on hoist, raise it as necessary to access the mounting bolts, tighten the stabilizer link fasteners to the specified torque, and perform a wheel alignment.