JeepParts
My Garage
My Account
Cart
OEM Chrysler Sebring Rod Bearing
Engine Connecting Rod Bearing- Select Vehicle by Model
- Select Vehicle by VIN
Select Vehicle by Model
orMake
Model
Year
Select Vehicle by VIN
For the most accurate results, select vehicle by your VIN (Vehicle Identification Number).
11 Rod Bearings found


Chrysler Sebring Bearings Part Number: 5174612AA
$14.57 MSRP: $24.10You Save: $9.53 (40%)


Chrysler Sebring Bearings Part Number: 4884913AB
$2.34 MSRP: $3.55You Save: $1.21 (35%)Ships in 1-2 Business Days

Chrysler Sebring Bearings Part Number: 4884911AB
$4.79 MSRP: $7.20You Save: $2.41 (34%)Ships in 1-2 Business Days


Chrysler Sebring Connecting Rod Bearing Part Number: 68002286AC
$18.22 MSRP: $27.05You Save: $8.83 (33%)Ships in 1-3 Business Days


Chrysler Sebring Bearings Part Number: 4884912AB
$18.19 MSRP: $23.55You Save: $5.36 (23%)

Chrysler Sebring Bearings Part Number: 68000512AB
$41.06 MSRP: $61.30You Save: $20.24 (34%)Ships in 1-2 Business Days
Chrysler Sebring Bearings Part Number: 4728997AB
$14.99 MSRP: $22.20You Save: $7.21 (33%)Ships in 1-2 Business Days

Chrysler Sebring Rod Bearings Part Number: 4397722
$1.79 MSRP: $2.27You Save: $0.48 (22%)Ships in 1-2 Business Days
Chrysler Sebring Bearing Set, Blue Part Number: MD327505
$3.62 MSRP: $4.58You Save: $0.96 (21%)Ships in 1-2 Business DaysChrysler Sebring Bearing Set Part Number: 1115A106
Chrysler Sebring Bearing Set, Yellow Part Number: 1115A105
Chrysler Sebring Rod Bearing
Choose OEM Rod Bearing that meet Chrysler factory standards. Chrysler designs and tests every component for precision and durability. Each Rod Bearing follows strict manufacturing steps to lock in quality and fit. If your Chrysler Sebring matters to you, OEM parts make the smart choice. You'll get the exact look, feel, and performance you expect. Shop genuine Sebring parts at the highly competitive prices online. Enjoy a manufacturer's warranty, a hassle-free return policy, and rapid delivery. No more guesswork with off brands. Get genuine parts with exact fit and true factory performance. Shop with confidence today at JeepPartsDeal.com.
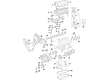
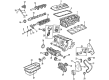
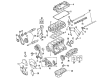
Chrysler Sebring Rod Bearing is another key piece, the functional efficiency of which positively affects the reliability of Chrysler's mid-size automobiles. It's used to fulfill the primary function of accommodating the crankshaft and the connecting rods; it also moves in a rotational matter; it also reduces friction, very important in an efficient running engine. Chrysler has used bi-metal and tri-metal constructions in the Sebring Rod Bearing to satisfy different performance levels in the Sebring models. The preferred tri-metal Rod Bearing is used in the performance variants as they provide higher strength and fatigue compared to its predecessors, ideal in high output engines. Such a level of attention positively implies in the durability of the engine and at the same time creates a safety standpoint in the Chrysler Sebring since there would be a proper space and clearance of the oil. The Sebring's dependability is further enhanced by peculiarities of the design: proprietary coatings and an intentionally idiosyncratic personality of the Rod Bearing that would ensure optimum oil containment. This capability is well illustrated by the fact that the Chrysler Sebring Rod Bearing Works can take different Sebring models; from the body style coupe to the later years' models providing both convertibles and sedans. Through such outstanding characteristic in the automotive market the Rod Bearing shows Chrysler's strong determination to continue to produce quality and performance cars that will remain competitive in the market and provide safe and efficient cars for the use by the people.
Chrysler Sebring Rod Bearing Parts and Q&A
- Q: How to Service and Repair Rod Bearings on Chrysler Sebring?A:Before servicing or repairing connecting rod bearings, measure the clearance of the bearings using Plastigage and be sure not to reuse the bolts that attach them to the rod. Before bolting your engine, oil the threads with some engine oil. Screw each bolt by hand until it is barely tight, then use a wrench to tighten each bolt in turn. Using the rough figure, tighten each bolt by hand until it is 27 Nm (20 ft. lbs.) plus one more quarter revolution. Always measure the clear space between the cam lobes and the side of the connecting rod on each side of the lobe with a feeler gauge.
- Q: How to Maintain and Fix a Rod Bearing on Chrysler Sebring?A:You must remove three things before you can begin servicing the connecting rod bearing, the cylinder head, Oil Pan and Balance Shaft Carrier Assembly. Smooth out the ridge on the cylinder's top with a ridge reamer before you remove the Pistons so their tops are not exposed. The directional stamping for the pistons is found on the front round side near the front of the engine. With the Crankshaft turned, use a wrench to remove each connecting rod and piston from the cylinder bore at its center. Use a permanent marker or paint to mark each connecting rod cap with the matching cylinder number and don't use a number stamp or punch to spare possible damage. Do not reuse the connecting rod bolts; carefully remove them, the rod cap and the rod, so as not to harm the fracture rod or cap. Place Special Tool 8189 onto the connecting rod to keep the crankshaft journal and broken rod surfaces safe while as you carefully guide each piston and rod assembly out of the cylinder bore. When you have completed threading the tool assembly, put back the bearing cap on the rod and go on to the next assembly before removing the piston rings. As you install the piston rings, place the compression rings so their gaps are staggered and the oil ring expander ends come together and then use the ring compressor. Lubricate the piston and rings in clean oil and after that, position the ring compressor over the piston so the rings stay in place. The front of the engine should have the directional stamp on the piston pointing at it. Spin the crankshaft until the center of the connecting rod journal is flush with the bore center and rub clean engine oil all around it. Set the upper bearing half in the connecting rod, then join Special Tool 8189 and push the piston down as you position the connecting rod. Take out the tool and after that, cover the new fasteners' threads with clean engine oil. Install the bearing half into the cap first, then install the cap and tighten by hand both bolts to 27 Nm (20 ft. lbs.), alternatively tighten another 1/4 turn without the torque wrench and repeat the same procedure with the other connecting rod. Replace the Balance Shaft Carrier Assembly, oil pan and cylinder head, making sure the connecting rod clearance is right, after using the feeler gauge to measure it.


Related Chrysler Sebring Parts
 Chrysler Sebring Cam Gear
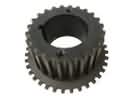 Chrysler Sebring Crankshaft Gear
 Chrysler Sebring Crankshaft Pulley
 Chrysler Sebring Cylinder Head
 Chrysler Sebring Engine Oil Cooler
 Chrysler Sebring Lash Adjuster
 Chrysler Sebring Oil Pan
 Chrysler Sebring Oil Pump Gasket
 Chrysler Sebring Oil Pump Rotor Set
 Chrysler Sebring Timing Belt Tensioner
 Chrysler Sebring Timing Cover
 Chrysler Sebring Valve Stem Seal