JeepParts
My Garage
My Account
Cart
OEM Chrysler Sebring Crankshaft
Crank Shaft- Select Vehicle by Model
- Select Vehicle by VIN
Select Vehicle by Model
orMake
Model
Year
Select Vehicle by VIN
For the most accurate results, select vehicle by your VIN (Vehicle Identification Number).
6 Crankshafts found


Chrysler Sebring Crankshaft Part Number: 4781643AA
$539.13 MSRP: $818.00You Save: $278.87 (35%)Ships in 1-2 Business Days

Chrysler Sebring Crankshaft Part Number: 4663638
$1000.64 MSRP: $1485.00You Save: $484.36 (33%)Ships in 1-2 Business Days
Chrysler Sebring Crankshaft Part Number: MD346026
$698.27 MSRP: $984.00You Save: $285.73 (30%)Ships in 1-2 Business Days

Chrysler Sebring Crankshaft Part Number: 4621917


Chrysler Sebring Crankshaft Part Number: 68001694AC

Chrysler Sebring Crankshaft Part Number: 4792692AB
Chrysler Sebring Crankshaft
Choose OEM Crankshaft that meet Chrysler factory standards. Chrysler designs and tests every component for precision and durability. Each Crankshaft follows strict manufacturing steps to lock in quality and fit. If your Chrysler Sebring matters to you, OEM parts make the smart choice. You'll get the exact look, feel, and performance you expect. Shop genuine Sebring parts at the highly competitive prices online. Enjoy a manufacturer's warranty, a hassle-free return policy, and rapid delivery. No more guesswork with off brands. Get genuine parts with exact fit and true factory performance. Shop with confidence today at JeepPartsDeal.com.
Chrysler Sebring Crankshaft Parts and Q&A
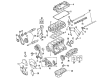
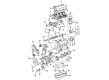
- Q: What Are the Steps Involved in Installing a Crankshaft on Chrysler Sebring?A:Five bearings support the crankshaft and the upper bearing shells inside the crankcase have oil grooves and holes, whereas the lower shells are without them. The end play of the crankshaft is handled by a two-piece thrust bearing on the number three main bearing journal. You should first use Mopar brake parts cleaner to clean the bolt holes in the main bearing cap and then blast them clean with compressed air before you go further. When you fit the upper bearing shells, check that the grooves and holes for oil are lined up in the engine block and that the bearings seat properly too. It is necessary to balance the crankshaft together with the target ring after machine work is completed. Wipe down the crankshaft and target ring using Mopar Brake Parts cleaner, then run plenty of compressed air over them to clean away any greasy remainders. Whenever you change the target ring, insert fresh mounting screws in the sequence from #1 and tighten all screws firmly to 13 Nm (110 in-lbs). With the notches on the thrust bearing facing the crankshaft, light trans gel and install those thrust bearings. Installing the thrust bearings on the block requires you to avoid getting oil on the where the ladder frame and block meet, as this can despoil the RTV seal. Apply some oil to the bearings and journals before you fit the crankshaft inside the engine block. Secure the lower main bearings into the main bearing cap, so the tabs are in place and then fit the main bearing caps to the engine block. Clean and dry every thread on the bolts before you install them loosely. After turning the crankshaft to TDC at number 4 and moving it all the way rearward, move it forward, holding it with a tool wedged between the cylinder block and crankshaft at the rear. You should identify the bolt heads to know the best torque value, since the specifications for each set of main bolts are not always the same. Work on the bolts according to their type and always remove the wedge tool when you're done with each head. The amount of turning torque on the crankshaft should not be more than 5.6 Nm (50 in-lbs) and its end play must be checked. After that, add connecting Rod Bearings and caps and fasten them using brand-new bolt bolts at 20 Nm + 90° (15 ft-lbs) + 90°. Go on to fit the frame for the ladder, balance shaft module, crankshaft position sensor and cylinder head if it was removed. Add the front crankshaft sprocket, the Timing Chain, timing chain front cover, Oil Pan, both crankshaft oil seals, the engine mount support bracket, crankshaft vibration damper and the water pump pulley. Lift the engine from the repair stand, put on the crankshaft lift chain and install the rear oil seal of the crankshaft. Secure the drive plate/flex plate with new bolts tightened to 95 Nm (70 ft-lbs) and fasten the transaxle to the engine, using bellhousing bolts that are tightened to 101 Nm (75 ft-lbs). After everything is ready, put in the engine assembly, set the new oil-filled filter, coolant and fire up the engine to look for any leaks. Next, install the engine cover.
- Q: How to Remove and Replace a Crankshaft in an Engine Assembly on Chrysler Sebring?A:First, remove the whole engine assembly from the car and then part the engine from the transaxle. After that, take out the flex plate and the crankshaft rear oil seal and carefully mount the engine on a repair stand. After removing the engine oil and replacing the Oil Filter, also remove the Oil Pan, Timing Belt covers, timing belt, oil pump and balance shafts with their housing assembly. Make sure all bedplate bolts from the engine block are taken out, then use a soft hammer to tap the bedplate loose from the dowel pins, keeping the job even on all sides. It is recommended to remove the bedplate equally on both sides to safeguard the dowel pins and thrust bearing and let the crankshaft be lifted out safely. Visually check the crankshaft journals, as excessive wear, taper or scoring should not be present. Also, tapers or out of round must be less than 0.025 mm (0.001 inch) and journal grinding should not go past 0.305 mm (0.012 inch) from the standard journal diameter. Polishing the front faces of the No. 3 main bearing is forbidden and it's important not to scratch either the crank pin or the bearings. Work on the outside surfaces to eliminate rough areas, then clean up the oil holes and the whole inside, so the crankshaft's polish stays aligned with its usual rotation. Bearing halves for the upper and lower No. 3 unit have flanges for thrusts and cannot be used in another bearing unit. Clean and apply oil to bearing cap bolts before installing and it is important to have the bearings available in standard and smaller sizes: 0.016 mm, 0.032 mm and 0.250 mm, making sure not to use undersized bearings that decrease clearance below needs. To install, put the main bearing shells into the cylinder block, lining up the grooves so that all oil holes are in line and the bearing tabs seat up correctly. Avoid putting oil on the surface between the bedplate and piston, oil the bearings and journals and use only the told anaerobic sealer to attach the crankshaft to the bedplate. After applying a small bead of Bed Plate Sealant, fit main bearing caps, install lower bearings and verify that bearing tabs line up well. Following oiling, place the main bearing or bedplate into the engine block, put the bolts in with your fingers and then tighten them until the bedplate presses against the cylinder block. To make sure the thrust bearings are perfectly aligned, rotate the crankshaft so number 4 piston is at TDC, move the crankshaft rearward and forward to its limits, wedge a tool between the rear of the cylinder block and the rear crankshaft counterweight and tighten bolts in sequence to a torque of 41 Nm (30 ft. lbs.). Get rid of the wedge tool, then tighten the bolts to 41 Nm (30 ft. lbs.) and give them one more 1/4 turn. Screw the main bearing bedplate onto the engine block bolts and torque each to 28 Nm (20 ft. lbs.) in order. After all is installed, set the crankshaft turning torque to a maximum of 5.6 Nm (50 in. lbs.), then assemble the balance shafts and housing, oil pump, timing belt rear cover, timing belt, timing belt front covers, engine support bracket, oil pan, oil filter, crankshaft rear oil seal and flex plate. Apply Mopar Lock & Seal Adhesive to the bolt threads and tighten them all to a torque of 95 Nm (70 ft. lbs.). After everything is assembled, bolt on the transaxle using 101 Nm (76 ft. lbs.) of torque and secure the engine assembly again.


Related Chrysler Sebring Parts
 Chrysler Sebring Oil Pump
 Chrysler Sebring Timing Chain
 Chrysler Sebring Camshaft
 Chrysler Sebring Camshaft Seal
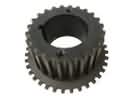 Chrysler Sebring Crankshaft Gear
 Chrysler Sebring Cylinder Head Gasket
 Chrysler Sebring Piston
 Chrysler Sebring Rocker Arm Pivot
 Chrysler Sebring Rod Bearing
 Chrysler Sebring Timing Belt Idler Pulley
 Chrysler Sebring Valve Stem Seal
 Chrysler Sebring Variable Timing Sprocket