JeepParts
My Garage
My Account
Cart
OEM Chrysler Sebring Piston
Engine Pistons- Select Vehicle by Model
- Select Vehicle by VIN
Select Vehicle by Model
orMake
Model
Year
Select Vehicle by VIN
For the most accurate results, select vehicle by your VIN (Vehicle Identification Number).
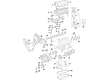
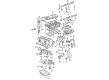
13 Pistons found


Chrysler Sebring Piston Part Number: 5191341AA
$162.84 MSRP: $247.00You Save: $84.16 (35%)Ships in 1-2 Business Days


Chrysler Sebring Vibration Damper Part Number: 5142303AB
$56.55 MSRP: $81.25You Save: $24.70 (31%)Ships in 1-3 Business Days

Chrysler Sebring Piston Part Number: 5018627AD
$316.65 MSRP: $576.00You Save: $259.35 (46%)Ships in 1-2 Business Days
Chrysler Sebring Piston Part Number: 5191342AA
$128.02 MSRP: $193.00You Save: $64.98 (34%)Ships in 1-2 Business Days
Chrysler Sebring Piston Part Number: MD357067
$89.79 MSRP: $133.00You Save: $43.21 (33%)Ships in 1-2 Business DaysChrysler Sebring Piston Part Number: MD357068
$45.47 MSRP: $65.35You Save: $19.88 (31%)Ships in 1-2 Business Days
Chrysler Sebring Piston Part Number: MD309399
$8.15 MSRP: $10.34You Save: $2.19 (22%)Ships in 1-2 Business DaysChrysler Sebring Piston Part Number: MD309393

Chrysler Sebring Piston Part Number: 4796212
Chrysler Sebring Piston Part Number: MD357066

Chrysler Sebring Piston Part Number: 68067342AA

Chrysler Sebring Piston Part Number: R4892194AB

Chrysler Sebring Piston Part Number: 68067617AA
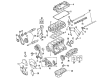
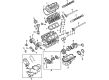
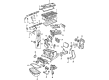
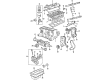
Chrysler Sebring Piston
Choose OEM Piston that meet Chrysler factory standards. Chrysler designs and tests every component for precision and durability. Each Piston follows strict manufacturing steps to lock in quality and fit. If your Chrysler Sebring matters to you, OEM parts make the smart choice. You'll get the exact look, feel, and performance you expect. Shop genuine Sebring parts at the highly competitive prices online. Enjoy a manufacturer's warranty, a hassle-free return policy, and rapid delivery. No more guesswork with off brands. Get genuine parts with exact fit and true factory performance. Shop with confidence today at JeepPartsDeal.com.
The Piston in Chrysler Sebring vehicles is useful in the conversion of combustion power to the energy that is needed to cause movement in the vehicle. This component is particularly crucial for the internal combustion engine in as much as it translates the momentum of expanding gasses to the crankshaft. Chrysler Sebring pistons are usually made of aluminum alloys and may consist of cast or forged or billet materials in performance versions only. Here there are several types of pistons used in various Chrysler Sebring models such as the trunk piston for both petrol and diesel engines with side force capability along with oil rings. Further, in high-performance variants, slippier pistons may be used in order to improve efficiency and reduce friction. Chrysler Sebring pistons are compact which are built standard to enhance high pressures and temperatures with most adroit manufacturing.
Chrysler Sebring Piston Parts and Q&A
- Q: How to Install Piston and Connecting Rod Assemblies on Chrysler Sebring?A:Begin by installing the piston rings on the piston and make sure the motion of the gaps of the top and second compression rings is opposite the oil ring rail gap. Before fitting the ring compressor, make sure that the ends of the oil ring expander are s items as neart together and the gaps in the rail are correctly set when looking down at the top of the piston. Choose friction-fit engine oil, dismantle the piston and rings, oil the piston head and its rings and plow the piston into the ring compressor from the back end of the engine. Adjust the Crankshaft with the connecting rod journal in the middle of the bore and then apply clean engine oil. Indications for Rod Bearing sizes are found on the nose of the crankshaft, so the correct size should be chosen. Attach the connecting rod upper bearing half inside the connecting rod and then place the ring compressor. Guide the connecting rod onto the connecting rod journal as you drive the piston into the cylinder bore with a hammer handle. It is important not to use the connecting rod cap bolts again and each of the new bolts should be greased with clean engine oil on the threads. Insert the lower half of the rod bearing into the connecting rod cap, slip the cap onto the big end and tighten each of the bolts finger tight before rotating each bolt in an alternating direction. First tighten the connecting rod bolts to 20 Nm, then turn them an additional 90 degrees to complete the process. Look at the space between the connecting rod and the case by using a feeler gauge. Set in the ladder frame, install the oil pump/balance shaft carrier assembly, insert the Oil Pan and set the cylinder head next. Afterward, put in the engine lift chain, secure the transaxle assembly to the engine and place the engine into the cradle.
- Q: How to Remove and Replace a Piston in the Connecting Rod Assembly on Chrysler Sebring?A:Before removing and replacing the piston and connecting rod assembly, remove the engine from the transaxle, stand it on a suitable stand and disconnect the engine lift chain. Drop the cylinder head and drain the oil from the engine next. Then remove the Oil Pan and the Oil Filter. After you've handled these steps, you need to get rid of the balance shaft assembly and the ladder frame. Before you remove the piston, ensure you clean your cylinder of carbon and debris to keep the skirts from becoming damaged. Carefully use a ridge reamer to level the top of each bore, making certain the pistons are still covered on top. By rotating the Crankshaft, you ensure each connecting rod sits in the middle of the cylinder bore; then, using a paint or permanent ink marker, mark the number of the cylinder on each rod cap, as number punches can damage the rod. Be careful to remove the bolts and cap from the connecting rod, being sure not to use them again. Then, by hand, remove each piston and rod from the cylinder block and restore the bearing cap to its proper place on the rod. Do this process for every assembly of a piston and connecting rod.


Related Chrysler Sebring Parts
 Chrysler Sebring Crankshaft
 Chrysler Sebring Engine Mount Bracket
 Chrysler Sebring Exhaust Valve
 Chrysler Sebring Harmonic Balancer
 Chrysler Sebring Intake Valve
 Chrysler Sebring Piston Ring Set
 Chrysler Sebring Rocker Arm
 Chrysler Sebring Rocker Arm Pivot
 Chrysler Sebring Rod Bearing
 Chrysler Sebring Timing Cover Gasket
 Chrysler Sebring Valve Cover Gasket
 Chrysler Sebring Variable Timing Sprocket