JeepParts
My Garage
My Account
Cart
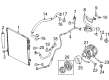
OEM Dodge Charger A/C Hose
Air Conditioning Hose- Select Vehicle by Model
- Select Vehicle by VIN
Select Vehicle by Model
orMake
Model
Year
Select Vehicle by VIN
For the most accurate results, select vehicle by your VIN (Vehicle Identification Number).
34 A/C Hoses found


Dodge Charger Discharge Hose Part Number: 55038153AB
$74.48 MSRP: $114.00You Save: $39.52 (35%)Ships in 1-2 Business Days


Dodge Charger Suction Hose Part Number: 55111273AC
$99.29 MSRP: $151.00You Save: $51.71 (35%)Ships in 1-2 Business Days


Dodge Charger A/C Line Part Number: 4596887AA
$229.84 MSRP: $351.00You Save: $121.16 (35%)Ships in 1-2 Business Days


Dodge Charger Suction Hose Part Number: 68245374AA
$144.95 MSRP: $219.00You Save: $74.05 (34%)Ships in 1-2 Business Days
Dodge Charger Suction Hose Part Number: 68223577AD
$144.95 MSRP: $219.00You Save: $74.05 (34%)Ships in 1-2 Business Days


Dodge Charger Discharge Hose Part Number: 68158879AB
$106.48 MSRP: $160.00You Save: $53.52 (34%)Ships in 1-2 Business Days
Dodge Charger Discharge Hose Part Number: 4596891AB
$54.09 MSRP: $78.45You Save: $24.36 (32%)Ships in 1-2 Business Days
Dodge Charger Discharge Hose Part Number: 68223576AC
$73.26 MSRP: $112.00You Save: $38.74 (35%)Ships in 1-2 Business DaysDodge Charger Discharge Hose Part Number: 4596893AB
$84.25 MSRP: $113.00You Save: $28.75 (26%)Ships in 1-2 Business DaysDodge Charger Discharge Hose Part Number: 4596611AD
$75.54 MSRP: $116.00You Save: $40.46 (35%)Ships in 1-3 Business Days
Dodge Charger Discharge Hose Part Number: 4596889AC
$80.73 MSRP: $123.00You Save: $42.27 (35%)Ships in 1-2 Business Days
Dodge Charger Suction Hose Part Number: 4596610AG
$67.68 MSRP: $102.00You Save: $34.32 (34%)Ships in 1-2 Business Days
Dodge Charger Suction Hose Part Number: 68158883AE
$95.89 MSRP: $144.00You Save: $48.11 (34%)Ships in 1-2 Business Days
Dodge Charger Suction Hose Part Number: 4596898AB
$131.33 MSRP: $174.00You Save: $42.67 (25%)Ships in 1-2 Business Days
Dodge Charger Suction Hose Part Number: 4596896AB
$141.53 MSRP: $187.00You Save: $45.47 (25%)Ships in 1-2 Business DaysDodge Charger Suction Hose Part Number: 4596897AB
$128.02 MSRP: $192.00You Save: $63.98 (34%)Ships in 1-2 Business Days
Dodge Charger Suction Hose Part Number: 68158875AD
$132.69 MSRP: $199.00You Save: $66.31 (34%)Ships in 1-2 Business Days


Dodge Charger Liquid Line Part Number: 68197719AE
$97.38 MSRP: $147.00You Save: $49.62 (34%)


Dodge Charger A/C Line Part Number: 55038154AD

Dodge Charger Discharge Hose Part Number: 68158881AA
$90.64 MSRP: $134.00You Save: $43.36 (33%)
| Page 1 of 2 |Next >
1-20 of 34 Results
Dodge Charger A/C Hose
Choose OEM A/C Hose that meet Dodge factory standards. Dodge designs and tests every component for precision and durability. Each A/C Hose follows strict manufacturing steps to lock in quality and fit. If your Dodge Charger matters to you, OEM parts make the smart choice. You'll get the exact look, feel, and performance you expect. Shop genuine Charger parts at the highly competitive prices online. Enjoy a manufacturer's warranty, a hassle-free return policy, and rapid delivery. No more guesswork with off brands. Get genuine parts with exact fit and true factory performance. Shop with confidence today at JeepPartsDeal.com.
Dodge Charger A/C Hose refers to a component normally used in Dodge Charger automobiles that offers a reliable and performing part in conditioning air in automobiles. This A/C Hose makes it easy to transport refrigerant from the compressor to other components and plays an important role in cooling the cabin of a car, thus making the driving experience comfortable. Used aluminum fittings build the Dodge Charger A/C Hose that can actually handle the high pressure coming from gaseous refrigerant thus being a closed system that performs very well. The air conditioning system integrates high quality O-rings and fittings thus increasing its reliability as a conspicuous feature in the automotive market. Being able to fit different Dodge Charger models, there is no compromise that this A/C Hose is tailored to serve the models that have been devised in the past, as well as the ones being developed in the present. Thus, the Dodge Charger A/C Hose not only provides a comfort to passengers by improving the efficiency of the air conditioning system but also contributes to vehicle safety preventing car's overheating. So, it is unambiguously organic fit, as it is vital to own a Charger that is efficient in every weather to meet the expectations of users owning Dodge car brand. In conclusion, the Dodge Charger A/C Hose embodies the brand's dedication to embodying the qualities that its consumers seek and prove why the brand is one of the go-to options by car lovers.
Dodge Charger A/C Hose Parts and Q&A
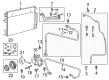
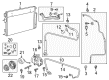
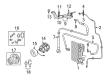
- Q: How to Install an A/C Hose Suction Line on Dodge Charger?A:The first step is to check that the refrigerant oil is in the right amount to avoid damage to the compressor. Whenever replacing several components, make sure to use the chart for the right amount of oil. Always put in new O-ring seals and gaskets on refrigerant lines when they are opened, so there are no leaks. The A/C suction line is serviced in two halves and its rear half is part of the same assembly as the rear A/C liquid line. For the front section, place the engine's A/C suction line into the suction line fitting, remove any rubber stoppers or tape, put a dual plane seal onto the line and lubricate the seal with clean oil. Fasten the front part to the rear with a nut that you tighten to 22 Nm. Take away the tape or obstructions from both fittings and around the A/C compressor, lubricate and mount a dual plane seal, then couple the suction line to the compressor and affix it with a nut turned to 23 Nm. Mount the air conditioner housing, put back the negative battery cable, release any refrigerant from the system, fill the right refrigerant oil and complete a charge. If you remove the rear section, place the A/C pressure transducer onto the A/C liquid line, set up the rear pieces of the suction and liquid lines, remove tape or plugs from the fittings, apply lubricant, insert new dual plane seals and join the lines to the A/C Expansion Valve. Tighten the nut on the liquid and suction line tapping block to 23 Nm, use 11 Nm on the screw for the refrigerant line bracket and attach the wire harness to the A/C pressure transducer. Unplug the tape or plugs near the fittings between the front and rear on the liquid line, apply some lubricant to the seal, fit a new dual plane seal in place, connect the lines and tighten the nut to 22 Nm. Work through the same steps for the A/C suction line, then put on the air cleaner housing, attach the negative battery cable again, draw out any old refrigerant, set the oil to the desired level and charge the air-conditioning system.
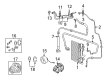
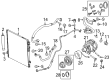
- Q: How to Safely Service and Repair an A/C Hose Discharge Line on Dodge Charger?A:Begin serving the A/C discharge line by capturing the refrigerant in the refrigerant receiver and unattaching the car's negative Battery Cable. After taking out the air cleaner housing, you'll notice the headlamp area above the radiator; undo the nut on the A/C discharge line to remove it from the A/C Condenser. Unhook the A/C discharge line from the condenser and throw away the dual plane seal and afterward either plug or tape the discharge line fitting and condenser inlet port. After that, take out the fastener holding the A/C discharge line to the A/C compressor, release the line and throw away the dual plane seal, once more using a plug or tape to seal the opened refrigerant line and compressor port. Take the A/C discharge line out of the engine compartment. Position the A/C discharge line in the engine compartment and then, without the tape or plugs, join the discharge line fitting to the A/C condenser inlet port. Always clean the new dual plane seal with refrigerant oil, then install it at the fitting for the discharge line, using the proper R-134a seal and suitable refrigerant oil recommended by the manufacturer. Bolt the A/C discharge line to the A/C condenser and tighten it to 22 N.m (16 ft. lbs.). Lift the tape or plugs from where they are keeping the A/C discharge line fitting and A/C compressor outlet port shut, grease a new dual plane seal, insert it into the discharge line fitting and then connect it to the A/C compressor outlet port. To secure the hardware, use the nut and tighten it to 23 N.m (17 ft. lbs.). Put the air cleaner housing back in place, link the negative battery cable, release all refrigerant and fill the system with the right refrigerant.


Related Dodge Charger Parts
 Dodge Charger Cabin Air Filter
 Dodge Charger Blend Door Actuator
 Dodge Charger Heater Core
 Dodge Charger Blower Motor Resistor
 Dodge Charger A/C Accumulator
 Dodge Charger A/C Compressor Clutch
 Dodge Charger A/C Compressor Cut-Out Switches
 Dodge Charger A/C Expansion Valve
 Dodge Charger A/C Service Cap
 Dodge Charger A/C System Valve Core
 Dodge Charger HVAC Control Module
 Dodge Charger HVAC Pressure Switch
Browse Dodge Charger A/C Hose by Years
2023
2022
2021
2020
2019
2018
2017
2016
2015
2014
2013
2012
2011
2010
2009
2008
2007
2006