JeepParts
My Garage
My Account
Cart
OEM Dodge Journey A/C Clutch
Air Conditioning Clutch- Select Vehicle by Model
- Select Vehicle by VIN
Select Vehicle by Model
orMake
Model
Year
Select Vehicle by VIN
For the most accurate results, select vehicle by your VIN (Vehicle Identification Number).
7 A/C Clutches found


Dodge Journey Clutch Coil Part Number: 5003681AA
$186.95 MSRP: $279.00You Save: $92.05 (33%)Ships in 1-2 Business Days
Dodge Journey Clutch Part Number: 68087441AC
$159.47 MSRP: $242.00You Save: $82.53 (35%)Ships in 1-2 Business Days
Dodge Journey Coil - A/C Clutch Part Number: 5140461AB
$122.73 MSRP: $257.00You Save: $134.27 (53%)Ships in 1-2 Business DaysDodge Journey Clutch Part Number: 68087443AC
$154.97 MSRP: $234.00You Save: $79.03 (34%)Ships in 1-2 Business Days

Dodge Journey Clutch Part Number: 68091780AA
$35.63 MSRP: $52.35You Save: $16.72 (32%)Ships in 1-2 Business DaysDodge Journey Pulley Part Number: 68045270AA
$367.55 MSRP: $538.00You Save: $170.45 (32%)Ships in 1-2 Business Days
Dodge Journey Clutch Part Number: 68045268AA
$34.03 MSRP: $50.05You Save: $16.02 (33%)
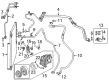
Dodge Journey A/C Clutch
Choose OEM A/C Clutch that meet Dodge factory standards. Dodge designs and tests every component for precision and durability. Each A/C Clutch follows strict manufacturing steps to lock in quality and fit. If your Dodge Journey matters to you, OEM parts make the smart choice. You'll get the exact look, feel, and performance you expect. Shop genuine Journey parts at the highly competitive prices online. Enjoy a manufacturer's warranty, a hassle-free return policy, and rapid delivery. No more guesswork with off brands. Get genuine parts with exact fit and true factory performance. Shop with confidence today at JeepPartsDeal.com.
The Dodge Journey Ac Clutch is used to greatly improve performance for air conditioning and reduce the number of typical malfunctions. It is commonly associated with durability The ac clutch connects the ac system's compressor when the users want to turn on the system for the benefit of the passengers. This reliability is especially important, as it is seen in different climates and any issue might lower the A/C effectiveness or even cause its failure. Thanks to its compatibility with multiple Dodge Journey models, this A/C Clutch is suitable for all Journey owners willing to keep their vehicle in good shape. Its operation in this regard fits into the comfort aspect of the automobile and also adds to the safety of the Dodge Journey especially on a long trip when the heat can cause drowsiness to the driver. Some of the benefits its possess are such as: Construction of the A/C Clutch is strengthened and designed in a way that gives it a long service period due to reduced wear ages. Also, the A/C Clutch is smartly compatible with the Journey to easily fit into the other systems of the car seamlessly. In summing up, the A/C Clutch occupies a privileged position in the automotive market as it effectively contributes to the Journey as an efficient, safe, family or single-owned car.
Dodge Journey A/C Clutch Parts and Q&A
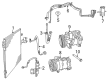
- Q: How to Maintain the A/C Clutch on Dodge Journey?A:The first step is to turn off the negative Battery Cable and lift and support the vehicle before you start on the compressor clutch service. Take off the splash shield from the right side frame rail and the accessory Drive Belt. Pull the engine wire harness off the compressor clutch field coil connector on the top of the A/C compressor. Remove the bolts attaching the A/C compressor to the engine if needed and try to shift it to reach the shaft bolt or pulley and field coil snap rings as you keep the refrigerant fully charged. Separate the connector between the compressor clutch field coil and the wiring by hand, then use a band-type or strap wrench to hold the clutch plate still as you remove the compressor shaft bolt. Make sure not to force anything between the clutch plate and the pulley and bearing group because doing so can damage the clutch plate. Be careful to keep any clutch shim(s) you remove, as you can use them again during installation. Rap the end of the clutch plate with a plastic mallet to release it from the splines on the compressor shaft, then take out the plate and any shims. First, remove the snap ring at the front of the A/C compressor using your Snap Ring Pliers 9764, then remove the whole pulley assembly from the front of the compressor using appropriate tools. Then, with your hand tools, remove the snap ring holding the field coil to the front of the compressor and lift out the field coil.
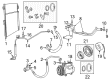
- Q: How to Install an A/C Clutch on Dodge Journey?A:Put the claw on the clutch face over the dowel pin that is fitted into the back of the compressor clutch field coil and make sure the wires aren't caught or squished. The compressor clutch field coil should be secured with a new snap ring and the bevel edge should face out while the eyelets are beside the dowel pin, either on its right or left. With our pliers or an equivalent, add the snap ring on the compressor clutch field coil and check that it is sitting properly in the groove. As you put on the pulley and bearing assembly, don't harm the friction surfaces and apply the snap ring, bevel outward, to secure it to the A/C compressor. If you are reusing the clutch plate and pulley and bearing assembly, set in place the original shims from before; however, when using new parts, use trial shims of 2.54 mm thickness. Place the clutch plate on the front of the A/C compressor and set the bolt fastening the shaft to 19 Nm. After fixing the screws, check the gap in several areas; if it isn't the right size, make adjustments with shims. Push the compressor clutch field coil wire behind the connector bracket, then fit the connector to the bracket. Replace the A/C compressor on the engine, attach the compressor clutch field coil connector to the engine wire harness, put the accessory Drive Belt in place and then set the splash shield onto the right side frame rail. After that, lower the car so you can attach the negative battery cable.


Related Dodge Journey Parts
 Dodge Journey Blend Door Actuator
 Dodge Journey Heater Core
 Dodge Journey Blower Motor Resistor
 Dodge Journey A/C Accumulator
 Dodge Journey A/C Compressor
 Dodge Journey A/C Compressor Cut-Out Switches
 Dodge Journey A/C Condenser
 Dodge Journey A/C Expansion Valve
 Dodge Journey A/C Hose
 Dodge Journey Blower Control Switches
 Dodge Journey Evaporator
 Dodge Journey HVAC Pressure Switch