JeepParts
My Garage
My Account
Cart
OEM Dodge Journey Crankshaft
Crank Shaft- Select Vehicle by Model
- Select Vehicle by VIN
Select Vehicle by Model
orMake
Model
Year
Select Vehicle by VIN
For the most accurate results, select vehicle by your VIN (Vehicle Identification Number).
4 Crankshafts found

Dodge Journey Crankshaft Part Number: 4884563AD
$681.79 MSRP: $1045.00You Save: $363.21 (35%)Ships in 1-2 Business Days

Dodge Journey Crankshaft Part Number: 5184251AI
$849.75 MSRP: $1285.00You Save: $435.25 (34%)Ships in 1-2 Business Days

Dodge Journey Crankshaft Part Number: 68001694AC

Dodge Journey Crankshaft Part Number: 4792692AB
Dodge Journey Crankshaft
Choose OEM Crankshaft that meet Dodge factory standards. Dodge designs and tests every component for precision and durability. Each Crankshaft follows strict manufacturing steps to lock in quality and fit. If your Dodge Journey matters to you, OEM parts make the smart choice. You'll get the exact look, feel, and performance you expect. Shop genuine Journey parts at the highly competitive prices online. Enjoy a manufacturer's warranty, a hassle-free return policy, and rapid delivery. No more guesswork with off brands. Get genuine parts with exact fit and true factory performance. Shop with confidence today at JeepPartsDeal.com.
Dodge Journey Crankshaft Parts and Q&A
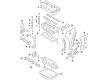
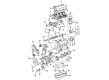
- Q: How is the Crankshaft Installed on Dodge Journey?A:Start by ensuring that the selection of bearings fits properly onto the crankshaft. Attach the crankshaft upper main bearings to the block, so the holes in each match up. Following this, put the crankshaft into the cylinder block and push it forward as far as it will go. On the side with the lower main bearing, roll the front thrust washer over the machined shelf between the No. 2 upper main bulkhead and the crankshaft thrust surface. Rotate the crankshaft all the way to its furthest point, apply grease and set the rear thrust washer into place as before. Place the lower main bearings into the main bearing caps, apply a small amount of clean engine oil to them and spread oil on the inner bolts before installing them. Place every main cap and tighten its inner screws just enough to avoid contact between the cap and the crankshaft counterweights. Check the alignment and turn in the inner bolts until they reach 20 Nm (almost fifteen ft. lbs.) of force. Push the crankshaft while watching for a shim or feeler gauge to fit between the rear face of the main cap and the crankshaft thrust face with at least 0.25 mm (0.010 inch) showing. Follow this process on the front face of #2 after moving the crankshaft back. When the clearance is 0.25 mm (0.010 inch) or less, turn the #2 main bearing cap slightly to increase the clearance to 0.25 mm (0.010 inch) and then do another 90° turn on each of the inner bolts for a proper fit. Check the crankshaft end play and then put the connecting rods in place, measuring their side clearance. Start by tightening the bolts in the inner main cap, then tighten those on the windage tray, before finishing with the main cap tie bolts. Slide the windage tray in, lubricate each bolt and tighten all four bolts to 28 Nm + 90° turn, beginning with the bolts inside the engine. Install the oil pickup tube and tighten the bolt to 28 Nm (20 ft. lbs.) and then tighten the main cap tie bolts to the exact same torque. Place the rear crankshaft oil seal retainer and oil seal and then the oil pump assembly. Insert the dowel pin in the crankshaft after that. Continue by adding the crankshaft sprocket, Timing Belt and the tensioner. Set the timing belt cover on the front, the Oil Pan and finish by assembling the engine. When finished, fill the engine crankcase with the right measure of oil.
- Q: How to Extract the Crankshaft from an Engine on Dodge Journey?A:Begin by removing the engine from the car and then get rid of the Oil Pan. After that, take off the oil pickup tube and windage tray. Once that's done, unscrew and remove the Timing Belt cover, then take out the timing belt and tensioner. Loosen the crankshaft sprocket and carefully tap the dowel pin from where it is in the crankshaft. Get rid of the oil pump assembly and crankshaft rear oil seal retainer. Do not mark the bearing caps with a metal stamp; use a scribe or some paint marking instead. Check the Rod Bearing caps first and draw a line from the #2 main bearing cap to the engine block for later use in positioning them. Take off the caps from the connecting rod bearings, labeling them so you don't confuse them. Following that, take off the caps that go on the main bearings and remember the correct position of each cap. Make sure to remove the crankshaft after you've removed the connecting rods. It is important that both the main and connecting rod bearings are installed correctly prior to installing the crankshaft.


Related Dodge Journey Parts
 Dodge Journey Timing Belt
 Dodge Journey Engine Oil Cooler
 Dodge Journey Cam Gear
 Dodge Journey Camshaft
 Dodge Journey Crankshaft Thrust Washer
 Dodge Journey Cylinder Head Gasket
 Dodge Journey Engine Mount Bracket
 Dodge Journey Harmonic Balancer
 Dodge Journey Intake Valve
 Dodge Journey Spool Valve
 Dodge Journey Timing Belt Tensioner
 Dodge Journey Timing Chain Guide