JeepParts
My Garage
My Account
Cart
OEM Dodge Ram 2500 Van A/C Hose
Air Conditioning Hose- Select Vehicle by Model
- Select Vehicle by VIN
Select Vehicle by Model
orMake
Model
Year
Select Vehicle by VIN
For the most accurate results, select vehicle by your VIN (Vehicle Identification Number).
8 A/C Hoses found

Dodge Ram 2500 Van Discharge Line, Front Part Number: 55037173AB

Dodge Ram 2500 Van Suction Line, Rear Part Number: 5003262AC
Dodge Ram 2500 Van Discharge Line, Front Part Number: 55037328AB

Dodge Ram 2500 Van Suction Line, Front Part Number: 5003269AD
Dodge Ram 2500 Van Suction Line Part Number: 5003267AE

Dodge Ram 2500 Van Liquid Line Part Number: 5003113AB

Dodge Ram 2500 Van Suction Line Part Number: 5003114AB
Dodge Ram 2500 Van Suction Line Part Number: 5003268AE
Dodge Ram 2500 Van A/C Hose
Choose OEM A/C Hose that meet Dodge factory standards. Dodge designs and tests every component for precision and durability. Each A/C Hose follows strict manufacturing steps to lock in quality and fit. If your Dodge Ram 2500 Van matters to you, OEM parts make the smart choice. You'll get the exact look, feel, and performance you expect. Shop genuine Ram 2500 Van parts at the highly competitive prices online. Enjoy a manufacturer's warranty, a hassle-free return policy, and rapid delivery. No more guesswork with off brands. Get genuine parts with exact fit and true factory performance. Shop with confidence today at JeepPartsDeal.com.
Dodge Ram 2500 Van A/C Hose Parts and Q&A
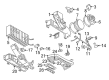
- Q: How are the underbody A/C Hose plumbing lines utilized and serviced equipped with the optional rear heater-A/C unit on Dodge Ram 2500 Van?A:If a model has the optional heated-A/C unit, it uses only underbody plumbing lines and though they may be serviced separately, all underbody lines are taken out as a group for service. Curved or bended plumbing under the vehicle can decrease the heating or air conditioning system's ability to hold and store fluid which leads to air conditioning problems with higher refrigerant pressure and engine heater problems with hot coolant. You should start by unplugging the negative cable from the battery, draining the cooling liquid and releasing the refrigerant from the system. Take the underbody liquid line at the liquid line extension and the underbody suction line at the suction line jumper from the engine compartment and be sure to seal off all open refrigerant ports with plugs or tape. Unplug the hoses from the heater line beneath the vehicle, lift off the passenger cabin engine cover, raise the car and remove the clip holding the park brake release cable from the underbody suction line. Unplug the liquid line connector from the rear heater-A/C unit under the vehicle and do the same for the suction line under the vehicle before taping or plugging all the line fittings. Disconnect the heater supply and return hoses from the rear heater-A/C unit heater lines, remove the clip holding the underbody plumbing to the front floor panel, remove the screw that holds the underbody plumbing to the front floor panel reinforcement and remove the screws securing the two underbody refrigerant line clamps to the side panel and underbody reinforcement. Installation involves firmly connecting the underbody plumbing bundle to the side panel to underbody reinforcement and then loosely screwing in the two mounting clamps. Connect the heater's supply and return hoses to the rear heater-A/C unit heater lines, take off the tape or plugs from the suction line fittings and join the underbody suction line flare nut to the rear heater-A/C unit suction line, tightening to 47 Nm (420 in. lbs.). Pull off the tape or remove the plugs from the liquid line fittings and attach the flare nut at the bottom passing through the firewall to the rear heater-A/C unit liquid line, protected with a torque limiter to 27 Nm (244 in.-lbs.). Attach and tighten the mounting hardware of the underbody plumbing bundle to recommended torque, then reconnect the park brake release cable clip at the front, lower the vehicle and attach the heater supply and return tubes on the underbody combination line from your engine compartment. After removing tape or plugs from the front refrigerant fittings on the underbody liquid and suction lines, join the underbody liquid line to the liquid line extension, connect the underbody suction line to the suction line jumper, lower the engine cover, connect the negative battery cable, fill the radiator and charge the air conditioning refrigerant.
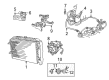
- Q: How to replace the A/C Hose (discharge line) on Dodge Ram 2500 Van?A:Initially, cut off the negative battery cable, disconnect it and recover the refrigerant from the old A/C discharge hose/line. Take the wire harness connector out of the high pressure cut-off switch, unbolt the radiator grille and take out the radiator grille. After that, take out the screw connecting the block fitting on the discharge line to the condenser and remove the fitting, placing plugs or tape over all opened refrigerant line openings. Unscrew the flare nut from the suction line and connect it to the suction line jumper, remember to tape over the open fittings once more. First, remove the refrigerant line manifold screw from the compressor and afterward, place plugs or tape across the open fittings, before removing the suction and discharge hoses from the car. For installation, release the tape or plugs covering the fittings on the compressor's refrigerant line, install the manifold onto the compressor and tighten the mounting screw to 22 Nm (200 in. lbs.). Take off the tape or plugs from the fittings on the suction line and attach the flare nut to the suction line jumper, tightening to 47 Nm (420 in. lbs.). Remove the tape or plug from the block fitting in the line going out and direct it to the condenser inlet, tightening it with a screw to 22 Nm (200 in. lbs.). Attach the radiator grille, insert the wire harness connector into the high pressure cut-off switch, reattach the battery negative cable, remove the refrigerant from the system and then charge it with -refrigerant.


Related Dodge Ram 2500 Van Parts
 Dodge Ram 2500 Van A/C Accumulator
 Dodge Ram 2500 Van A/C Compressor
 Dodge Ram 2500 Van A/C Compressor Clutch
 Dodge Ram 2500 Van A/C Compressor Cut-Out Switches
 Dodge Ram 2500 Van A/C Expansion Valve
 Dodge Ram 2500 Van Blend Door Actuator
 Dodge Ram 2500 Van Blower Control Switches
 Dodge Ram 2500 Van Blower Motor Resistor
 Dodge Ram 2500 Van Evaporator
 Dodge Ram 2500 Van Heater Control Valve
 Dodge Ram 2500 Van Heater Core
 Dodge Ram 2500 Van HVAC Pressure Switch
Browse Dodge Ram 2500 Van A/C Hose by Years
2003
2002
2001
2000
1999