JeepParts
My Garage
My Account
Cart
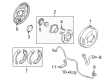
OEM Dodge Stratus Brake Drum
- Select Vehicle by Model
- Select Vehicle by VIN
Select Vehicle by Model
orMake
Model
Year
Select Vehicle by VIN
For the most accurate results, select vehicle by your VIN (Vehicle Identification Number).
3 Brake Drums found

Dodge Stratus Drum, Rear Part Number: MB895659


Dodge Stratus Drum, Rear Part Number: 4779286AA


Dodge Stratus Drum Part Number: 4695732AB
Dodge Stratus Brake Drum
Choose OEM Brake Drum that meet Dodge factory standards. Dodge designs and tests every component for precision and durability. Each Brake Drum follows strict manufacturing steps to lock in quality and fit. If your Dodge Stratus matters to you, OEM parts make the smart choice. You'll get the exact look, feel, and performance you expect. Shop genuine Stratus parts at the highly competitive prices online. Enjoy a manufacturer's warranty, a hassle-free return policy, and rapid delivery. No more guesswork with off brands. Get genuine parts with exact fit and true factory performance. Shop with confidence today at JeepPartsDeal.com.
This product is the Dodge Stratus Brake Drum that goes to the brake system of cars well famed for its quality and performance in most of the Dodge Stratus models that were manufactured between the years 1995 up to 2005. It is made of heat-conductive and wear-resistant cast iron; This component is pivotal for braking by creating friction between the brake shoes and the drum which is significant in slowing down or halting the car. This friction creates heat which is useful in the operation of the Dodge Stratus by maintaining the appropriate performance and safety level. The Dodge Stratus brake drum also applies to the sedan and coupe models thus giving the vehicle better braking as it is highly reliable. Notable is the fact that the designs of this product have changed with time to enhance the braking system on the Dodge Stratus and given the vehicle good fuel consumption rates of 20 - 21 / 26 - 29 mpg, AS City/ HWY respectively. The Dodge Stratus received rather nice reviews for such things as the design of the interior and exterior and powerful engines, and with the addition of the high-quality Brake Drum, the car is guaranteed to drive smoothly. Besides, these features improve the vehicle's performance, not to mention that safety is certainly boosted to such degree that the Dodge Stratus Brake Drum really deserves its place in the list of automotive innovations. This Brake Drum for the Dodge Stratus is especially demanded due to the established reliability and efficiency of this spare part.
Dodge Stratus Brake Drum Parts and Q&A
- Q: Can a Brake Drum Be Machined if It's Deeply Scored or Warped, and What Precautions Are Necessary on Dodge Stratus?A:A brake lathe made for this purpose can remove scratches or warpage from a brake drum that is too badly damaged for typical machining. If you find that machining the drum would cause its inside diameter to exceed the maximum, then the drum should be replaced. All brake drums are identified by the maximum allowable inside diameter size. When cutting a brake shoe roundness, set the feed on the last cut to fine to prevent a screw effect, remembering that this specification may be different among different lathe companies.
- Q: How Can a Deeply Scored or Warped Brake Drum Be Machined and Installed on Dodge Stratus?A:Deeply scored or warped brake drums should be raw on a special brake lathe that installers use, following the maker's directions. Measure the inside diameter of the brake drum before any machining; a drum that will go over the maximum diameter must be replaced. The maximum inside diameter recommended by the brake drum is indicated on all brake drums. Be sure to set the final machining feed cut to fine, to make sure the screw effect does not happen when braking on your brake shoes; however, this may differ by the brand of lathe you use. When removing the brake drum, lift the car, take off the rear tires and wheel mount and slide the brake drum away from the mounted wheel studs. Should the drum remain on, use a pawl release tool made from a coat hanger or heavy mechanics wire, remove the plug from the end of the support plate located under the Wheel Cylinder and insert the tool into the access hole to free the pawl from the adjuster's star-wheel teeth as the wheel moves downward. If the adjuster screw is backed away far enough, the drum will slide off the wheel studs. After you have set aside the tools, mount the plug in the support plate. Prior to adding the drum, check the brake shoe linings for their condition, proper placement and if they are dirty, carry out repairs or replacements. If there is rust or foreign objects on the hub, drum or wheel mating spots, remove them with a wet wire brush prior to assembly. Clean the stretch marks around the outer machined part of the drum, measure the brake shoes to the drum's width using the tool and screw on the drum to the rear hub and bearing. Fit the wheel and tire assembly back on, tighten the wheel mounting nuts to 135 Nm (100 ft. lbs.) and lower the vehicle. After that, do a road test and check that the vehicle brakes smoothly in both directions, because the automatic adjuster will adjust them as you go.


Related Dodge Stratus Parts
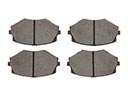 Dodge Stratus Brake Pads
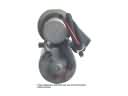 Dodge Stratus ABS Pump And Motor Assembly
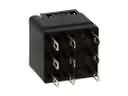 Dodge Stratus ABS Relay
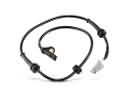 Dodge Stratus ABS Sensor
 Dodge Stratus Brake Caliper Piston
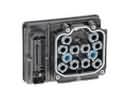 Dodge Stratus Brake Controller
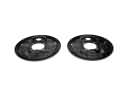 Dodge Stratus Brake Dust Shields
 Dodge Stratus Brake Proportioning Valve
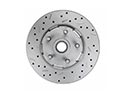 Dodge Stratus Brake Rotor
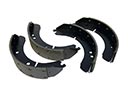 Dodge Stratus Brake Shoe Set
 Dodge Stratus Wheel Bearing Dust Cap
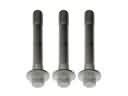 Dodge Stratus Wheel Hub Bolt