JeepParts
My Garage
My Account
Cart
OEM Dodge Stratus Brake Pad
Disc Brake Pad Set- Select Vehicle by Model
- Select Vehicle by VIN
Select Vehicle by Model
orMake
Model
Year
Select Vehicle by VIN
For the most accurate results, select vehicle by your VIN (Vehicle Identification Number).
8 Brake Pads found


Dodge Stratus Brake Pads, Rear Part Number: 5135543AB
$61.33 MSRP: $99.00You Save: $37.67 (39%)Ships in 1-2 Business Days
Dodge Stratus Brake Pads, Front Part Number: 5018945AA
$29.59 MSRP: $162.00You Save: $132.41 (82%)Ships in 1-2 Business Days
Dodge Stratus Brake Pads, Front Part Number: 5018942AA
$38.40 MSRP: $48.68You Save: $10.28 (22%)Ships in 1-2 Business Days

Dodge Stratus Brake Pads, Front Part Number: 5016164AA
$44.18 MSRP: $72.40You Save: $28.22 (39%)Ships in 1-2 Business Days
Dodge Stratus Brake Pads, Front Part Number: MR569588
Dodge Stratus Brake Pads, Front Part Number: 5093021AA

Dodge Stratus Brake Pads, Rear Part Number: 5093218AA
$65.03 MSRP: $95.70You Save: $30.67 (33%)Dodge Stratus Brake Pads, Front Part Number: MR569403
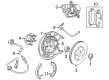
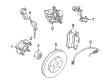
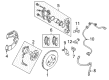
Dodge Stratus Brake Pad
Choose OEM Brake Pad that meet Dodge factory standards. Dodge designs and tests every component for precision and durability. Each Brake Pad follows strict manufacturing steps to lock in quality and fit. If your Dodge Stratus matters to you, OEM parts make the smart choice. You'll get the exact look, feel, and performance you expect. Shop genuine Stratus parts at the highly competitive prices online. Enjoy a manufacturer's warranty, a hassle-free return policy, and rapid delivery. No more guesswork with off brands. Get genuine parts with exact fit and true factory performance. Shop with confidence today at JeepPartsDeal.com.
The Brake Pad is one of the important parts that reveal the dependability and effectiveness of the Dodge Stratus, a mid-size car that was manufactured between the years 1995 to 2005. Known for the ability to provide superb braking, the Brake Pad is intended to form the very premier coefficient of friction with the brake rotors while slowing a vehicle safely. Suitable for the different models of the Dodge Stratus as a car whether as a sedan or coupe the brake pads are designed to make the general usage of the vehicle more enjoyable due to better stopping power besides prolonging the life of the braking mechanism. The Brake Pad is made from high-quality materials to ensure that will endure high temperatures making it excellently suitable for drivers who want to ensure safety and the premier performance on the road. Due to their durability the brake pads, they are usually expected to be changed after fifty thousand miles of use thus keeping the Dodge Stratus as efficient as possible. The automotive market can point out the unique selling proposition and upgraded Brake Pad by noise reduction features and better heat transfers, which makes the car's brake pad quieter and comfortable to ride. In summary, therefore, the Brake Pad is very critical in the enhancement of the safety and performance of the Dodge Stratus, and therefore is a worthy investment for any owner who intends to maintain his/her vehicle's safety and the pleasure of driving the car.
Dodge Stratus Brake Pad Parts and Q&A
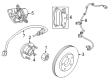
- Q: How to Service Brake Pads on Front Disc Brakes on Dodge Stratus?A:To deal with the front disc brake shoes, raise the car and take away both front wheel and tire assemblies, first on one side. Take off the rattle spring from around the outboard end of the caliper and adapter, then pull the covers off the caliper guide pin bolts and remove the bolts. Unscrew the caliper from the adapter and rotor, remembering that the outboard shoe will sometimes come off with the adapter and the inboard shoe will be loosened with the caliper. Fasten the caliper with wire or cord to the front strut to keep it from touching the brake fluid hose. After this, unclip the outboard brake shoe from the caliper adapter and move the inboard brake shoe backward until the retaining clip is free. Follow this same method for the flip side of the template. Make sure the piston is all the way back inside the bore for the install. When need be, tear away the protective covering over the noise suppression gasket from the brake shoe assemblies. The P-slot on the piston insulator should be placed looking upward, since brake shoes can be identified as either L or R. Press the retaining clip of the new brake shoe into the piston bore, making sure it is level inside the caliper. Cover the adapter abutments with some Mopar(R) Dielectric grease and insert the new outboard brake shoe with its lining against the brake rotor. Place the brake caliper on top of the rotor and adapter, attach the guide pin bolts and tighten them to 35 Nm (26 ft. lbs.), being sure not to cross-thread them. Cover the guide pin bolts with their caps and fit the new caliper hold down spring onto the outside side of the caliper, stretching the legs so they pass the abutments. Repeat the installation on the opposite side, attach the wheels and tires and tighten the bolts to half of what's required until completing the process by setting the tightening torque to 135 Nm (100 ft. lbs.). Roll the car down onto the jack stand or ground, press the brake several times to set the shoes in place, see if the brake fluid needs adjusting and finish by testing the car as you drive it.
- Q: How to Maintain Your Brake Pads on Dodge Stratus?A:First, lift the vehicle on either jackstands or a hoist and then remove both the rear wheels and tires. After that, extract the 2 guide pin bolts that secure the caliper to the adapter, turn the top half away from the adapter and lift the caliper off the lower machined surface. Place the caliper behind the rear strut so that the flexible brake hose is not twisted and damaged, then remove the back rotor from the hub/bearing and examine all parking brake shoes and the rotor for damage or extra wear, putting in new shoes if you find damage. Slide the pad out by placing a screwdriver behind the retaining clip on the caliper and turning it to the side. Slightly push the pads into the piston and pull the clip until you can remove the brake pad from the caliper assembly. Look for leaks at the seal of the piston and any damage to the dust boot; if either is found, tear down the caliper to change the seal and boot and replace the piston if it is scored. First, press the caliper piston fully backwards in the bore, smear the adapter edges with Mopar Multipurpose Lubricant, then put the rear rotor in place on the hub. Remove the protective paper from the noise suppression gasket on the brake pad assemblies, then press in the new inboard brake pad to the caliper piston and place the new outboard brake pad over the caliper, confirming the retaining clip is in place. Be careful to lower the caliper and its brake shoes onto the rotor while keeping guide pin bolts, bushings and sleeves away from the adapter bosses and screw in the guide pin bolts using 22 Nm (192 inch lbs.). Put back the wheels and tires on your vehicle, fasten all the shorter mounting stud nuts first, then proceed with the full length nuts, tightening them all up to 135 Nm (100 ft. lbs.). You should also take off the jackstands, also if using a hoist, lower it, inspect the brake fluid, pump the brake pedal to check its firmness, test-drive the car and brake a few times for the pads to fit.


Related Dodge Stratus Parts
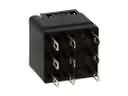 Dodge Stratus ABS Relay
 Dodge Stratus Brake Booster
 Dodge Stratus Brake Caliper
 Dodge Stratus Brake Caliper Bracket
 Dodge Stratus Brake Caliper Piston
 Dodge Stratus Brake Disc
 Dodge Stratus Brake Dust Shield
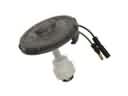 Dodge Stratus Brake Fluid Level Sensor
 Dodge Stratus Brake Master Cylinder
 Dodge Stratus Brake Proportioning Valve
 Dodge Stratus Parking Brake Cable
 Dodge Stratus Wheel Cylinder