JeepParts
My Garage
My Account
Cart
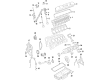
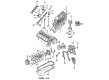
OEM Dodge Viper Crankshaft
Crank Shaft- Select Vehicle by Model
- Select Vehicle by VIN
Select Vehicle by Model
orMake
Model
Year
Select Vehicle by VIN
For the most accurate results, select vehicle by your VIN (Vehicle Identification Number).
6 Crankshafts found


Dodge Viper Crankshaft Part Number: 5038250AD
$1414.08 MSRP: $2065.00You Save: $650.92 (32%)Ships in 1-3 Business Days
Dodge Viper Crankshaft Part Number: 68171436AA
$6983.05 MSRP: $10555.00You Save: $3571.95 (34%)Ships in 1-2 Business Days
Dodge Viper Crankshaft Part Number: 5037599AC
$1683.15 MSRP: $2450.00You Save: $766.85 (32%)Ships in 1-3 Business Days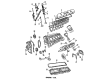
Dodge Viper Crankshaft Part Number: 5245103
Dodge Viper Crankshaft Part Number: 5037050AC

Dodge Viper Crankshaft Part Number: 4848733AC
Dodge Viper Crankshaft
Choose OEM Crankshaft that meet Dodge factory standards. Dodge designs and tests every component for precision and durability. Each Crankshaft follows strict manufacturing steps to lock in quality and fit. If your Dodge Viper matters to you, OEM parts make the smart choice. You'll get the exact look, feel, and performance you expect. Shop genuine Viper parts at the highly competitive prices online. Enjoy a manufacturer's warranty, a hassle-free return policy, and rapid delivery. No more guesswork with off brands. Get genuine parts with exact fit and true factory performance. Shop with confidence today at JeepPartsDeal.com.
Dodge Viper Crankshaft Parts and Q&A
- Q: How to Remove and Install a Crankshaft on Dodge Viper?A:First, get rid of the engine assembly and mount it on the appropriate stand so you can work better. Besides, you should also take off the timing chain cover, the Oil Pan and the rear oil seal retainer, completing with the windage tray. Be sure to place a mark on the bearing caps before you start, as they aren't the same and then loosen and remove the main bearing caps and bolts that hold the cross and main caps. Always pull out the crankshaft at the center to keep it from being damaged. First, put a thin layer of clean engine oil on the crankshaft main bearings and then fit them into the cylinder block before installing the crankshaft. Inject clean engine oil onto the main journals and insert each main cap. After that, tighten all bolts just enough with your fingers. Turn each main cap bolt in the center, then in the specified order, to 20 Nm (15 ft. lbs.), so the bearing caps rest on the engine block. To check the crankshaft is correctly aligned, first place it against the back of the cylinder block. Push it forward, wedging something behind the counterweight to hold it in place. Set the Al bolts at 61 Nm (45 ft. lbs.), the A2 bolts at 115 Nm (85 ft. lbs.) and the A3 bolts at 54 Nm (40 ft. lbs.) in the arranged order. Once you remove the holding tool, add the windage tray and fix its nuts to 11 Nm (95 in. lbs.). Proceed with the crankshaft rear oil seal, retainer, timing chain cover, oil pan and lastly fit the engine assembly.
- Q: How to Extract the Crankshaft from an Engine on Dodge Viper?A:Before taking out the crankshaft, separated the engine from the vehicle and place it on a secure stand for the job. After that, pull out the Oil Pan and the crankshaft rear oil seal retainer, as well as the crankshaft pulley and damper, Timing Chain cover and timing chain next. Once it's cooled, withdraw the oil pump pick-up tube and crankshaft oil scraper from the engine. Don't mark connecting rods with a number stamp or punch, as this could harm them. Identify each connecting rod and cap by looking at them or marking them with a permanent marker, being sure not to damage the broken connection areas. Don't try to save connecting rod bolts; get new ones for each cylinder. Carefully remove the connecting rod bolts and caps, but don't forget to mark the main bearing caps as you go because the caps are unique. Firs.t, take out the side main bearing cap bolts and then the main bearing cap bolts. Remember to lift the crankshaft straight out of the engine block to make sure you do no damage to either of them.


Related Dodge Viper Parts
 Dodge Viper Camshaft
 Dodge Viper Oil Filter
 Dodge Viper Oil Pan
 Dodge Viper Crankshaft Seal
 Dodge Viper Cylinder Head
 Dodge Viper Harmonic Balancer
 Dodge Viper Intake Valve
 Dodge Viper Piston Ring Set
 Dodge Viper Rocker Arm
 Dodge Viper Timing Cover
 Dodge Viper Valve Cover Gasket
 Dodge Viper Valve Stem Seal