JeepParts
My Garage
My Account
Cart
OEM Jeep Commander Blend Door Actuator
Air Blend Door Actuator- Select Vehicle by Model
- Select Vehicle by VIN
Select Vehicle by Model
orMake
Model
Year
Select Vehicle by VIN
For the most accurate results, select vehicle by your VIN (Vehicle Identification Number).
3 Blend Door Actuators found


Jeep Commander Actuator, Front Part Number: 5143192AA
$114.55 MSRP: $170.00You Save: $55.45 (33%)Ships in 1-2 Business Days
Jeep Commander Door Actuator Part Number: 5183151AB
$56.64 MSRP: $84.95You Save: $28.31 (34%)
Jeep Commander Actuator Part Number: 5183152AA
$40.44 MSRP: $51.25You Save: $10.81 (22%)Ships in 1-2 Business Days
Jeep Commander Blend Door Actuator
Choose OEM Blend Door Actuator that meet Jeep factory standards. Jeep designs and tests every component for precision and durability. Each Blend Door Actuator follows strict manufacturing steps to lock in quality and fit. If your Jeep Commander matters to you, OEM parts make the smart choice. You'll get the exact look, feel, and performance you expect. Shop genuine Commander parts at the highly competitive prices online. Enjoy a manufacturer's warranty, a hassle-free return policy, and rapid delivery. No more guesswork with off brands. Get genuine parts with exact fit and true factory performance. Shop with confidence today at JeepPartsDeal.com.
The Jeep Commander Blend Door Actuator functions as the central part of HVAC systems through Jeep Commander vehicles because it showcases high dependability and outstanding performance. The electric motor functions as a vital component which controls airflow through multiple vents to blend hot and cold air for reaching the set cabin temperature. The Jeep Commander Blend Door Actuator redirects heater core air outdoors to stop surplus heated air from entering the cabin and improve both performance and safety. The Jeep Commander actuator works with multiple vehicle models which makes it necessary for proper climate control maintenance due to improper functionality resulting in incorrect heating and airflow problems. As an important component of the Jeep Commander model lineup the robust design and reliable performance of this actuator makes it exceptional in the automotive market. It allows comfortable level driving regardless of external weather conditions. The superior driving experience of the brand model depends largely on the effortless integration of this device with its heating ventilation and air conditioning system. The car Blend Door Actuator demonstrates the automaker's dedication to quality and innovation by delivering multiple comfort and performance features which makes it essential for the car lineup.
Jeep Commander Blend Door Actuator Parts and Q&A
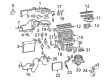
- Q: How to Install a Blend Door Actuator in a Single Zone Heater-A/C System on Jeep Commander?A:Place the actuator in the vehicle and then attach it to the left side of the heater-A/C distribution housing in a single zone system. Turn the actuator just enough to get the splines on both shafts to match each other. Join the actuator to the housing with screws, fastening them to a tightness of 2 Nm (17 in. lbs.) and attach the HVAC wire harness connector to the actuator. On LHD models, put the instrument panel silencer on the passenger side and on RHD models, install the Glove Box into the instrument panel. After reconnecting the negative Battery Cable, start the Actuator Calibration function with a scan tool. To use a dual zone system, follow the same steps on the right side of the air distribution housing, aligning the splines, securing everything with screws and connecting the HVAC wire harness. As appropriate for your model, fix the glove box or instrument panel silencer, attach the negative battery cable and start the Actuator Calibration function using a scan tool.
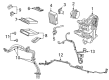
- Q: How to Safely Remove and Service a Blend Door Actuator on Jeep Commander?A:Before servicing or repairing the Air Door Actuator/Motor, remove the negative Battery Cable to turn off the air bag system, then wait two minutes to make sure the capacitor has discharged to keep the air bag from deploying mistakenly. First, take out the Glove Box from the instrument panel. Afterward, pull the wire harness connector out of the HVAC box found on the recirculation door actuator. Unscrew the three connecting screws for the recirculation door actuator in the HVAC air inlet housing and take out the actuator as well.


Related Jeep Commander Parts
 Jeep Commander Blower Motor
 Jeep Commander Blower Motor Resistor
 Jeep Commander Heater Core
 Jeep Commander A/C Accumulator
 Jeep Commander A/C Compressor
 Jeep Commander A/C Compressor Clutch
 Jeep Commander A/C Condenser
 Jeep Commander A/C Expansion Valve
 Jeep Commander A/C Hose
 Jeep Commander A/C Switch
 Jeep Commander Blower Control Switches
 Jeep Commander Evaporator