JeepParts
My Garage
My Account
Cart
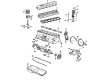
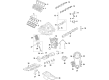
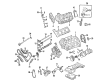
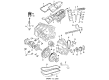
OEM Jeep Grand Cherokee Lash Adjuster
Lash Adjuster Lifter- Select Vehicle by Model
- Select Vehicle by VIN
Select Vehicle by Model
orMake
Model
Year
Select Vehicle by VIN
For the most accurate results, select vehicle by your VIN (Vehicle Identification Number).
13 Lash Adjusters found


Jeep Grand Cherokee Valve Lifters Part Number: 5184332AA
$18.24 MSRP: $26.70You Save: $8.46 (32%)


Jeep Grand Cherokee Valve Lifters Part Number: 5047883AC
$20.72 MSRP: $26.50You Save: $5.78 (22%)


Jeep Grand Cherokee Valve Lifters Part Number: 53010574AB
$35.15 MSRP: $51.00You Save: $15.85 (32%)


Jeep Grand Cherokee Valve Seals Part Number: 53021894AA
$37.58 MSRP: $54.00You Save: $16.42 (31%)Ships in 1-2 Business Days


Jeep Grand Cherokee Valve Lifters Part Number: 53021077
$22.56 MSRP: $32.45You Save: $9.89 (31%)


Jeep Grand Cherokee Valve Lifters Part Number: 5038787AD
$80.96 MSRP: $107.00You Save: $26.04 (25%)

Jeep Grand Cherokee Valve Lifters Part Number: 5038785AD
$262.30 MSRP: $350.00You Save: $87.70 (26%)


Jeep Grand Cherokee Valve Lifters Part Number: 5038786AD
$283.63 MSRP: $377.00You Save: $93.37 (25%)


Jeep Grand Cherokee Valve Lifters Part Number: 5038784AD
$163.91 MSRP: $245.00You Save: $81.09 (34%)
Jeep Grand Cherokee Valve Lifters Part Number: 5175440AA
$17.94 MSRP: $23.10You Save: $5.16 (23%)Ships in 1-2 Business Days
Jeep Grand Cherokee Valve Lifters Part Number: 5038788AD
$178.50 MSRP: $238.00You Save: $59.50 (25%)


Jeep Grand Cherokee Valve Lifters Part Number: 4713439

Jeep Grand Cherokee Valve Lifters Part Number: 5047979AA
Jeep Grand Cherokee Lash Adjuster
Choose OEM Lash Adjuster that meet Jeep factory standards. Jeep designs and tests every component for precision and durability. Each Lash Adjuster follows strict manufacturing steps to lock in quality and fit. If your Jeep Grand Cherokee matters to you, OEM parts make the smart choice. You'll get the exact look, feel, and performance you expect. Shop genuine Grand Cherokee parts at the highly competitive prices online. Enjoy a manufacturer's warranty, a hassle-free return policy, and rapid delivery. No more guesswork with off brands. Get genuine parts with exact fit and true factory performance. Shop with confidence today at JeepPartsDeal.com.
Jeep Grand Cherokee Lash Adjuster Parts and Q&A
- Q: How to Service and Repair Lash Adjusters on Jeep Grand Cherokee?A:When you want to service and repair a hydraulic lifter, start by removing both the cylinder head and then the push rods. Pull out the tappets using a Hydraulic Valve Tappet Tool via push rod openings in the cylinder block, putting all pieces back as they were picked up. Put each tappet assembly into cleaning solvent to remove varnish, gum and sludge buildup. Examine the side and base of every tappet to find scuffing; inspect the base again with a straightedge to look for concave wear and if found, you should replace both the Camshaft and tappets. Make sure each tappet meets its zero-lash requirement by fitting a 7.925 - 7.950 mm diameter ball bearing on the plunger cap, inserting the tappet into the tester cup and pressing the ram, keeping the hex nut unadjusted as it touches the ball bearing. Pour hydraulic valve tappet test oil into the tester cup so that the tappet is under the oil, then press the plunger pump to remove air bubbles. Set the pointer on the ram to line up with the SET mark and fasten the nut, then lift the weighted arm onto the push rod and observe the leak-down time for the valve; a good tappet should leak down between 20 and 110 seconds, so any that do not should be replaced. There is no need to place the oil hole plugs for each tappet in. Instead, dip each tappet in Mopar Engine Oil Supplement or an equivalent, then use the Hydraulic Valve Tappet Removal/Installation Tool to put each tappet back into its bore. Reassemble the cylinder head and insert all of the push rods, Rocker Arms and assembly bridges and pivots until the capscrews are loosely inserted. Then, tighten each screw in turn to 28 Nm torque. Slowly pour what is left of the Mopar Engine Oil Supplement on the valve actuating assembly, so it isn't drained before 1,609 km and then secure the cylinder head cover.
- Q: How to Ensure Proper Functioning of a Lash Adjuster on a Jeep Grand Cherokee?A:To begin servicing the lifter or lash adjuster, you need to take out the engine cylinder head and after that the push rods. Guide a Hydraulic Valve Tappet Removal/Installation tool through each push rod hole in the cylinder block to take out the tappets. Clean all your tappet assemblies with a cleaning solvent to prevent varnish, gum and sludge buildup. See if there is scuffing along the edges and bottom of each tappet and check the base with a straightedge; if it is concave, change both the Camshaft and the set of tappets. Following cleaning and inspection, check the tappet by holding a 7.925 - 7.950 mm ball bearing on the plunger, putting it in the tester cup and filling the cup with hydraulic valve tappet test oil until it is submerged. Pump the tappet plunger to remove all air, put the tester so that the pointer is on SET and tighten the hex nut. Turn the tester cup while you watch it-it should take 20-110 seconds to leak and you must get rid of any that do not meet this time. For installation, dip every tappet in either Mopar Engine Oil Supplement or an equivalent, then set each tappet into its originating bore with the special installation tool. Secure the cylinder head and push rods in the proper places, put the Rocker Arms and bridge and pivot assemblies on as well and ensure that the capscrews are still loose. Tighten each capscrew till it reads 28 Nm in a zigzag pattern to protect the bridges. Pour the rest of the Supplement on the valve actuating assembly that it remains with the engine oil for at least 1,609 km. Make sure to install everything by putting in the cylinder head cover as the last piece.


Related Jeep Grand Cherokee Parts
 Jeep Grand Cherokee Rocker Arm
 Jeep Grand Cherokee Valve Cover Gasket
 Jeep Grand Cherokee Engine Cover
 Jeep Grand Cherokee Harmonic Balancer
 Jeep Grand Cherokee Crankshaft Pulley
 Jeep Grand Cherokee Crankshaft Thrust Washer
 Jeep Grand Cherokee Crankshaft Timing Gear
 Jeep Grand Cherokee Cylinder Head Gasket
 Jeep Grand Cherokee Engine Mount Bracket
 Jeep Grand Cherokee Piston
 Jeep Grand Cherokee Spool Valve
 Jeep Grand Cherokee Variable Timing Solenoid