JeepParts
My Garage
My Account
Cart
OEM Jeep Grand Cherokee Exhaust Valve
Exhaust Muffler Valve- Select Vehicle by Model
- Select Vehicle by VIN
Select Vehicle by Model
orMake
Model
Year
Select Vehicle by VIN
For the most accurate results, select vehicle by your VIN (Vehicle Identification Number).
16 Exhaust Valves found


Jeep Grand Cherokee Exhaust Valve Part Number: 5038332AB
$108.31 MSRP: $163.00You Save: $54.69 (34%)Ships in 1-2 Business Days


Jeep Grand Cherokee Exhaust Valve Part Number: 5038753AA
$130.27 MSRP: $195.00You Save: $64.73 (34%)Ships in 1-2 Business Days


Jeep Grand Cherokee Exhaust Valve Part Number: 5048022AA
$15.45 MSRP: $22.85You Save: $7.40 (33%)Ships in 1-2 Business Days


Jeep Grand Cherokee Exhaust Valve Part Number: 5184128AE
$23.14 MSRP: $34.25You Save: $11.11 (33%)Ships in 1-2 Business Days


Jeep Grand Cherokee Exhaust Valve Part Number: 53022088AD
$36.00 MSRP: $53.35You Save: $17.35 (33%)Ships in 1-2 Business Days


Jeep Grand Cherokee Exhaust Valve Part Number: 5037373AB
$37.62 MSRP: $55.35You Save: $17.73 (33%)Ships in 1-2 Business Days


Jeep Grand Cherokee Valves Part Number: 68147269AA
$55.12 MSRP: $81.05You Save: $25.93 (32%)Ships in 1-2 Business Days


Jeep Grand Cherokee Exhaust Valve Part Number: 53021551AB
$34.28 MSRP: $49.45You Save: $15.17 (31%)Ships in 1-2 Business Days
Jeep Grand Cherokee Exhaust Valve Part Number: 5048262AA
$38.76 MSRP: $57.05You Save: $18.29 (33%)Ships in 1-2 Business Days

Jeep Grand Cherokee Exhaust Valve Part Number: 53021916AB
$40.83 MSRP: $47.85You Save: $7.02 (15%)Ships in 1-2 Business Days


Jeep Grand Cherokee Exhaust Valve Part Number: 53020748


Jeep Grand Cherokee Exhaust Valve Part Number: 53021571AA

Jeep Grand Cherokee Exhaust Valve Part Number: 53006724

Jeep Grand Cherokee Exhaust Valve Part Number: 53010513AA

Jeep Grand Cherokee Exhaust Valve Part Number: 53021644AC


Jeep Grand Cherokee Exhaust Valve Part Number: 5175397AA
Jeep Grand Cherokee Exhaust Valve
Choose OEM Exhaust Valve that meet Jeep factory standards. Jeep designs and tests every component for precision and durability. Each Exhaust Valve follows strict manufacturing steps to lock in quality and fit. If your Jeep Grand Cherokee matters to you, OEM parts make the smart choice. You'll get the exact look, feel, and performance you expect. Shop genuine Grand Cherokee parts at the highly competitive prices online. Enjoy a manufacturer's warranty, a hassle-free return policy, and rapid delivery. No more guesswork with off brands. Get genuine parts with exact fit and true factory performance. Shop with confidence today at JeepPartsDeal.com.
It is now clear that the Exhaust Valve part of the Jeep Grand Cherokee is very important to the vehicle and plays a huge role in the reliability and performance of the automobile. This essential part aids in the proper release of burnt exhaust gases from the cylinder of the engine in order to enhance the functionality of the engine. A proper working of Exhaust Valve is important to avoid problems like loss in power, likes misfiring as well as deterioration in fuel economy which hampers the pleasant driving experience. The Jeep Grand Cherokee has had several models of Exhaust Valves with each manufactured to improve the engines used in the Jeep Grand Cherokee as well as maintaining the vehicles rugged character. Cross compatibility of our Exhaust Valve implies that the automobile drivers of any model of the Grand Cherokee can always depend on the performance of their part. Of course, this reliability also improves vehicle performance but it has a rather important function of increasing road safety. Some characteristics of the product with the name Exhaust Valve indicate its uniqueness in the automotive market, namely its durability and accuracy of manufacturing: the brand is popular among Jeep owners. The Jeep Grand Cherokee is one of the many luxury and innovative mid-size SUVs to include the Exhaust valve performance acumen to further boost the model and rank it among the premier in the market. In conclusion, the Exhaust Valve is an essential component from the Jeep Grand Cherokee's view point of performance, efficiency and safety standpoint and therefore it makes the centre of attraction in this car.
Jeep Grand Cherokee Exhaust Valve Parts and Q&A
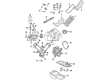
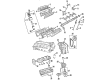
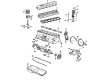
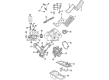
- Q: How to Remove and Replace Exhaust Valve and Intake Valves in a Cylinder Head on Jeep Grand Cherokee?A:Once removed, the valve is taken out and can be properly replaced after first removing the cylinder heads. To start, remove the Rocker Arms and Lash Adjusters and then the Camshaft bearing caps and the camshaft. Though the process is used for all six valve springs and valves, one valve and valve spring will be highlighted in the demonstration. Apply compressor tool C-3422-B or C-3422-C and the 8519 adapter on the valve spring and gently strike down on the valve spring to remove the locks from around the retainer. Remember to release the valve spring compressor slowly, watching as you carefully remove the two spring retainer lock halves. In the next step, uninstall the valve spring compressor and remove the spring retainer and spring. Look for rough spots on the edges of the keeper grooves and take out any burrs from the valve's stem before taking the valve out of the cylinder head. Because intake and exhaust Valve Stem Seals are the same, simply prior to installing the valve, preparing by removing the seal and marking it. Whenever the valves are out, it's a good idea to inspect and test the valve springs before reusing them. See if any of the valve springs are worn out or damaged and align Tool C-647 40.12 mm from the threaded stud and with the zero mark at the front to check their strength. Atop the stud, put in the spring, set the tone using the lever and keep turning the torque wrench until you hear a ping, checking the reading then. If you read this value two times, it will give you the spring load at test length, allowing you to improve the measurement with help from the table's fractional readings. Look for the Specifications value to check expected height and maximum tension; discard any spring that is not 100% compatible.
- Q: How to Install Exhaust Valve and Intake Valves on Jeep Grand Cherokee?A:Before putting in the valve, first cover the stem with oil and guide the valve inside the cylinder head. Next, install the sealing item over the end of the valve stem, fully seating it and making sure all is fine with the garter spring at the top. After that, insert the spring and the spring retainer into the dishwasher. Insert the valve spring compressor and, using it, compress the spring. Afterward, fit and secure each valve spring retainer half. When releasing the spring compressor, check that the two halves of the retainer and the retainer are resting properly inside. With clean engine oil, lubricate the Camshaft journal and put the camshaft with its dowels at the left camshaft at an 11 o'clock position and the right at an 12 o'clock position and finally place the camshaft bearing caps. Attach the bearing cap bolt while following the specified sequence, tightening each by 11 Nm (100 in. lbs.). After that, place the hydraulic Lash Adjusters and Rocker Arms in their intended position.


Related Jeep Grand Cherokee Parts
 Jeep Grand Cherokee Oil Pump
 Jeep Grand Cherokee Crankshaft
 Jeep Grand Cherokee Cylinder Head
 Jeep Grand Cherokee Harmonic Balancer
 Jeep Grand Cherokee Crankshaft Seal
 Jeep Grand Cherokee Crankshaft Thrust Washer
 Jeep Grand Cherokee Cylinder Head Gasket
 Jeep Grand Cherokee Lash Adjuster
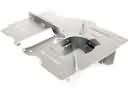 Jeep Grand Cherokee Oil Pan Baffle
 Jeep Grand Cherokee Pushrod
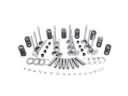 Jeep Grand Cherokee Rocker Shaft Spring Kit
 Jeep Grand Cherokee Timing Cover