JeepParts
My Garage
My Account
Cart
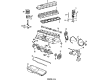
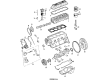
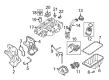
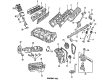
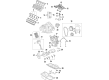
OEM Jeep Oil Pan
Oil Drain Pan- Select Vehicle by Model
- Select Vehicle by VIN
Select Vehicle by Model
orMake
Model
Year
Select Vehicle by VIN
For the most accurate results, select vehicle by your VIN (Vehicle Identification Number).
61 Oil Pans found


Jeep Oil Pan, Upper Part Number: 68249490AC
$169.57 MSRP: $257.00You Save: $87.43 (35%)Product Specifications- Other Name: Pan - Oil; Engine Oil Pan, Upper; Upper Oil Pan; Pan Oil Upper
- Position: Upper


Jeep Oil Pan Part Number: 53021860AC
$221.00 MSRP: $338.00You Save: $117.00 (35%)Ships in 1-2 Business DaysProduct Specifications- Other Name: Pan - Engine Oil; Engine Oil Pan; Pan Engine Oil


Jeep Oil Pan, Upper Part Number: 68078951AC
$299.46 MSRP: $457.00You Save: $157.54 (35%)Ships in 1-2 Business DaysProduct Specifications- Other Name: Pan - Engine Oil; Engine Oil Pan, Upper; Pan Engine Oil; Engine Oil Pan
- Position: Upper


Jeep Oil Pan, Upper Part Number: 68051598AC
$356.92 MSRP: $542.00You Save: $185.08 (35%)Ships in 1-2 Business DaysProduct Specifications- Other Name: Pan - Engine Oil; Engine Oil Pan, Upper; Upper Oil Pan; Pan Engine Oil
- Position: Upper
- Replaces: 68051598AB, 68051598AA


Jeep Oil Pan Part Number: 4666153AC
$383.44 MSRP: $583.00You Save: $199.56 (35%)Ships in 1-2 Business DaysProduct Specifications- Other Name: Pan - Oil; Engine Oil Pan; Upper Oil Pan; Lower Oil Pan; Pan Oil


Jeep Oil Pan Part Number: 53022293AA
$145.99 MSRP: $219.00You Save: $73.01 (34%)Product Specifications- Other Name: Pan - Engine Oil; Engine Oil Pan; Pan Engine Oil


Jeep Oil Pan, Upper Part Number: 68313581AB
$166.20 MSRP: $249.00You Save: $82.80 (34%)Product Specifications- Other Name: Pan - Engine Oil; Engine Oil Pan, Upper; Upper Oil Pan; Pan Engine Oil Upper; Pan Engine Oil
- Position: Upper
- Replaces: 68313581AA


Jeep Oil Pan Part Number: 68160481AC
$197.65 MSRP: $296.00You Save: $98.35 (34%)Product Specifications- Other Name: Pan - Engine Oil; Engine Oil Pan; Pan Engine Oil
- Replaces: 68160481AB, 68160481AA


Jeep Oil Pan, Upper Part Number: 68161415AA
$204.39 MSRP: $308.00You Save: $103.61 (34%)Ships in 1-2 Business DaysProduct Specifications- Other Name: Pan - Engine Oil; Engine Oil Pan, Upper; Upper Oil Pan; Pan Engine Oil Upper; Pan Engine Oil
- Position: Upper


Jeep Oil Pan Part Number: 68086157AC
$216.74 MSRP: $326.00You Save: $109.26 (34%)Ships in 1-2 Business DaysProduct Specifications- Other Name: Pan - Engine Oil; Engine Oil Pan; Pan Engine Oil


Jeep Oil Pan Part Number: 5038468AC
$223.20 MSRP: $329.00You Save: $105.80 (33%)Ships in 1-3 Business DaysProduct Specifications- Other Name: Pan - Engine Oil; Engine Oil Pan; Pan Engine Oil
- Replaces: 5038468AB


Jeep Oil Pan Part Number: 53010340AB
$253.79 MSRP: $375.00You Save: $121.21 (33%)Product Specifications- Other Name: Pan - Engine Oil; Engine Oil Pan; Pan Engine Oil


Jeep Oil Pan Part Number: 53020833AB
$352.66 MSRP: $519.00You Save: $166.34 (33%)Ships in 1-2 Business DaysProduct Specifications- Other Name: Pan - Engine Oil; Engine Oil Pan; Pan Engine Oil


Jeep Oil Pan Part Number: 53022343AL
$335.09 MSRP: $445.00You Save: $109.91 (25%)Product Specifications- Other Name: Pan - Engine Oil; Engine Oil Pan
- Replaces: 53022343AI, 53022343AJ


Jeep Oil Pan Part Number: 5047566AE
$166.20 MSRP: $252.00You Save: $85.80 (35%)Ships in 1-2 Business DaysProduct Specifications- Other Name: Pan - Engine Oil; Engine Oil Pan
- Replaces: 5047566AB, 5047566AC, 5047566AD, 5047566AA


Jeep Oil Pan Part Number: 53020831
Product Specifications- Other Name: Pan - Engine Oil; Engine Oil Pan; Pan, Engine Oil


Jeep Oil Pan Part Number: 53010491AA
Product Specifications- Other Name: Pan - Engine Oil; Engine Oil Pan; Pan Engine Oil


Jeep Oil Pan Part Number: 5142548AC
Product Specifications- Other Name: Pan - Engine Oil


Jeep Oil Pan Part Number: 53020918
Product Specifications- Other Name: Pan - Engine Oil; Engine Oil Pan; Pan, Oil, Partial; Pan Engine Oil


Jeep Oil Pan Part Number: 5037685AA
Product Specifications- Other Name: Pan - Engine Oil; Engine Oil Pan; Pan Engine Oil
| Page 1 of 4 |Next >
1-20 of 61 Results
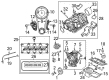
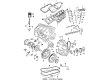
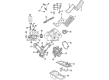
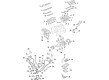
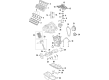
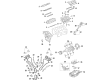
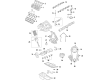
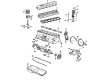
Jeep Oil Pan
OEM parts sourced directly from Jeep deliver superior quality, long lasting strength, and a precise fit you can trust. Each item goes through strict quality checks to ensure safety, toughness, and performance that matches your factory equipment. At JeepPartsDeal online shop, you'll get top-quality, budget-friendly OEM Jeep Oil Pan for your vehicle. We focus on giving you a high standard without pushing up the price. Our full selection of genuine factory products comes backed by the original manufacturer's warranty. You'll love our fast delivery, seamless shopping experience, and convenient return policy, saving you all the hassle.
Jeep Oil Pan keeps the engine oil in its position and shields it against the rocky roads. Jeep has toiled the legend and is now smoking at the weekday commutes. Jeep drivers simply press a button and the Selec-Terrain system changes snow to sand to mud and lets novices seem to be knowledgeable of the trail manuals without training. The interiors of Jeeps are now integrating waterproof floor plugs, touchscreen dashboards, voice commands and over-the-air updates; they are the sign that both high-tech and rugged fun can share the same seat. Even the Jeep culture to some extent is so permeated that people can indicate through a non-verbal signal on the road in the dirt; groups of people who swap trail directions faster than the weather become a tribe that values grit more than brochures that are polished. Oil Pan is located at the bottom of the engine and is a reservoir made of metal that provides the pump with a constant supply of lubricant and slosh of fluids is suppressed by splash baffles during sudden increase conditions. Oil Pan also has the advantage of being a heat sink and it pours excess heat on to passing air to keep pistons cool as tachometer fluctuates around the redline. Recent models, using Oil Pan instead of the obsolete stamped steel, cut weight by use of cast aluminum and added the strength of the cast aluminum to the wall to brush off invisible stumps. High-temperature gaskets and bolts are applied in the process of Oil Pan sealing and they are controlled by the use of torque in order to seal any leaks that can cause the bearings to starve or the trail to be substituted with slick waste.
Jeep Oil Pan Parts and Q&A
- Q: How to remove the oil pans in 3.6L V6 engine on Jeep Grand Cherokee?A:With regard to removing the oil pans, before doing so, pull the cable off the negative terminal of the battery and lift the front of the car and place it on jackstands, engage the parking brake and block the rear wheels. Safely drain the engine oil and, if your model has them, unscrew the lower splash shield or skid plate fasteners. Around the lower oil pan, there are bolts and nuts that should be removed after which it should be popped out from under the upper oil pan but without use of pry bar as this may cause damage to the parts. Using a soft-face hammer, tap the pan to break the gasket seal, add the usage of the putty knife where is necessary. Third, unscrew and take out the power steering gear as well as the dipstick tube bracket mounting bolt and turn a little to pull the dipstick tube out. The exhaust crossunder pipe flange should be disengaged and the pipe and the coolant tube needs to be shifted after the fastener of the pipe has been removed. For 4WD models; remove the front differential from the engine mounts, attach an engine hoist and detach the engine mounts and brackets to get access to the oil pan bolts. All lower oil pan to transmission mounting bolts, the torque converter access plate and the rubber plugs below it must be removed. Lift the upper pan-to-rear main seal housing bolts counterclockwise when viewed from the top until all the bolts are removed to avoid stripping of bolt threads. Loosen and take out the upper oil pan bolts and take out the oil pan from the engine block if it sticks use prying points or putty knife. Scrub the pan and high-area surfaces of the engine block, look for distortion and flattening if required. Put RTV sealant on the upper pan sealing surface and fit the pan together with the bolts, then tighten the bolts in an anticlockwise sequence. Do the same for the lower oil pan, filling them with sealant and tightened the bolts in the same manner as above. Last, add more oil into the engine, switch on the engine and check if there is any sign of leakage.
- Q: How to disconnect the battery, remove the oil pan, and reinstall it in 2.4L four cylinder engine on Jeep Wrangler?A:Disconnect the cable from the negative terminal of the battery, remove the air filter housing, raise the vehicle and support it securely on jackstands, and drain the engine oil. Disconnect the exhaust pipe at the exhaust manifold and remove the structural collar. For 4WD models, support the front axle assembly with a floor jack, remove the front axle assembly mounting bolts, and lower the axle housing as much as possible. Remove nuts from the engine mounts, support the engine from above with an engine hoist (avoiding the intake manifold), take the weight off the engine mounts, and remove the engine mount through-bolts. Raise the engine sufficiently to allow access for oil pan removal, then remove the mounting bolts and lower the oil pan using a criss-cross pattern to loosen and remove the bolts. If the pan is stuck, tap it with a soft-face hammer or use a wood block to assist. Remove the oil pump pickup tube and screen assembly, clean both thoroughly, and install with a new seal. Clean the oil pan and sealing surfaces on the block and pan, removing all traces of old gasket material, and check for distortion, straightening or replacing as necessary. Apply a 1/8-inch bead of ATV sealant at the cylinder block-to-oil pump assembly joint at the oil pan flange and install a new oil pan gasket. Place the oil pan into position and install the bolts finger-tight, then tighten them to the specified torque. Lower the engine and install the through-bolts in the engine mounts, tightening them securely. Install the structural collar by placing it in position between the transmission and the oil pan, hand-starting the collar-to-transmission bolts, hand-tightening the collar-to-oil pan bolts, and then tightening both sets of bolts. The remainder of the installation follows the reverse order of removal. Refill the crankcase with the correct quantity and grade of oil, run the engine, and check for leaks, followed by a road test to check for leaks again.


Related Jeep Parts
 Jeep Cylinder Head
 Jeep Oil Pan Gasket
 Jeep Transmission Mount
 Jeep Valve Cover Grommet
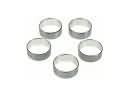 Jeep Camshaft Bearing
 Jeep Camshaft Seal
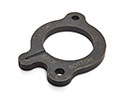 Jeep Camshaft Thrust Plate
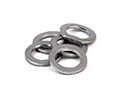 Jeep Oil Drain Plug Gasket
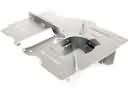 Jeep Oil Pan Baffle
 Jeep Oil Pump Rotor Set
 Jeep Pushrod
 Jeep Timing Belt Tensioner