JeepParts
My Garage
My Account
Cart
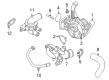
OEM Jeep Thermostat
Engine Coolant Thermostat- Select Vehicle by Model
- Select Vehicle by VIN
Select Vehicle by Model
orMake
Model
Year
Select Vehicle by VIN
For the most accurate results, select vehicle by your VIN (Vehicle Identification Number).
23 Thermostats found


Jeep Thermostat (Not Including Gaskets) Part Number: 52028186AC
$38.76 MSRP: $56.70You Save: $17.94 (32%)Ships in 1-2 Business DaysProduct Specifications- Other Name: Engine Coolant Thermostat
- Replaces: 52028186AB


Jeep Thermostat Housing Part Number: 68273161AA
$62.66 MSRP: $93.65You Save: $30.99 (34%)Ships in 1-2 Business DaysProduct Specifications- Other Name: Thermostat; Engine Coolant Thermostat; Thermostat Housing Cover; Thermostat, Coolant
- Replaces: 4666140AA


Jeep Thermostat Housing Part Number: 68253514AA
$197.65 MSRP: $296.00You Save: $98.35 (34%)Product Specifications- Other Name: Tstat; Engine Coolant Thermostat Housing; Thermostat and Housing Assembly; Thermostat Housing Cover; Thermostat Unit; Thermostat; Engine Coolant Thermostat
- Replaces: 68211186AB, 68211186AA


Jeep Front Cover Part Number: 68174083AA
$38.87 MSRP: $56.85You Save: $17.98 (32%)Product Specifications- Other Name: Thermostat; Engine Coolant Thermostat Housing Gasket; Engine Coolant Thermostat
- Replaces: 52079476AB, 52079476AC, 52079476AD, 52079476AE


Jeep Thermostat Housing Part Number: 4893926AH
$64.34 MSRP: $96.20You Save: $31.86 (34%)Product Specifications- Other Name: Thermostat; Engine Coolant Thermostat Housing; Engine Coolant Thermostat Kit; Thermostat Housing Cover
- Replaces: 4893926AD, 4893926AG, 4893926AF

Jeep THERMOSTA Part Number: 68676480AA
$57.42 MSRP: $85.95You Save: $28.53 (34%)
Jeep Thermostat Housing Part Number: 53010923AB
$56.08 MSRP: $83.55You Save: $27.47 (33%)Product Specifications- Other Name: Housing - Thermostat; Engine Coolant Thermostat Housing; Thermostat Housing Cover; Housing Thermostat
- Replaces: 53010923AA

Jeep Thermostat Housing Part Number: 68211424AA
$99.05 MSRP: $147.00You Save: $47.95 (33%)Ships in 1-2 Business DaysProduct Specifications- Other Name: Thermostat

Jeep Thermostat Housing Part Number: 5048757AA
$143.74 MSRP: $214.00You Save: $70.26 (33%)Ships in 1-2 Business DaysProduct Specifications- Other Name: Thermostat; Engine Coolant Thermostat

Jeep Thermostat Housing Part Number: 5048714AA
$151.61 MSRP: $226.00You Save: $74.39 (33%)Ships in 1-2 Business DaysProduct Specifications- Other Name: Thermostat

Jeep Thermostat Housing Part Number: 68498366AA
$178.56 MSRP: $265.00You Save: $86.44 (33%)Ships in 1-2 Business DaysProduct Specifications- Other Name: Thermostat; Engine Coolant Thermostat Housing; Thermostat Housing Cover
- Replaces: 68479675AA, 68439166AA

Jeep Thermostat Part Number: 52028185AC
$18.30 MSRP: $26.80You Save: $8.50 (32%)Product Specifications- Other Name: Engine Coolant Thermostat
- Replaces: 52028185AB, 4494469, 52028185

Jeep Thermostat Part Number: 53010552AC
$38.42 MSRP: $56.25You Save: $17.83 (32%)Ships in 1-2 Business DaysProduct Specifications- Other Name: Engine Coolant Thermostat
- Replaces: 53010552AA

Jeep THERMOSTA Part Number: 68676481AA
$39.84 MSRP: $58.25You Save: $18.41 (32%)Ships in 1-2 Business Days
Jeep Thermostat Part Number: 68361650AH
$56.32 MSRP: $80.95You Save: $24.63 (31%)Ships in 1-2 Business DaysProduct Specifications- Other Name: THERMOSTA
- Replaces: 68361650AD, 68361650AE, 68361650AF, 68361650AG


Jeep Thermostat Part Number: 52028898AJ
$69.58 MSRP: $91.75You Save: $22.17 (25%)Product Specifications- Replaces: 52028898AE, 52028898AI


Jeep Thermostat Part Number: 55111016AC
$3.94 MSRP: $5.70You Save: $1.76 (31%)Product Specifications- Other Name: Engine Coolant Thermostat; Thermostat See Catalog Note
- Replaces: 55111016AA, 55111016AB


Jeep Thermostat Part Number: 55111017AB
Product Specifications- Other Name: Engine Coolant Thermostat; Thermostat See Catalog Note
- Replaces: 55111017AA, 68003583AA


Jeep Thermostat Part Number: 83501426AD
Product Specifications- Other Name: Thermostat - Engine Coolant; Engine Coolant Thermostat
- Replaces: 83501426AC, 52001797


Jeep Thermostat Part Number: 5142601AA
Product Specifications- Other Name: Thermostat - Engine Coolant
| Page 1 of 2 |Next >
1-20 of 23 Results
Jeep Thermostat
OEM parts sourced directly from Jeep deliver superior quality, long lasting strength, and a precise fit you can trust. Each item goes through strict quality checks to ensure safety, toughness, and performance that matches your factory equipment. At JeepPartsDeal online shop, you'll get top-quality, budget-friendly OEM Jeep Thermostat for your vehicle. We focus on giving you a high standard without pushing up the price. Our full selection of genuine factory products comes backed by the original manufacturer's warranty. You'll love our fast delivery, seamless shopping experience, and convenient return policy, saving you all the hassle.
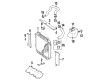
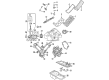
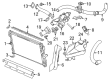
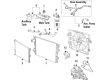
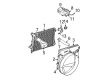
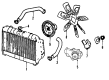
Jeep Thermostat maintains engine temperatures and enables power to remain high even when pavements come to an end. In 1945, Jeep established its image on boxy steel and open-air freedom, which challenged drivers to abandon the mapped roads and rely on mechanical grit. Jeep thrill seekers are fond of the Selec-Terrain dial which allows them to twist between snow and sand in a few moments, traction systems piercing the surface that seems to be present. Jeep cabins are now combining washable floor mats with slick touchscreens, voice command, over-the-air updates and driver aids that keep an eye on the blind spots but never make the adventure dull. Loyalty is increased due to the fact that the owners exchange trail tips, discuss stories in campfires and rejoice in a vehicle that seems their passport to anywhere. The Thermostat is mounted close to the radiator and opens and closes flow paths within a closed-loop circuit as coolant reaches approximately 195 °F and closes when temperature decreases to keep the engine operating at its optimum efficiency range and to eliminate the possibility of metal fatigue and vapor pockets. The development of Thermostats started with simple bimetal strips to wax pellet Thermostats which expand with heat and are able to move the valves without jerky bursts of coolant on steep ascents, jamming in the city, and during idle periods. The Thermostat variants have standardized housings and ports to ensure that they fit in many powertrains in the range to provide drivers with uniform warmth in winter and coolant calmness under load in summer during towing heavy trailers. The Jeep Thermostat is crucial for maintaining optimal engine performance.
Jeep Thermostat Parts and Q&A
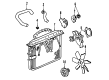
- Q: How to Maintain and Fix a Thermostat on Jeep Cherokee?A:Before servicing or repairing the thermostat, check that the radiator draincock is not loose while the system is under pressure or you could suffer serious burns by coolant leaking from the system. Remove all the coolant from the radiator, stopping when it goes below the thermostat housing and save any unused coolant you find clean. Apply special attention by using only clamp tools designed for constant tension hose clamps such as 6094 or HPC-20 for larger clamps and always use safety glasses while working. Should you have to replace the clamps for constant tension, get ones that have the same identifier as the stamped letter or number you find on the inside curve of the tongue. Unhook the upper hose and the heater hose from the thermostat housing, unplug the wiring connector on the engine coolant temperature sensor and remove the bolts that secure the thermostat housing. Afterward, unfasten the thermostat housing, gasket and thermostat, throwing away the old gasket. Making sure the pellet of the replacement thermostat faces the engine, clean the mating surfaces and ensure the flange's arrow and air bleed hole line up in the recess groove in the engine cylinder head. Secure the gasket and thermostat housing in place, tightening everything evenly so the housing does not crack and adjust the bolts to 20 Nm (15 ft. lbs.). Plug the hoses back on to both the thermostat housing and the coolant temperature sensor. After seating the radiator draincock, carefully fill the cooling system to the right level with your coolant. Engine readiness checks should include turning on and warming the engine and looking for signs of leaks.
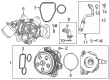
- Q: How to Install a Thermostat for a 3.8L Engine on Jeep Wrangler?A:To install engine coolant thermostat for 3.8L engine, the thermostat has to be positioned in the thermostat housing. Then start the thermostat housing and thermostat assembly to the intake manifold and tighten its bolts to 28 Nm (250 in. lbs.). Throttle body electrical connector and attach radiator upper hose to thermostat housing. Connect the negative battery cable and refill cooling system to correct level. Finally, you are going to install the air filter housing, as prescribed by the applicable service procedures.
")

Related Jeep Parts
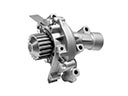 Jeep Water Pump
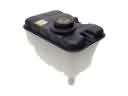 Jeep Coolant Reservoir
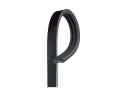 Jeep Serpentine Belt
 Jeep Radiator Cap
 Jeep Radiator Hose
 Jeep Water Pump Gasket
 Jeep Water Pump Pulley
 Jeep Coolant Pipe
 Jeep Coolant Reservoir Hose
 Jeep Cooling Fan Resistors
 Jeep Cooling Hose
 Jeep Water Hose