JeepParts
My Garage
My Account
Cart
OEM 2000 Dodge Durango Clock Spring
Spiral Cable Clock Spring- Select Vehicle by Model
- Select Vehicle by VIN
Select Vehicle by Model
orMake
Model
Year
Select Vehicle by VIN
For the most accurate results, select vehicle by your VIN (Vehicle Identification Number).
2 Clock Springs found


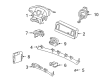
2000 Dodge Durango Clockspring Part Number: 56045455AH
$256.06 MSRP: $377.00You Save: $120.94 (33%)Ships in 1-3 Business DaysProduct Specifications- Other Name: Air Bag Clockspring
- Replaces: 56045455AC, 56020038AD, 56045455AA, 56045455AG, 56045455AE, 56045455AD
- Item Weight: 0.90 Pounds
- Item Dimensions: 4.8 x 4.2 x 2.0 inches
- Condition: New
- Fitment Type: Direct Replacement
- SKU: 56045455AH
- Warranty: This genuine part is guaranteed by Mopar's factory warranty.
2000 Dodge Durango Clockspring Part Number: 56045456AG
Product Specifications- Other Name: Air Bag Clockspring
- Replaces: 56045456AC, 56045456AE, 56045456AD, 56045553AA
- Item Weight: 1.00 Pounds
- Item Dimensions: 6.5 x 6.3 x 3.4 inches
- Condition: New
- Fitment Type: Direct Replacement
- SKU: 56045456AG
- Warranty: This genuine part is guaranteed by Mopar's factory warranty.
2000 Dodge Durango Clock Spring Parts and Q&A
- Q: Is Your Clock Spring Faulty or Damaged, and What Steps Should You Take on 2000 Dodge Durango?A: A Clock Spring needs to be changed if it does not work or if the driver's air bag has been used, since fixing it is not possible. Do not begin work on air bag components or the air bag system until you have disconnected the battery negative cable, waited for two minutes and checked that the capacitor is empty. First, straighten the front wheels and then take off the driver side air bag module from the steering wheel. Should the vehicle be so equipped, take off the upper Clock Spring wire harness connectors from the speed control and remote radio switches inside the steering wheel cavity. With the armature removed, fit a steering wheel puller (Special Tool C-3428-B) over the spline of the upper steering shaft and use it to pull the steering wheel off. Then, pull away the cover at the top of the steering wheel and, if needed, unscrew the lever for the tilt steering column. Start by taking off both upper and lower shrouds from the steering column, then the lower fixed column shroud. Tighten or untighten the multi-function switch to the steering column lock housing by removing the two tamper-proof mounting screws with a Snap On tamper-proof Torx bit TTXR20B2 or a similar version. Take hold of the multi-function switch and carefully pull it away to access the Clock Spring assembly area, after which remove the lower Clock Spring connector from the instrument panel wire harness and the lower Clock Spring connector from the wire harness for the instrument panel. Get rid of the plastic latches with a small screwdriver before taking the Clock Spring out to avoid damage to the Clock Spring's hinges. To install, check that the Clock Spring is centered; all service replacement Clock Springs have tape covering the auto-locking tabs which should stay on until you attach them. Center the Clock Spring over the upper shaft of the steering column after which slide it forward and let the latches catch the receptacles. Realign the two clips on the lower Clock Spring wire harness connector with the locator on the instrument panel harness and then plug the instrument panel connector into the lower Clock Spring receptacle. Lay the multi-function switch at the bottom of the steering column lock housing and use two screws at 2 Nm (17 in. lbs.) to hold it in place. The next step is to place the shrouds on the steering column, making certain the lower wire harness is routed inside and then set in the cover for the opening. Attach the steering wheel to the upper shaft, making sure the flat areas on its hub fit into the shapes inside the Clock Spring hub and pull each Clock Spring wire harness through the holes between the steering wheel's back cover and the armature. Tighten the wheel mount nut to 61 Nm (45 ft. lbs.) and keep an eye out for wires as you do so. If the vehicle has these components, reconnect the wire harness to the vehicle speed control or remote radio switch, securely route the wires and place the tilt steering column lever in its proper place if one exists. The last step is to install the driver side air bag module onto the steering wheel.
Related 2000 Dodge Durango Parts
 2000 Dodge Durango Headlight Switch
 2000 Dodge Durango Brake Light Switch
 2000 Dodge Durango Ignition Switch
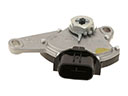 2000 Dodge Durango Neutral Safety Switch
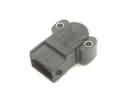 2000 Dodge Durango Throttle Position Sensor
 2000 Dodge Durango Air Bag
 2000 Dodge Durango Air Bag Control Module
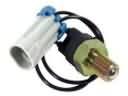 2000 Dodge Durango Back Up Light Switch
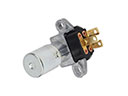 2000 Dodge Durango Dimmer Switch
 2000 Dodge Durango Ignition Lock Assembly
 2000 Dodge Durango Ignition Lock Cylinder
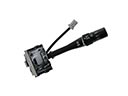 2000 Dodge Durango Wiper Switch