JeepParts
My Garage
My Account
Cart
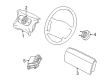
OEM Dodge Durango Clock Spring
Spiral Cable Clock Spring- Select Vehicle by Model
- Select Vehicle by VIN
Select Vehicle by Model
orMake
Model
Year
Select Vehicle by VIN
For the most accurate results, select vehicle by your VIN (Vehicle Identification Number).
23 Clock Springs found


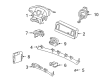
Dodge Durango Clockspring Part Number: 56045455AH
$256.06 MSRP: $377.00You Save: $120.94 (33%)Ships in 1-3 Business Days


Dodge Durango Multifunction Switch, Beige/Black Part Number: 1HE78DX9AO
$468.31 MSRP: $683.00You Save: $214.69 (32%)
Dodge Durango Multifunction Switch, Black Part Number: 5VN54DX9AC
$364.11 MSRP: $531.00You Save: $166.89 (32%)Ships in 1-3 Business Days
Dodge Durango Clockspring, Beige Part Number: 1HE80XTWAH
$392.74 MSRP: $573.00You Save: $180.26 (32%)Ships in 1-3 Business DaysDodge Durango Multifunction Switch, Black Part Number: 7HJ36DX9AA
$408.77 MSRP: $597.00You Save: $188.23 (32%)Ships in 1-3 Business DaysDodge Durango Multifunction Switch, Black Part Number: 7HJ37DX9AA
$423.65 MSRP: $619.00You Save: $195.35 (32%)Ships in 1-3 Business DaysDodge Durango Multifunction Switch, Black Part Number: 7HJ39DX9AA
$438.54 MSRP: $638.00You Save: $199.46 (32%)Ships in 1-3 Business DaysDodge Durango Combination Switch, Black Part Number: 5VN55DX9AE
$492.35 MSRP: $718.00You Save: $225.65 (32%)Dodge Durango Multifunction Switch, Beige/Black Part Number: 1HE79DX9AN
$503.80 MSRP: $735.00You Save: $231.20 (32%)Dodge Durango Multifunction Switch, Black Part Number: 5VN52DX9AE
$511.82 MSRP: $746.00You Save: $234.18 (32%)Dodge Durango Multifunction Switch, Black Part Number: 1HE80DX9AO
$546.17 MSRP: $796.00You Save: $249.83 (32%)Dodge Durango Multifunction Switch, Black Part Number: 5VN53DX9AE
$630.90 MSRP: $919.00You Save: $288.10 (32%)Ships in 1-2 Business Days
Dodge Durango Clockspring Part Number: 56045403AG
$501.32Ships in 1-2 Business Days


Dodge Durango Clockspring Part Number: 56049795AE
$226.60 MSRP: $334.00You Save: $107.40 (33%)


Dodge Durango Clockspring Part Number: R5082062AJ
Dodge Durango Multifunction Switch, Black Part Number: 7HJ38DX9AA
$383.58 MSRP: $560.00You Save: $176.42 (32%)Dodge Durango Multifunction Switch, Black Part Number: 1NJ71DX9AK
$435.10 MSRP: $635.00You Save: $199.90 (32%)
Dodge Durango Module - Steering Column Part Number: 1HE79XTWAN
$441.97 MSRP: $645.00You Save: $203.03 (32%)Dodge Durango Multifunction Switch, Beige/Gray Part Number: 1HE78XTWAO
$447.70 MSRP: $653.00You Save: $205.30 (32%)Dodge Durango Multifunction Switch, Black Part Number: 1NJ72DX9AK
$582.81 MSRP: $850.00You Save: $267.19 (32%)
| Page 1 of 2 |Next >
1-20 of 23 Results
Dodge Durango Clock Spring
Choose OEM Clock Spring that meet Dodge factory standards. Dodge designs and tests every component for precision and durability. Each Clock Spring follows strict manufacturing steps to lock in quality and fit. If your Dodge Durango matters to you, OEM parts make the smart choice. You'll get the exact look, feel, and performance you expect. Shop genuine Durango parts at the highly competitive prices online. Enjoy a manufacturer's warranty, a hassle-free return policy, and rapid delivery. No more guesswork with off brands. Get genuine parts with exact fit and true factory performance. Shop with confidence today at JeepPartsDeal.com.
Dodge Durango Clock Spring Parts and Q&A
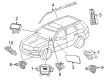
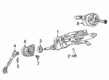
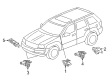
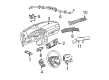
- Q: How to Remove the Clock Spring Assembly on Dodge Durango?A:Begin by turning off the SRS, disconnecting the negative battery cable and isolating it to make sure accidental air bag release does not happen while you work. For all cars with HEV, have a qualified specialist take off the high voltage service disconnect. Keep the car in forward gear and line up the front wheels straight. After that, remove the air bag from the Steering Wheel. Unplug the steering wheel wire harness connector from the two upper connectors on the Clock Spring. Removing the steering wheel, make sure that the screws from the steering wheel puller do not harm the Clock Spring. Following this, remove the screw that holds down the tilt steering column knob and pull it from the tilt actuator. Underneath the steering wheel, undo the two screws that hold the upper column shroud to the lower one and then push both sides of the upper shroud in gently to remove it. Before getting out the steering wheel, remove the upper shroud, release the centre screw and lift away the lower shroud. Take off both of these connectors from the two locations; make sure to also take off the numbered connector for the Steering Angle Sensor (SAS). Lift off the multi-function switch mounting housing by turning loose the two screws securing the Clock Spring to it and get rid of the Clock Spring as well. If there are plans to use the Clock Spring, fasten its rotor to the case so it stays central; otherwise, be sure to center the Clock Spring before returning it to the case.
- Q: How to Install a Clock Spring Assembly on Dodge Durango?A:The first step is to disconnect and isolate the battery's negative cable to deactivate the supplemental restraint system, so you can safely install the Clock Spring assembly after letting the capacitor discharge for about two minutes. Note that the Clock Spring has a pre-centered locking pin securely in place which should not be removed until assembly on the Steering Column. Always ensure that your front wheels are straight before you begin. Either hold the Clock Spring rotor and case in place or leave the plastic locking pin where it is and push the Clock Spring down over the steering column shaft. Place the hole in the locating tab on the Clock Spring case over the locating pin on the multi-function switch mounting housing and attach it with two screws, applying a torque of 2 Nm (20 in. lbs.) to each one. Bring the two instrument panel wire harness connectors back together and connect the Steering Angle Sensor (SAS) wire harness to its receptacle in the Clock Spring housing. Slide the lower shroud around the steering column and fix it with one center screw, tightening it to 2 Nm (20 in. lbs.). Stack the upper shroud on top of the lower one, making sure the gearshift lever gap hider is holding them together, then snap them together and hold them in place with two screws tightened to 2 Nm (20 in. lbs.). Set the screw of the knob to 2 Nm (20 in. lbs.) after attaching the tilt steering column knob to the tilt adjuster actuator. If you put in a new Clock Spring, remove the locking pin to help the clock keep its center. Before you fix the Steering Wheel in place, insert the dowel from the Clock Spring rotor between the two fins on the hub at the end of your steering wheel armature. Instead, reinstall the steering wheel, attach the steering wheel wire harness connectors correctly, place back the driver air bag and then connect the negative battery cable.


Related Dodge Durango Parts
 Dodge Durango Headlight Switch
 Dodge Durango Airbag
 Dodge Durango Brake Light Switch
 Dodge Durango Ignition Switch
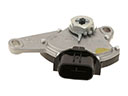 Dodge Durango Neutral Safety Switch
 Dodge Durango Air Bag Sensor
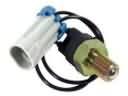 Dodge Durango Back Up Light Switch
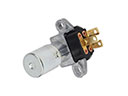 Dodge Durango Dimmer Switch
 Dodge Durango Ignition Lock Cylinder
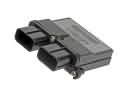 Dodge Durango Occupant Detection Sensor
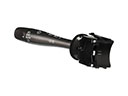 Dodge Durango Turn Signal Switch
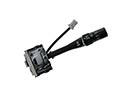 Dodge Durango Windshield Wiper Switch