JeepParts
My Garage
My Account
Cart
OEM 2000 Dodge Durango Evaporator
A/C Evaporator Core- Select Vehicle by Model
- Select Vehicle by VIN
Select Vehicle by Model
orMake
Model
Year
Select Vehicle by VIN
For the most accurate results, select vehicle by your VIN (Vehicle Identification Number).
1 Evaporator found

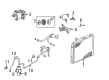
2000 Dodge Durango Evaporator Core, Front Part Number: 4885582AC
$382.64 MSRP: $534.00You Save: $151.36 (29%)Ships in 1-2 Business DaysProduct Specifications- Other Name: Evaporato - A/C Evaporator Core, Front; Repair Kit.
- Position: Front
- Replaces: 4885582AA, V9900012AB
- Item Weight: 4.80 Pounds
- Item Dimensions: 15.2 x 11.9 x 3.8 inches
- Condition: New
- Fitment Type: Direct Replacement
- SKU: 4885582AC
- Warranty: This genuine part is guaranteed by Mopar's factory warranty.
2000 Dodge Durango Evaporator Parts and Q&A
- Q: How to Replace the Rear Evaporator Core on 2000 Dodge Durango?A: When replacing the rear evaporator core, disconnect the car's negative battery cable and afterward retrieve all the refrigerant from the system. Take off the headliner in the passenger area and remove the nuts at the B-pillar refrigerant line fittings connected to the rear overhead A/C unit at the top. Afterwards, disconnect the fittings and put in plugs or tape over every opened refrigerant line at this stage. Untie the hoses connected to the B-pillar drain from the wye fitting in each side of the rear overhead A/C unit and remove all the nine screws securing the cover of the lower housing to the unit. The rear blower motor switch wire harness and connector can be brought out of the rear overhead A/C unit by unclipping the snap retainer on the bottom of the lower housing near the center on the outlet side and then removed through the hole in the right end of the lower housing cover. Take off the screw holding the rear overhead A/C refrigerant tube and overhead A/C block fitting retaining strap in the right rear corner of the upper housing cover. After that, remove the two screws securing the rear evaporator coil to the upper housing cover and pick out the rear evaporator coil. Secure the new rear evaporator coil to the overhead rear A/C unit using two screws fastened to 2.2 Nm (20 in. lbs.). The rear overhead A/C refrigerant tube and block fitting should be fitted next and the retaining strap's screw should be tightened to 2.2 Nm (20 in. lbs.) still. Route the rear blower switch wire harness and connector cable through the hole in the lower housing cover, placing it on the body and checking that the snap retainer has clicked into place. Then secure the cover in place with the nine screws tightened to 2.2 Nm (20 in. lbs.). Screw the B-pillar drain hoses into the wye fittings, take off the tape or plugs from the block fittings and fit the B-pillar refrigerant line block fittings onto the studs of the rear overhead A/C unit, tightening the mounting nuts to 11.3 Nm (100 in. lbs.). Place the headliner back in position, attach the battery negative connector, eliminate the remaining gas from the system and charge it. Upon replacing both the rear evaporator coil and expansion valve, include 30 ml (1 fluid ounce) of oil for the system's refrigerant, as recommended by the manufacturer and fill it with the recommended oil type.
Related 2000 Dodge Durango Parts
 2000 Dodge Durango Blend Door Actuator
 2000 Dodge Durango Heater Core
 2000 Dodge Durango Blower Motor Resistor
 2000 Dodge Durango A/C Accumulator
 2000 Dodge Durango A/C Compressor
 2000 Dodge Durango A/C Compressor Cut-Out Switches
 2000 Dodge Durango A/C Condenser
 2000 Dodge Durango A/C Hose
 2000 Dodge Durango A/C Switch
 2000 Dodge Durango A/C System Valve Core
 2000 Dodge Durango Blower Control Switches
 2000 Dodge Durango HVAC Pressure Switch