JeepParts
My Garage
My Account
Cart
OEM 2003 Jeep Wrangler Wiper Switch
Windshield Wiper Switch- Select Vehicle by Model
- Select Vehicle by VIN
Select Vehicle by Model
orMake
Model
Year
Select Vehicle by VIN
For the most accurate results, select vehicle by your VIN (Vehicle Identification Number).
2 Wiper Switches found


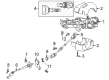
2003 Jeep Wrangler Rear Wiper Switch Part Number: 56007249
Product Specifications- Other Name: Switch - Windshield Wiper; Back Glass Wiper Switch; Windshield Washer Switch; Front Wiper Switch; Switch; Switch Windshield Wiper
- Item Weight: 0.50 Pounds
- Item Dimensions: 3.5 x 2.5 x 2.1 inches
- Condition: New
- Fitment Type: Direct Replacement
- SKU: 56007249
- Warranty: This genuine part is guaranteed by Mopar's factory warranty.

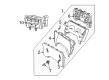
2003 Jeep Wrangler Wiper Switch Part Number: 5016711AB
Product Specifications- Other Name: Switch - Intermittent Wiper; Windshield Washer Switch; Front Wiper Switch; Switch Intermittent Wiper Right Stalk Includes Windshield Washer & Wiper Functions
- Item Weight: 1.10 Pounds
- Item Dimensions: 9.6 x 5.0 x 2.8 inches
- Condition: New
- Fitment Type: Direct Replacement
- SKU: 5016711AB
- Warranty: This genuine part is guaranteed by Mopar's factory warranty.
2003 Jeep Wrangler Wiper Switch Parts and Q&A
- Q: What is the Role of the Wiper Switch in Servicing the Right Multi-Function Switch on 2003 Jeep Wrangler?A: Shut off the supplemental restraint system first by unhooking and isolating the negative battery cable and after two minutes, the system capacitor will be safe to handle. Lift off the cover on top of the steering column, then from below the steering wheel, remove the two screws joining the upper and lower shrouds. With a tilt steering column, push the column up to its lowest position and hold the release lever in the un clicked setting. Unplug the left and right multi-function switch connectors from the two harness receptacles after removing both the upper and lower shroud. Raise the steering wheel by turning it until you see the multi-function switch assembly. Then, unlock the two screws securing it and remove it. Then, remove the two small screws on the right side of the multi-function switch, grab the control stalk and gently move the switch to the right so the alignment pins come out. First, set the right multi-function switch over the left multi-function switch mounting housing so that the alignment pins are properly in place and then attach it with two small screws tightened to 2 N.m (20 in. lbs.). Before the multi-function switch installation, be sure to put the left switch control stalk to neutral and pull back the turn signal cancel actuator. Place the multi-function switch assembly onto the upper steering housing and attach it with two screws tightened to 2 N.m (20 in. lbs.). Place the body wire harness connectors back into both multi-function switches and line up the upper and lower shrouds with the steering column by connecting the locating tabs. On the lower side of the steering column, attach and fix the two screws that hold the lower shroud to the upper shroud with 2 N.m (18 in. lbs.) force. If the car has a tilt steering column, rotate it all the way up and lock it tightly. After that, place the steering column opening cover back and attach the negative battery cable.
Related 2003 Jeep Wrangler Parts
 2003 Jeep Wrangler Clock Spring
 2003 Jeep Wrangler Ignition Switch
 2003 Jeep Wrangler Headlight Switch
 2003 Jeep Wrangler Brake Light Switch
 2003 Jeep Wrangler Dimmer Switch
 2003 Jeep Wrangler Fuel Pump Relay
 2003 Jeep Wrangler Ignition Lock Cylinder
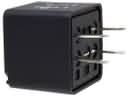 2003 Jeep Wrangler Relay
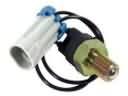 2003 Jeep Wrangler Back Up Light Switch
 2003 Jeep Wrangler Door Jamb Switch
 2003 Jeep Wrangler Ignition Lock Assembly
 2003 Jeep Wrangler Intake Manifold Temperature Sensor