JeepParts
My Garage
My Account
Cart
OEM 2005 Chrysler Pacifica A/C Expansion Valve
Air Conditioning Expansion Valve- Select Vehicle by Model
- Select Vehicle by VIN
Select Vehicle by Model
orMake
Model
Year
Select Vehicle by VIN
For the most accurate results, select vehicle by your VIN (Vehicle Identification Number).
1 A/C Expansion Valve found

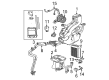
2005 Chrysler Pacifica Expansion Valve, Front Part Number: 5136101AB
$170.83 MSRP: $285.00You Save: $114.17 (41%)Ships in 1-2 Business DaysProduct Specifications- Other Name: Valve - A/C Expansion; A/C Expansion Valve, Front; Valve Kit A/C Expansion; Valve Kit Expansion; A/C Expansion Valve
- Position: Front
- Item Weight: 1.20 Pounds
- Item Dimensions: 2.4 x 4.4 x 5.3 inches
- Condition: New
- Fitment Type: Direct Replacement
- SKU: 5136101AB
- Warranty: This genuine part is guaranteed by Mopar's factory warranty.
2005 Chrysler Pacifica A/C Expansion Valve Parts and Q&A
- Q: How to Service and Repair an A/C Expansion Valve on 2005 Chrysler Pacifica?A: Before you begin service or repair on the A/C expansion valve, remove the refrigerant and loosen the negative battery cable. Remove the housing on the air cleaner, the inlet tube and the drain tube from the end of the wiper module. Remove the wire harness connector from the A/C pressure transducer and take off the screw fixing the liquid line to the receiver/drier outlet, then separate the liquid line, but throw away the seal. Place tape or a plug over both the open liquid line fitting and the receiver/drier outlet port. Unfasten the nut holding the suction and liquid lines to the expansion valve, then separate these pipes and throw out the seals. Disconnect the HVAC wire harness from the evaporater temperature device, unscrew the A/C expansion valve from the evaporater tube tapping plate, remove the expansion valve and throw away the seals from the fittings on the evaporator tube while closing or covering these openings. Should you need to work on the valve, take out the retaining screw and the evaporator temperature sensor. If you removed the evaporator temperature sensor during installation, install it back with the retaining screw. Free the evaporator inlet and outlet from any tape or plugs and remove the connections at both ports of the A/C expansion valve on its back. Lubricate the new rubber O-ring seals with clean refrigerant oil, put them on the evaporator inlet and outlet tubing and secure the A/C expansion valve to those fittings. Signal the wire harness to the evaporator temperature sensor and screw the valve tight using the two screws to a torque of 97 in. lbs. Lift off the tape or plugs from the back liquid line rear and suction line fittings, both front expansion valve ports and attach the rubber seals you have bought. Screw the A/C liquid line and suction line onto the expansion valve and tighten their nuts to 23 N.m (17 ft. lbs.). Remove the tape or plug from the liquid line rear fitting and receiver/outlet receiver, put clean oil on the new rubber O-ring seal and screw the liquid line fitting into the receiver/drier outlet port until tightened to 11 N.m (97 in. lbs.). To finish, hook up the wire harness to the A/C pressure sensor, put the drain tube back onto the wiper module, the air cleaner housing and air inlet tube, plus attach the negative battery cable, empty the system of refrigerant and fill it.
Related 2005 Chrysler Pacifica Parts
 2005 Chrysler Pacifica Cabin Air Filter
 2005 Chrysler Pacifica Blend Door Actuator
 2005 Chrysler Pacifica Blower Motor Resistor
 2005 Chrysler Pacifica A/C Accumulator
 2005 Chrysler Pacifica A/C Compressor
 2005 Chrysler Pacifica A/C Condenser
 2005 Chrysler Pacifica A/C Hose
 2005 Chrysler Pacifica A/C Switch
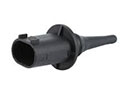 2005 Chrysler Pacifica Ambient Temperature Sensor
 2005 Chrysler Pacifica Blower Control Switches
 2005 Chrysler Pacifica Heater Core
 2005 Chrysler Pacifica HVAC Pressure Switch