JeepParts
My Garage
My Account
Cart
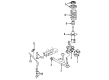
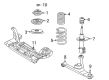
OEM 2006 Chrysler PT Cruiser Coil Springs
Strut Spring- Select Vehicle by Model
- Select Vehicle by VIN
Select Vehicle by Model
orMake
Model
Year
Select Vehicle by VIN
For the most accurate results, select vehicle by your VIN (Vehicle Identification Number).
42 Coil Springs found


2006 Chrysler PT Cruiser Coil Spring, Rear Part Number: 4656542AC
$56.28 MSRP: $89.20You Save: $32.92 (37%)Ships in 1-2 Business DaysProduct Specifications- Other Name: Spring - Rear Coil; Coil Spring, Rear; Coil Springs; Spring; Spring Rear Coil
- Position: Rear
- Replaces: 4656542AB
- Item Weight: 6.60 Pounds
- Item Dimensions: 13.9 x 6.4 x 5.4 inches
- Condition: New
- Fitment Type: Direct Replacement
- SKU: 4656542AC
- Warranty: This genuine part is guaranteed by Mopar's factory warranty.

2006 Chrysler PT Cruiser Coil Spring, Front Part Number: 4656529AD
$4.56 MSRP: $84.55You Save: $79.99 (95%)Ships in 1-2 Business DaysProduct Specifications- Other Name: Spring - Front Suspension Coil; Coil Spring, Front; Coil Springs
- Position: Front
- Replaces: 4656529AC
- Item Weight: 6.90 Pounds
- Item Dimensions: 15.7 x 7.2 x 7.4 inches
- Condition: New
- Fitment Type: Direct Replacement
- SKU: 4656529AD
- Warranty: This genuine part is guaranteed by Mopar's factory warranty.
2006 Chrysler PT Cruiser Spring, Front Part Number: 4656529AE
$15.24 MSRP: $96.60You Save: $81.36 (85%)Ships in 1-2 Business DaysProduct Specifications- Other Name: Spring - Front Coil; Coil Springs
- Position: Front
- Item Weight: 7.20 Pounds
- Item Dimensions: 15.6 x 7.3 x 7.2 inches
- Condition: New
- Fitment Type: Direct Replacement
- SKU: 4656529AE
- Warranty: This genuine part is guaranteed by Mopar's factory warranty.
2006 Chrysler PT Cruiser Coil Spring, Front Part Number: 4656526AF
$19.54 MSRP: $61.95You Save: $42.41 (69%)Ships in 1-2 Business DaysProduct Specifications- Other Name: Spring - Front Coil; Coil Spring, Front; Coil Springs; Spring
- Position: Front
- Replaces: 4656526AC, 4656526AD, 4656526AE
- Item Weight: 6.40 Pounds
- Item Dimensions: 14.8 x 7.4 x 7.4 inches
- Condition: New
- Fitment Type: Direct Replacement
- SKU: 4656526AF
- Warranty: This genuine part is guaranteed by Mopar's factory warranty.
2006 Chrysler PT Cruiser Coil Spring, Rear Part Number: 4656543AC
$46.60 MSRP: $66.85You Save: $20.25 (31%)Ships in 1-2 Business DaysProduct Specifications- Other Name: Spring - Rear Coil; Coil Spring, Rear; Coil Springs; Spring; Spring Rear Coil
- Position: Rear
- Replaces: 4656543AB
- Item Weight: 6.70 Pounds
- Condition: New
- Fitment Type: Direct Replacement
- SKU: 4656543AC
- Warranty: This genuine part is guaranteed by Mopar's factory warranty.
2006 Chrysler PT Cruiser Coil Spring, Front Part Number: 4656527AD
Product Specifications- Other Name: Spring - Front Coil; Coil Spring, Front; Coil Spring Kit Front; Coil Spring Set; Coil Springs; Spring; Spring Front Coil
- Position: Front
- Replaces: 4656527AC
- Item Weight: 6.70 Pounds
- Item Dimensions: 15.0 x 7.2 x 7.0 inches
- Condition: New
- Fitment Type: Direct Replacement
- SKU: 4656527AD
- Warranty: This genuine part is guaranteed by Mopar's factory warranty.
2006 Chrysler PT Cruiser Coil Spring, Front Part Number: 4656528AD
Product Specifications- Other Name: Spring - Front Coil; Coil Spring, Front; Coil Springs; Spring; Spring Front Coil
- Position: Front
- Replaces: 4656528AC
- Item Weight: 6.70 Pounds
- Item Dimensions: 15.3 x 7.4 x 7.7 inches
- Condition: New
- Fitment Type: Direct Replacement
- SKU: 4656528AD
- Warranty: This genuine part is guaranteed by Mopar's factory warranty.
2006 Chrysler PT Cruiser Coil Spring, Rear Part Number: 4656541AC
Product Specifications- Other Name: Spring - Rear Coil; Coil Spring, Rear; Coil Springs; Spring; Spring Rear Coil
- Position: Rear
- Replaces: 4656541AB
- Item Weight: 6.60 Pounds
- Item Dimensions: 14.1 x 5.2 x 5.2 inches
- Condition: New
- Fitment Type: Direct Replacement
- SKU: 4656541AC
- Warranty: This genuine part is guaranteed by Mopar's factory warranty.
2006 Chrysler PT Cruiser Coil Spring, Rear Part Number: 5272454AB
Product Specifications- Other Name: Spring - Rear Coil; Coil Spring, Rear; Coil Springs; Spring; Spring Rear Coil
- Position: Rear
- Item Weight: 7.10 Pounds
- Item Dimensions: 15.0 x 4.8 x 4.9 inches
- Condition: New
- Fitment Type: Direct Replacement
- SKU: 5272454AB
- Warranty: This genuine part is guaranteed by Mopar's factory warranty.
2006 Chrysler PT Cruiser Coil Spring, Front Part Number: 5105057AB
Product Specifications- Other Name: Spring - Front Suspension Coil; Coil Spring, Front; Coil Springs; Spring; Spring Front Suspension Coil
- Position: Front
- Item Weight: 7.70 Pounds
- Item Dimensions: 13.9 x 4.1 x 4.1 inches
- Condition: New
- Fitment Type: Direct Replacement
- SKU: 5105057AB
- Warranty: This genuine part is guaranteed by Mopar's factory warranty.
2006 Chrysler PT Cruiser Coil Spring, Front Part Number: 5272467AC
Product Specifications- Other Name: Spring - Front Coil; Coil Spring, Front; Coil Spring Kit Front; Coil Spring Set; Coil Springs; Spring Front Suspension Coil
- Position: Front
- Replaces: 5272467AD
- Item Weight: 7.40 Pounds
- Condition: New
- Fitment Type: Direct Replacement
- SKU: 5272467AC
- Warranty: This genuine part is guaranteed by Mopar's factory warranty.
2006 Chrysler PT Cruiser Coil Spring, Front Part Number: 4656524AE
Product Specifications- Other Name: Spring - Front Coil; Coil Spring, Front; Coil Springs; Spring; Spring Front Coil
- Position: Front
- Replaces: 4656524AC, 4656524AD
- Item Weight: 6.30 Pounds
- Item Dimensions: 14.6 x 4.1 x 4.1 inches
- Condition: New
- Fitment Type: Direct Replacement
- SKU: 4656524AE
- Warranty: This genuine part is guaranteed by Mopar's factory warranty.


2006 Chrysler PT Cruiser Coil Spring, Rear Part Number: 5272882AA
Product Specifications- Other Name: Spring - Rear Coil; Coil Spring, Rear; Coil Springs; Spring; Spring Rear Coil
- Position: Rear
- Item Weight: 6.80 Pounds
- Item Dimensions: 14.6 x 5.2 x 5.2 inches
- Condition: New
- Fitment Type: Direct Replacement
- SKU: 5272882AA
- Warranty: This genuine part is guaranteed by Mopar's factory warranty.
2006 Chrysler PT Cruiser Coil Spring, Front Part Number: 4656525AE
Product Specifications- Other Name: Spring - Front Coil; Coil Spring, Front; Coil Spring Front; Coil Springs; Spring; Spring Front Coil
- Position: Front
- Replaces: 4656525AC, 4656525AD
- Item Weight: 6.90 Pounds
- Item Dimensions: 14.1 x 7.5 x 7.2 inches
- Condition: New
- Fitment Type: Direct Replacement
- SKU: 4656525AE
- Warranty: This genuine part is guaranteed by Mopar's factory warranty.
2006 Chrysler PT Cruiser Coil Spring, Front Part Number: 5272462AD
Product Specifications- Other Name: Spring - Front Suspension Coil; Coil Spring, Front; Coil Springs
- Position: Front
- Replaces: 5272462AC
- Item Weight: 6.60 Pounds
- Condition: New
- Fitment Type: Direct Replacement
- SKU: 5272462AD
- Warranty: This genuine part is guaranteed by Mopar's factory warranty.
2006 Chrysler PT Cruiser Coil Spring, Front Part Number: 5272463AD
Product Specifications- Other Name: Spring - Front Suspension Coil; Coil Spring, Front; Coil Springs
- Position: Front
- Replaces: 5272463AC
- Item Weight: 6.50 Pounds
- Condition: New
- Fitment Type: Direct Replacement
- SKU: 5272463AD
- Warranty: This genuine part is guaranteed by Mopar's factory warranty.
2006 Chrysler PT Cruiser Coil Spring, Front Part Number: 5105053AB
Product Specifications- Other Name: Spring - Front Suspension Coil; Coil Spring, Front; Coil Springs; Spring; Spring Front Suspension Coil
- Position: Front
- Item Weight: 6.60 Pounds
- Condition: New
- Fitment Type: Direct Replacement
- SKU: 5105053AB
- Warranty: This genuine part is guaranteed by Mopar's factory warranty.
2006 Chrysler PT Cruiser Coil Spring, Front Part Number: 5272464AD
Product Specifications- Other Name: Spring - Front Suspension Coil; Coil Spring, Front; Coil Springs
- Position: Front
- Replaces: 5272464AC
- Item Weight: 7.00 Pounds
- Condition: New
- Fitment Type: Direct Replacement
- SKU: 5272464AD
- Warranty: This genuine part is guaranteed by Mopar's factory warranty.
2006 Chrysler PT Cruiser Coil Spring, Rear Part Number: 5272883AA
Product Specifications- Other Name: Spring - Rear Coil; Coil Spring, Rear; Coil Springs; Spring; Spring Rear Coil
- Position: Rear
- Item Weight: 7.00 Pounds
- Item Dimensions: 14.2 x 5.5 x 5.4 inches
- Condition: New
- Fitment Type: Direct Replacement
- SKU: 5272883AA
- Warranty: This genuine part is guaranteed by Mopar's factory warranty.
2006 Chrysler PT Cruiser Coil Spring, Front Part Number: 5105056AB
Product Specifications- Other Name: Spring - Front Suspension Coil; Coil Spring, Front; Coil Springs; Spring; Spring Front Suspension Coil
- Position: Front
- Item Weight: 7.60 Pounds
- Condition: New
- Fitment Type: Direct Replacement
- SKU: 5105056AB
- Warranty: This genuine part is guaranteed by Mopar's factory warranty.
| Page 1 of 3 |Next >
1-20 of 42 Results
2006 Chrysler PT Cruiser Coil Springs Parts and Q&A
- Q: How to Service and Repair Coil Springs on 2006 Chrysler PT Cruiser?A: Before trying to service or repair the coil spring, raise and brace the vehicle, remove the nuts on the wheel mounts and then take out the back wheels and tires on both sides. Then, get rid of the bolt, nut and washer connecting the watts link bell crank to the center of the axle. Should a rear stabilizer bar exist, loosen the bolt attaching the stabilizer bar cushion retainer to the rear axle on both sides, so that the bar hangs down unfastened. Place a transmission jack on the axle's center, then lift it up to help the axle stay steady. Remove both the lower bolt, nut and washer bolting the shock absorber to the axle on both sides, then lower the jack enough to take out the coil springs and rubber isolators. At installation time, put a rubber isolator on both ends of the coil springs, so that the rubber fingers go around the coil and the rubber abutment rests against the flat side of the spring. Lay the coil springs above the axle spring perches so their shape fits properly with the body. Turn all spring coils around the axle so that the flat end of each upper spring coil comes to rest on the line centered on the axle beam and both ends of the upper coils are to the outward side of the car. Hold the car body into the air by the jack and move the coil springs into the spring mounting brackets. Continue raising the body until the shock absorber lower mounting bolts can be placed through the axle brackets and mounting eyes. Put washers with nuts on each shock absorber lower mounting bolt and tighten them to 88 Nm. After taking out the jack, join the lower ends of the stabilizer bar cushion retainers onto the slots in the axle at the rear if there's a rear stabilizer bar. Pull the retainers upward and attach the opposite end of the retainers to the mounting bolts, tightening both to 61 Nm. While attaching the watts links and bell crank to the axle, keep the bell crank upright with "BACK UP" visible from behind the axle. Connect the central part of the axle to the end of the watts link bell crank bolt, add a washer and nut and tighten to 149 Nm. At last, fasten both sides, tightening the wheel mounting nuts to 135 Nm and make sure the vehicle curb height is within range after lowering the entire vehicle.
Related 2006 Chrysler PT Cruiser Parts
 2006 Chrysler PT Cruiser Wheel Bearing
 2006 Chrysler PT Cruiser Control Arm
 2006 Chrysler PT Cruiser Ball Joint
 2006 Chrysler PT Cruiser Bump Stop
 2006 Chrysler PT Cruiser Coil Spring Insulator
 2006 Chrysler PT Cruiser Shock Absorber
 2006 Chrysler PT Cruiser Shock And Strut Mount
 2006 Chrysler PT Cruiser Spindle
 2006 Chrysler PT Cruiser Steering Knuckle
 2006 Chrysler PT Cruiser Sway Bar Bracket
 2006 Chrysler PT Cruiser Sway Bar Bushing
 2006 Chrysler PT Cruiser Sway Bar Kit