JeepParts
My Garage
My Account
Cart
OEM 2006 Dodge Durango Dimmer Switch
Light Dimmer Switch- Select Vehicle by Model
- Select Vehicle by VIN
Select Vehicle by Model
orMake
Model
Year
Select Vehicle by VIN
For the most accurate results, select vehicle by your VIN (Vehicle Identification Number).
2 Dimmer Switches found

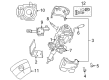
2006 Dodge Durango Multifunction Switch Part Number: 56044802AC
$211.12 MSRP: $318.00You Save: $106.88 (34%)Ships in 1-2 Business DaysProduct Specifications- Other Name: Switch - Multifunction; Turn Signal & Combination Lever; Combination Switch; Multi Purpose Switch; Switch Multifunction
- Replaces: 56044802AB
- Item Weight: 1.00 Pounds
- Item Dimensions: 11.4 x 5.8 x 3.6 inches
- Condition: New
- Fitment Type: Direct Replacement
- SKU: 56044802AC
- Warranty: This genuine part is guaranteed by Mopar's factory warranty.


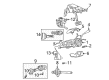
2006 Dodge Durango Turn Signal Switch Part Number: 56049823AB
Product Specifications- Other Name: Switch - Multifunction; Turn Signal & Combination Lever; Steering Column Switch; Air Bag Clockspring.; Multifunction Switch; Switch Housing; Ignition Housing; Clockspring; Switch Multifunction
- Replaces: 56045515AA, 56049823AA, 56045165AB
- Item Weight: 1.00 Pounds
- Item Dimensions: 4.0 x 5.6 x 11.2 inches
- Condition: New
- Fitment Type: Direct Replacement
- SKU: 56049823AB
- Warranty: This genuine part is guaranteed by Mopar's factory warranty.
2006 Dodge Durango Dimmer Switch Parts and Q&A
- Q: How to Service and Repair a Dimmer Switch on 2006 Dodge Durango?A: Before repairing or servicing the combination switch, cut the cable from the negative battery terminal. After that, stop the supplemental restraint system by letting its capacitor discharge for two minutes while the battery cable is disconnected. Removal should start by unplugging the steering wheel wire harness from the upper Clock Spring connector receptacles and taking out the driver air bag from the steering wheel. Make sure the screws on the steering wheel puller are tight so that you avoid scratching or otherwise hurting the Clock Spring. Once the steering wheel is away, pull the tilt steering column knob straight toward the back to get it off the tilt adjustment lever. Below the steering wheel, loosen the two outboard screws securing the upper shroud to the lower shroud. After that, press down on the two sides of the upper shroud to pop it loose. First, unhook the upper shroud, then remove the screw in the middle holding the lower shroud to the steering tube and finally take off the lower shroud. Separate the wire harness connector from the back of the switch,and get rid of the two screws that hold the switch on its mounting housing. Turn the switch control stalk to the left to remove the steering column. First, slide the multi-function switch into the mounting housing and settle it so the alignment pins fit, then attach and tighten the two screws to 2 Nm (20 in. lbs.). Insert the wire harness that comes from the switch into the connector, fit the top shroud over the steering column and tighten the center screw to 2 Nm (20 in. lbs.). Put the upper shroud over the lower shroud, line up the holes in the gearshift lever gap hider, then press together and snap them. Set the upper shroud screws to 2 Nm (20 in. lbs.), then bring the tilt steering column knob parallel with the tilt adjustment lever and snap it back in. Once you have the steering wheel in place, line up the yellow rubber-booted dowel on the rotor's top with the two fingers of the steering wheel hub. Install the steering wheel, put on the steering wheel's wire harness connectors as you make sure they are all routed correctly and connect the steering wheel's negative cable to the driver's air bag.
Related 2006 Dodge Durango Parts
 2006 Dodge Durango Headlight Switch
 2006 Dodge Durango Antenna
 2006 Dodge Durango Brake Light Switch
 2006 Dodge Durango Ignition Switch
 2006 Dodge Durango Air Bag Control Module
 2006 Dodge Durango Air Bag Sensor
 2006 Dodge Durango Clock Spring
 2006 Dodge Durango Ignition Lock Assembly
 2006 Dodge Durango Ignition Lock Cylinder
 2006 Dodge Durango Relay
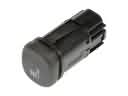 2006 Dodge Durango Seat Heater Switch
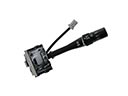 2006 Dodge Durango Wiper Switch