JeepParts
My Garage
My Account
Cart
OEM 2006 Dodge Durango Rod Bearing
Engine Connecting Rod Bearing- Select Vehicle by Model
- Select Vehicle by VIN
Select Vehicle by Model
orMake
Model
Year
Select Vehicle by VIN
For the most accurate results, select vehicle by your VIN (Vehicle Identification Number).
3 Rod Bearings found


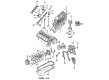
2006 Dodge Durango Connecting Rod Bearing Part Number: 68207790AA
$6.32 MSRP: $7.70You Save: $1.38 (18%)Product Specifications- Other Name: Bearing Package - Connecting Rod; Rod Bearing; Bearing; Bearings; Bearing Kit Connecting Rod Standard
- Replaces: 5086003AB
- Item Weight: 0.50 Pounds
- Item Dimensions: 3.8 x 2.6 x 1.8 inches
- Condition: New
- Fitment Type: Direct Replacement
- Require Quantity: 10
- SKU: 68207790AA
- Warranty: This genuine part is guaranteed by Mopar's factory warranty.


2006 Dodge Durango Bearings Part Number: 68052222AB
$18.13 MSRP: $26.80You Save: $8.67 (33%)Ships in 1-2 Business DaysProduct Specifications- Other Name: Bearing - Connecting Rod; Engine Connecting Rod Bearing Set; Connecting Rod Bearing Set; Rod Bearing; Bearing Kit Connecting Rod Standard See Note
- Replaces: 5019447AA, 68052222AA
- Item Weight: 0.50 Pounds
- Item Dimensions: 3.9 x 2.6 x 2.0 inches
- Condition: New
- Fitment Type: Direct Replacement
- Require Quantity: 6
- SKU: 68052222AB
- Warranty: This genuine part is guaranteed by Mopar's factory warranty.


2006 Dodge Durango Bearings Part Number: 5012363AE
$16.87 MSRP: $25.00You Save: $8.13 (33%)Ships in 1-2 Business DaysProduct Specifications- Other Name: Bearing - Connecting Rod; Rod Bearing; Bearing Kit Connecting Rod Standard See Note; Bearing Kit Connecting Rod Standard
- Replaces: 5012363AC, 5012363AD, 5018584AB, 5012363AB
- Item Weight: 0.50 Pounds
- Item Dimensions: 4.0 x 2.7 x 2.0 inches
- Condition: New
- Fitment Type: Direct Replacement
- SKU: 5012363AE
- Warranty: This genuine part is guaranteed by Mopar's factory warranty.
2006 Dodge Durango Rod Bearing Parts and Q&A
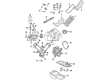
- Q: How to Ensure Proper Alignment and Clearance When Inspecting and Installing Rod Bearings on 2006 Dodge Durango?A: Look at the connecting rod bearings to find scoring and check them for normal wear, grooving, fatigue and pitting; replace any that seem to be worn in an unusual way. Look at the connecting rod journals for any furrows, nicks or burrs, because having misaligned and bent connecting rods can result in unusual wear on the pistons, the piston rings, the cylinder walls, the connecting rod bearings and the crankshaft connecting rod journals. Should damage or wear patterns indicate a misaligned connecting rod, check its alignment and change any rods that appear misaligned, bent or twisted. Cleans the oil off the connecting rod journal and first greases the upper bearing insert. Afterward, center it in the rod as you set it in place. Take two measurements, making sure they are not more than 0.50 mm (0.0196 inch). Install the rod and piston assemblies with a piston ring compressor and Guide Pins Special Tool 8507, making sure F on the piston points to the front and the oil slinger slots on the rods also point there. Apply a strip of Plastigage to the middle of the surface of the lower insert after setting it in the bearing cap and center it. Place the bearing cap and rod onto the journal, secure with the bolts to 27 Nm (20 ft. lbs.) plus a 90° spin without making the crankshaft turn to prevent Plastigage from getting smeared. With the bearing cap off, check the measure of the compressed Plastigage to find the clearance between the bearing and journal and compare it with the correct clearance listed in the Engine Specifications. Differences in the clearance can mean there is a tapered journal, an out-of-shape connecting rod or something caught between the insert and cap or rod. If the measurements are right, install the part after peeling the Plastigage off. Should clearance be greater than specs, specify the correct set of bearings, since the connecting rod bolts must never be re-used once removed or loosened and should always be replaced. After bearing selection is completed, use Plastigage again to make sure the bearing supports the weight before putting anything in the engine. Once you choose the proper bearing, install it and the cap, tightening the connecting rod bolts to 27 Nm (20 ft. lbs.) and an extra quarter turn. Fit the feeler gauge by placing its open end between the connecting rod and the crankshaft journal and see if the clearance matches what your Engine Specifications require. If the dimensions don't match, remove the connecting rod and replace it.
Related 2006 Dodge Durango Parts
 2006 Dodge Durango Camshaft
 2006 Dodge Durango Oil Pan
 2006 Dodge Durango Oil Pump
 2006 Dodge Durango Timing Chain
 2006 Dodge Durango Cam Gear
 2006 Dodge Durango Crankshaft Pulley
 2006 Dodge Durango Crankshaft Seal
 2006 Dodge Durango Crankshaft Timing Gear
 2006 Dodge Durango Cylinder Head
 2006 Dodge Durango Harmonic Balancer
 2006 Dodge Durango Intake Valve
 2006 Dodge Durango Piston Ring Set