JeepParts
My Garage
My Account
Cart
OEM 2006 Jeep Wrangler A/C Accumulator
Accumulator- Select Vehicle by Model
- Select Vehicle by VIN
Select Vehicle by Model
orMake
Model
Year
Select Vehicle by VIN
For the most accurate results, select vehicle by your VIN (Vehicle Identification Number).
2 A/C Accumulators found


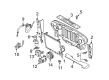
2006 Jeep Wrangler Dehydrator Part Number: 55037600AD
Product Specifications- Other Name: Line - A/C; A/C Receiver Drier; Drier Desiccant Element; A/C Accumulator; Accumulator; Drier; Accumulator A/C Complete With Suction Line, Contains Items 31 To 38; Accumulator A/C
- Item Weight: 2.20 Pounds
- Item Dimensions: 17.6 x 5.2 x 4.3 inches
- Condition: New
- Fitment Type: Direct Replacement
- SKU: 55037600AD
- Warranty: This genuine part is guaranteed by Mopar's factory warranty.

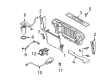
2006 Jeep Wrangler Dehydrator Part Number: 55037584AI
Product Specifications- Other Name: Line - A/C; A/C Receiver Drier; Drier Desiccant Element; A/C Accumulator; Accumulator; Drier; Accumulator A/C Complete, Contains Items 16 To 23
- Replaces: 55037584AH, 55037584AG
- Item Weight: 3.50 Pounds
- Condition: New
- Fitment Type: Direct Replacement
- SKU: 55037584AI
- Warranty: This genuine part is guaranteed by Mopar's factory warranty.
2006 Jeep Wrangler A/C Accumulator Parts and Q&A
- Q: How to Remove and Install an A/C Accumulator on 2006 Jeep Wrangler?A: Before removing the accumulator, set the negative battery cable aside, then remove the refrigerant from the refrigerant system. Remove the wire harness connector from the A/C low pressure switch and if wanted, remove the switch from the accumulator and get rid of the seal O-ring. Open the plastic clip that holds the suction line to the liquid line close to the accumulator and then loosen the bolt that attaches the accumulator retaining band to the dash panel support bracket. Take apart the area around the accumulator by releasing the nuts on the refrigerant lines, pulling off the lines and throwing away the O-ring seals. After opening the line fittings, plug them in or use tape to cover them and the accumulator ports. Pull the accumulator and its retaining band so far that the bolt on the retaining band is clear of the hole in the support bracket, then remove the accumulator and take off the retaining band if it is in your way. Before starting the installation, add 90 milliliters (3 fluid ounces) of refrigerant oil to the refrigerant side, using exactly what is suggested for the car's A/C compressor. Slide the accumulator into the retaining device and ease in the bolt; then place the retaining band-and-accumulator together into the slot on the dash panel. Take off the tape or plugs from the refrigerant line fittings and accumulator ports, put a small amount of clean refrigerant oil on new rubber O-ring seals and fit them onto the fitting, using the specified special O-rings made for R-134a refrigerant. Bring the refrigerant lines into the accumulator, link them together and tighten the nuts on each line to 9 N.m (80 in. lbs.). Secure the quick-connect line to the retainer to 4.5 N m (40 in. lbs.). and then attach the plastic clip that holds the A/C suction line to the liquid line close to the accumulator. Once you take out the low pressure switch, set it on the accumulator and secure it in place with a new O-ring seal fixed by hand. First, attach the wire harness connector to the A/C low pressure switch, then put the negative battery cable back in, evacuate the refrigerant and finish by charging the system.
Related 2006 Jeep Wrangler Parts
 2006 Jeep Wrangler Blend Door Actuator
 2006 Jeep Wrangler Heater Core
 2006 Jeep Wrangler Blower Motor
 2006 Jeep Wrangler A/C Compressor
 2006 Jeep Wrangler Blower Motor Resistor
 2006 Jeep Wrangler Evaporator
 2006 Jeep Wrangler A/C Clutch
 2006 Jeep Wrangler A/C Compressor Cut-Out Switches
 2006 Jeep Wrangler A/C Condenser
 2006 Jeep Wrangler A/C Hose
 2006 Jeep Wrangler Blower Control Switches
 2006 Jeep Wrangler HVAC Pressure Switch