JeepParts
My Garage
My Account
Cart
OEM 2006 Jeep Wrangler A/C Hose
Air Conditioning Hose- Select Vehicle by Model
- Select Vehicle by VIN
Select Vehicle by Model
orMake
Model
Year
Select Vehicle by VIN
For the most accurate results, select vehicle by your VIN (Vehicle Identification Number).
5 A/C Hoses found


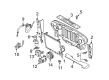
2006 Jeep Wrangler A/C Hoses Part Number: 55037599AE
$129.34 MSRP: $195.00You Save: $65.66 (34%)Ships in 1-2 Business DaysProduct Specifications- Other Name: Line - A/C Discharge; A/C Refrigerant Discharge Hose; A/C Refrigerant Liquid Hose; A/C Hose; Discharge Line; Line A/C Discharge Contains Items 2 To 7; Line A/C Discharge
- Item Weight: 2.40 Pounds
- Item Dimensions: 27.3 x 10.1 x 10.3 inches
- Condition: New
- Fitment Type: Direct Replacement
- SKU: 55037599AE
- Warranty: This genuine part is guaranteed by Mopar's factory warranty.


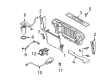
2006 Jeep Wrangler A/C Hoses Part Number: 55037581AG
Product Specifications- Other Name: Line - A/C Liquid; A/C Refrigerant Liquid Hose; A/C Hose; Liquid Line; Line A/C Liquid Contains Items 9 To 13
- Item Weight: 1.40 Pounds
- Item Dimensions: 25.4 x 24.7 x 4.2 inches
- Condition: New
- Fitment Type: Direct Replacement
- SKU: 55037581AG
- Warranty: This genuine part is guaranteed by Mopar's factory warranty.


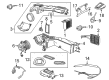
2006 Jeep Wrangler Discharge Hose Part Number: 55037579AD
Product Specifications- Other Name: Line - A/C Discharge; A/C Refrigerant Discharge Hose; A/C Refrigerant Liquid Hose; A/C Hose; A/C Hoses; Line A/C Discharge Contains Items 3 To 8
- Replaces: 55037579AC
- Item Weight: 0.90 Pounds
- Condition: New
- Fitment Type: Direct Replacement
- SKU: 55037579AD
- Warranty: This genuine part is guaranteed by Mopar's factory warranty.


2006 Jeep Wrangler A/C Hoses Part Number: 55037602AE
Product Specifications- Other Name: Line - A/C Suction; A/C Refrigerant Liquid Hose; A/C Hose; Suction Line; Line A/C Suction Contains Items 37 To 40; Line A/C Suction
- Item Weight: 1.50 Pounds
- Item Dimensions: 38.6 x 13.0 x 6.4 inches
- Condition: New
- Fitment Type: Direct Replacement
- SKU: 55037602AE
- Warranty: This genuine part is guaranteed by Mopar's factory warranty.

2006 Jeep Wrangler A/C Hoses Part Number: 55037706AE
Product Specifications- Other Name: Line - A/C Liquid; A/C Refrigerant Liquid Hose; A/C Hose; Liquid Line; Line A/C Liquid Contains Items 10 To 14; Line A/C Liquid
- Condition: New
- Fitment Type: Direct Replacement
- SKU: 55037706AE
- Warranty: This genuine part is guaranteed by Mopar's factory warranty.
2006 Jeep Wrangler A/C Hose Parts and Q&A
- Q: How to Service an A/C Hose in the HVAC Liquid Line on 2006 Jeep Wrangler?A: Separately disconnect the negative battery and seal all lines when you start servicing the HVAC liquid line. If the application requires it, take off the engine air cleaner housing. Taking out the secondary retaining clip from the spring-lock coupler attaching the liquid line to the A/C evaporator, use the proper A/C line disconnect tool to disconnect the liquid line, throwing away the O-ring seal. Secure your fingers inside the popped lugs, then pliers or more tape over the liquid line fitting and evaporator port. After, remove the liquid line from the right inner fender's retaining clips. Then, loose the nut tied to the liquid line and disconnect the liquid line from the A/C condenser. Remove and discard the O-ring seal from the opening and install plugs or tape there and the same place on the condenser opening. In LHD models, pull the liquid line from the engine area; in RHD models, unclip the rear part of the liquid line from the dash panel. Take out the secondary retaining clip from the spring-lock coupler that joins the end of the liquid line to the rest of the pipe, detach the rear end with an A/C disconnect tool, throw out the seal and plug or tape over the two connections on the fittings. Once the liquid line is in place, take off any tape or plugs from both the liquid line and the condenser port, lubricate a brand new O-ring seal with clean oil for the refrigerant, insert it into the fitting at each end and secure it so that only the specific O-rings and oil for R-134a are used. Attach the liquid line to the A/C condenser, secure it with a nut and tighten this nut to 12 N.m. Use the plastic clips on the right inner fender to install the liquid line, remove the plugs or tape covering the liquid line and evaporator, use refrigerant oil to lube a new rubber seal, put the new seal on the liquid line fitting and then attach the liquid line to the A/C evaporator. Place the secondary retaining clip at the end of the spring-lock coupler and snap the liquid line into position on the evaporator. If your model is LHD, go on to the next step; if it is RHD, take off the tape or plugs from the liquid line fittings, put a clean rubber O-ring seal on one liquid line, lubricate it with refrigerant oil and fit the line between the back and front parts before finishing the connection. Add the secondary clip to the spring-lock element fixing the rear section to the front section and then fit the rear section into its retaining clips in the dashboard. After removing the engine air cleaner housing, reattach it, link the battery's negative cable once again, empty the refrigerant and charge it once more.
Related 2006 Jeep Wrangler Parts
 2006 Jeep Wrangler Blend Door Actuator
 2006 Jeep Wrangler Heater Core
 2006 Jeep Wrangler Blower Motor
 2006 Jeep Wrangler A/C Compressor
 2006 Jeep Wrangler Blower Motor Resistor
 2006 Jeep Wrangler Evaporator
 2006 Jeep Wrangler A/C Accumulator
 2006 Jeep Wrangler A/C Clutch
 2006 Jeep Wrangler A/C Compressor Cut-Out Switches
 2006 Jeep Wrangler A/C Condenser
 2006 Jeep Wrangler A/C Switch
 2006 Jeep Wrangler HVAC Pressure Switch