JeepParts
My Garage
My Account
Cart
OEM 2007 Jeep Wrangler A/C Switch
Air Conditioning Switch- Select Vehicle by Model
- Select Vehicle by VIN
Select Vehicle by Model
orMake
Model
Year
Select Vehicle by VIN
For the most accurate results, select vehicle by your VIN (Vehicle Identification Number).
2 A/C Switches found


2007 Jeep Wrangler Heater Control Part Number: 55111840AE
$230.95 MSRP: $349.00You Save: $118.05 (34%)Product Specifications- Other Name: Control - A/C And Heater; HVAC Temperature Control Panel; Climate Control Module; Blower Control Switch; Dash Control Unit; Control A/C And Heater
- Replaces: 55111840AB, 55111840AC, 55111840AD
- Item Weight: 1.50 Pounds
- Item Dimensions: 4.3 x 5.1 x 12.7 inches
- Condition: New
- Fitment Type: Direct Replacement
- SKU: 55111840AE
- Warranty: This genuine part is guaranteed by Mopar's factory warranty.


2007 Jeep Wrangler Heater Control Part Number: 55111841AE
$318.24 MSRP: $486.00You Save: $167.76 (35%)Product Specifications- Other Name: Control - A/C And Heater; HVAC Temperature Control Panel; Climate Control Module; Blower Control Switch; Dash Control Unit; Control A/C And Heater
- Replaces: 55111841AB, 55111841AC, 55111841AD
- Item Weight: 1.50 Pounds
- Item Dimensions: 12.2 x 5.1 x 4.4 inches
- Condition: New
- Fitment Type: Direct Replacement
- SKU: 55111841AE
- Warranty: This genuine part is guaranteed by Mopar's factory warranty.
2007 Jeep Wrangler A/C Switch Parts and Q&A
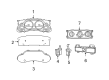
- Q: How to Install the A/C Switch for Temperature Control on 2007 Jeep Wrangler?A: Put the A/C-heater control (8) into the instrument panel center bezel (7), use four screws (6) to secure it and tighten the screws to 2 Nm (17 in. lbs.). Following that, mount the center bezel over the instrument panel and make the connections between the wire harness connectors (3 and 4) and the back of the A/C-heater control. The first step is attaching the mode control cable to the A/C heater control, after which you should attach the temperature control cable. With the retaining clips fully snapped into place in sector gear 2 and sector gear 5, secure the control cables to them, cables 1 and 9. Later, attach the control cables to the back of the A/C-heater control, making certain that the holding clips are securely joined. After all this, attach the wire harness connectors to the switches and power outlets as provided, mount the center bezel onto the instrument cluster and hook up the negative battery cable once again.
Related 2007 Jeep Wrangler Parts
 2007 Jeep Wrangler Blend Door Actuator
 2007 Jeep Wrangler Heater Core
 2007 Jeep Wrangler Blower Motor
 2007 Jeep Wrangler A/C Compressor
 2007 Jeep Wrangler Blower Motor Resistor
 2007 Jeep Wrangler Evaporator
 2007 Jeep Wrangler Ambient Temperature Sensor
 2007 Jeep Wrangler A/C Condenser
 2007 Jeep Wrangler A/C Expansion Valve
 2007 Jeep Wrangler A/C Service Cap
 2007 Jeep Wrangler A/C System Valve Core
 2007 Jeep Wrangler HVAC Pressure Switch