JeepParts
My Garage
My Account
Cart
OEM 2009 Dodge Nitro A/C Switch
Air Conditioning Switch- Select Vehicle by Model
- Select Vehicle by VIN
Select Vehicle by Model
orMake
Model
Year
Select Vehicle by VIN
For the most accurate results, select vehicle by your VIN (Vehicle Identification Number).
2 A/C Switches found


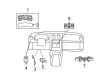
2009 Dodge Nitro Heater Control Part Number: 55111955AC
Product Specifications- Other Name: Control - A/C And Heater; HVAC Temperature Control Panel; Climate Control Module; Blower Control Switch; Dash Control Unit; Control A/C And Heater
- Replaces: 55111816AC, 55111816AF, 55111816AE, 55111955AB, 55111816AD, 55111816AB
- Item Weight: 2.40 Pounds
- Item Dimensions: 11.1 x 4.8 x 4.0 inches
- Condition: New
- Fitment Type: Direct Replacement
- SKU: 55111955AC
- Warranty: This genuine part is guaranteed by Mopar's factory warranty.


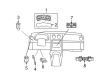
2009 Dodge Nitro Heater Control Part Number: 55111980AB
Product Specifications- Other Name: Control - A/C And Heater; HVAC Temperature Control Panel; Climate Control Module; Blower Control Switch; Dash Control Unit
- Replaces: 55111884AB, 55111884AC, 55111884AD, 55111802AC, 55111802AG, 55111802AD, 55111802AH, 55111802AE, 55111884AE, 55111980AA, 55111884AF, 55111884AA
- Item Weight: 1.40 Pounds
- Item Dimensions: 11.6 x 5.3 x 4.1 inches
- Condition: New
- Fitment Type: Direct Replacement
- SKU: 55111980AB
- Warranty: This genuine part is guaranteed by Mopar's factory warranty.
2009 Dodge Nitro A/C Switch Parts and Q&A
- Q: How to Install the A/C Switch for Temperature Control on 2009 Dodge Nitro?A: Start by connecting the A/C-heater control to the back of the instrument panel center bezel. Fit the control with four screws, then turn them all to 1.2 Nm (10 in. lbs.). After that, fit the middle bezel over the instrument panel and join the wire harness connectors to the back of the A/C-heater control. It's also important to attach the wire harness to the accessory switches before you mount the center bezel. Last, reconnect the negative battery cable. Anytime the ignition is turned on after installation or reinstallation, the A/C-heater control will automatically go through the Actuator Calibration function. Should the control come from another vehicle, you must activate the Actuator Calibration on your scan tool. In case it's needed, activate Actuator Calibration using a scan tool.
Related 2009 Dodge Nitro Parts
 2009 Dodge Nitro Heater Core
 2009 Dodge Nitro Blower Motor
 2009 Dodge Nitro Blower Motor Resistor
 2009 Dodge Nitro Cabin Air Filter
 2009 Dodge Nitro A/C Compressor
 2009 Dodge Nitro A/C Condenser
 2009 Dodge Nitro Evaporator
 2009 Dodge Nitro A/C Accumulator
 2009 Dodge Nitro A/C Expansion Valve
 2009 Dodge Nitro A/C Service Cap
 2009 Dodge Nitro A/C System Valve Core
 2009 Dodge Nitro Blower Control Switches