JeepParts
My Garage
My Account
Cart
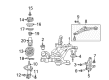
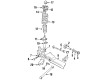
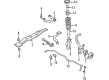
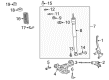
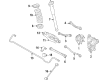
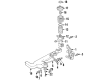
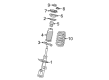
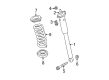
OEM Chrysler Coil Springs
Strut Spring- Select Vehicle by Model
- Select Vehicle by VIN
Select Vehicle by Model
orMake
Model
Year
Select Vehicle by VIN
For the most accurate results, select vehicle by your VIN (Vehicle Identification Number).
507 Coil Springs found


Chrysler Spring, Rear Part Number: 4877934AD
$71.04 MSRP: $158.00You Save: $86.96 (56%)Ships in 1-2 Business DaysProduct Specifications- Other Name: Spring - Rear Coil; Coil Spring, Rear; Coil Springs; Spring Rear Coil; Spring Coil
- Position: Rear
- Replaces: 4877934AB


Chrysler Coil Spring, Front Part Number: 5168882AB
$64.45 MSRP: $141.00You Save: $76.55 (55%)Ships in 1-2 Business DaysProduct Specifications- Other Name: Spring - Front Coil; Coil Spring, Front; Coil Springs; Spring; Spring Front Coil
- Position: Front
- Replaces: 5168882AA


Chrysler Spring, Front Part Number: 5006706AB
$42.21 MSRP: $69.15You Save: $26.94 (39%)Ships in 1-2 Business DaysProduct Specifications- Other Name: Spring - Front Coil; Coil Spring, Front; Coil Springs
- Position: Front


Chrysler Coil Spring, Rear Part Number: 5168953AB
$81.51 MSRP: $126.00You Save: $44.49 (36%)Product Specifications- Other Name: Spring - Rear Coil; Coil Spring, Rear; Coil Springs; Spring; Spring Rear Coil
- Position: Rear
- Replaces: 5168953AA

Chrysler Coil Spring, Front Part Number: 5168880AC
$92.49 MSRP: $141.00You Save: $48.51 (35%)Ships in 1-2 Business DaysProduct Specifications- Other Name: Spring - Front Coil; Coil Spring, Front; Coil Springs; Spring; Spring Front Coil
- Position: Front
- Replaces: 5168880AB, 5168880AA


Chrysler Coil Spring, Rear Part Number: 5168888AC
$102.36 MSRP: $156.00You Save: $53.64 (35%)Product Specifications- Other Name: Spring - Rear Coil; Coil Spring, Rear; Coil Springs; Spring; Spring Rear Coil
- Position: Rear
- Replaces: 5168888AB, 5168888AA


Chrysler Coil Spring, Front Part Number: 4670575AA
$113.73 MSRP: $172.00You Save: $58.27 (34%)Ships in 1-2 Business DaysProduct Specifications- Other Name: Spring - Front Coil; Coil Spring, Front; Coil Springs; Spring; Spring Front Coil
- Position: Front

Chrysler Coil Spring, Rear Part Number: 5168900AC
$128.23 MSRP: $194.00You Save: $65.77 (34%)Ships in 1-2 Business DaysProduct Specifications- Other Name: Spring - Rear Coil; Coil Spring, Rear; Coil Springs; Spring; Spring Rear Coil
- Position: Rear
- Replaces: 5168900AA, 5168900AB


Chrysler Strut Isolator Part Number: 4695385
$5.06 MSRP: $6.42You Save: $1.36 (22%)Ships in 1-2 Business DaysProduct Specifications- Other Name: Bushing - Coil Spring; Coil Spring Insulator; Isolator; Isolator, Rear Spring; Isolator Spring


Chrysler Coil Spring, Blue/Orange, Front Part Number: MB910507
$66.47 MSRP: $84.27You Save: $17.80 (22%)Ships in 1-2 Business DaysProduct Specifications- Other Name: Spring Front Coil; Coil Spring Kit Front; Coil Spring Set; Coil Springs; Spring; Spring, Front Suspension Coil
- Position: Front


Chrysler Coil Spring, Front Part Number: 5161527AA
$239.65 MSRP: $303.79You Save: $64.14 (22%)Ships in 1-2 Business DaysProduct Specifications- Other Name: Spring - Front Coil; Coil Springs; Spring; Spring Front Coil
- Position: Front

Chrysler Spring, Front Part Number: 4743987AC
Product Specifications- Other Name: Spring - Front Coil; Coil Spring, Front; Coil Springs; Spring Coil
- Position: Front
- Replaces: 4743987AA

Chrysler Coil Spring, Rear Part Number: 68083469AC
$102.14 MSRP: $154.00You Save: $51.86 (34%)Product Specifications- Other Name: Spring - Rear Coil; Coil Spring, Rear; Coil Springs; Spring; Spring Rear Coil
- Position: Rear


Chrysler Coil Spring, Rear Part Number: MR455131
Product Specifications- Other Name: Spring - Rear Coil; Coil Spring, Rear; Coil Spring Kit Rear Cargo; Coil Spring Set; Coil Springs; Spring; Spring Rear Coil
- Position: Rear

Chrysler Coil Spring Part Number: MB948111
Product Specifications- Other Name: Spring; Coil Spring Kit Rear Cargo; Coil Spring Set; Coil Springs; Spring, Rear Suspension Coil; Spring Rear Coil

Chrysler Coil Spring, Front Part Number: 5142010AA
Product Specifications- Other Name: Spring - Front Coil; Coil Spring, Front; Coil Springs; Spring; Spring Front Coil
- Position: Front


Chrysler Coil Spring, Rear Part Number: 4895583AA
Product Specifications- Other Name: Spring - Rear Coil; Coil Springs; Spring; Spring Rear Coil
- Position: Rear


Chrysler Spring Insulator Part Number: 4755002
Product Specifications- Other Name: Bushing - Coil Spring - Upper - Front Suspension; Isolator; Isolator, Front Suspension Strut Damper Lower Spring Seat; Isolator Front Suspension Spring


Chrysler Spring, Front Part Number: 5272763AC
Product Specifications- Other Name: Spring - Front Coil; Coil Spring, Front; Coil Springs; Spring Front Coil
- Position: Front


Chrysler Spring, Rear Part Number: 4895314AB
Product Specifications- Other Name: Spring - Rear Coil; Coil Spring, Rear; Coil Springs; Spring Rear Coil
- Position: Rear
| Page 1 of 26 |Next >
1-20 of 507 Results
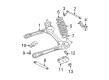
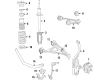
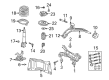
Chrysler Coil Springs
OEM parts sourced directly from Chrysler deliver superior quality, long lasting strength, and a precise fit you can trust. Each item goes through strict quality checks to ensure safety, toughness, and performance that matches your factory equipment. At JeepPartsDeal online shop, you'll get top-quality, budget-friendly OEM Chrysler Coil Springs for your vehicle. We focus on giving you a high standard without pushing up the price. Our full selection of genuine factory products comes backed by the original manufacturer's warranty. You'll love our fast delivery, seamless shopping experience, and convenient return policy, saving you all the hassle.
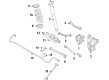
The Chrysler Coil Springs also absorb hits on the road to ensure that the cabin is calm and the height remains the same. Since 1925, Chrysler has been making its name on honest cars, combining reasonable prices with inventive ideas such as Floating Power that eliminated engine vibration and Airflow styling that cut the wind. It redefined the family trip with the introduction of the spacious first real minivan, all without compromising the feel of the ride and interior roominess. Today Chrysler arrives with smart utility; whenever you squeeze the lever in any door, it provides plenty of headroom, simple controls, and a calm interior that makes the old trip seem short when traffic is at a crawl. Chrysler can keep its prices stable as every model in the lineup combines fashion, practical technology, and agile movement without having to pay a premium price tag. Coil Springs bear the weight of the vehicle, compress on potholes, and bounce quickly to hold the tires on. They are in linear, progressive, or dual rate wind, so that the chassis can remain predictable with or without people on board or on a ramping exit. On the entire Chrysler line, replacement of worn out stock coils with high performance Coil Springs provides improved steering response, less body drop, and proper wheel positioning without compromising everyday comfort. Variable Coil Springs become firmer as they go, such that the bumps in cities become soft and the curves on the highway become firm. Adjustable Coil Springs allow drivers to adjust to new wheels and reduce fender contact to regain appropriate geometry.
Chrysler Coil Springs Parts and Q&A
- Q: How to Remove and Install Coil Springs on a Chrysler PT Cruiser?A:Loosen the wheel lug nuts and chock the front wheels to prevent rolling. Raise the rear of the vehicle and support it securely on jackstands placed under the rear jacking points. Remove the wheels. Remove the nut and pivot bolt securing the Watts linkage bell crank to the rear axle. Unbolt the rear stabilizer bar bushing clamps from the rear axle. Support the center of the rear axle with a floor jack. Raise the jack(s) slightly to take the spring pressure off the shock absorber lower mounts. Remove the shock absorber lower mounting bolts. Slowly lower the floor jack(s) until the coil springs are fully extended. Remove the coil springs and the upper and lower insulators. Check the spring for cracks and chips, replacing the springs as a set if any defects are found. Also check the insulators for damage and deterioration, replacing them as necessary. Installation is the reverse of the removal procedure, but make sure the coil springs are positioned properly against their upper mounts. Before tightening any of the suspension fasteners to the torque values, raise the rear axle to normal ride height with the floor jack(s). Install the wheel and lug nuts. Lower the vehicle and tighten the lug nuts to the torque.

Related Chrysler Parts
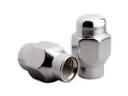 Chrysler Lug Nuts
 Chrysler Axle Support Bushings
 Chrysler Bump Stop
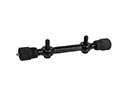 Chrysler Control Arm Shaft Kit
 Chrysler Lateral Link
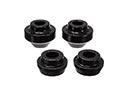 Chrysler Radius Arm Bushing
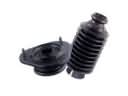 Chrysler Shock and Strut Boot
 Chrysler Sway Bar Bracket
 Chrysler Sway Bar Link
 Chrysler Track Bar
 Chrysler Trailing Arm Bushing
 Chrysler Wheel Cover