JeepParts
My Garage
My Account
Cart
OEM Chrysler LHS Rack And Pinion
Steering Gear- Select Vehicle by Model
- Select Vehicle by VIN
Select Vehicle by Model
orMake
Model
Year
Select Vehicle by VIN
For the most accurate results, select vehicle by your VIN (Vehicle Identification Number).
7 Rack And Pinions found

Chrysler LHS Steering Gear Part Number: 5003940AB

Chrysler LHS Steering Gear Part Number: 4886209AB
Chrysler LHS Steering Gear Part Number: 4886210AB
Chrysler LHS Steering Gear Part Number: 4897712AB

Chrysler LHS Steering Gear Part Number: 5003933AC

Chrysler LHS Steering Gear Part Number: 5073185AA
Chrysler LHS Steering Gear Part Number: 4897858AB
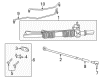
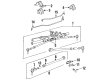
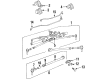
Chrysler LHS Rack And Pinion
Choose OEM Rack And Pinion that meet Chrysler factory standards. Chrysler designs and tests every component for precision and durability. Each Rack And Pinion follows strict manufacturing steps to lock in quality and fit. If your Chrysler LHS matters to you, OEM parts make the smart choice. You'll get the exact look, feel, and performance you expect. Shop genuine LHS parts at the highly competitive prices online. Enjoy a manufacturer's warranty, a hassle-free return policy, and rapid delivery. No more guesswork with off brands. Get genuine parts with exact fit and true factory performance. Shop with confidence today at JeepPartsDeal.com.
Chrysler LHS Rack And Pinion is one of the most important car parts in steering gears of Chrysler LHS automobiles recognized for their excellence and durability. This highly developed rack and pinion system then precisely translates the rotation of the steering wheel into lateral movement of the front wheels thus improving the steer age. Most Chrysler LHS models engage power assisted rack and pinion steering that features hydraulic systems to enhance easy steering reducing the energy to be used and ensuring the safety of a car. The major components which are helz and cylinder, the piston. They complement the rack and pinion assembly by offering the much-desired aid depending on the driver's instructions. Chrysler LHS was produced from 1994 to 2001 and compatibility with the different models emphasizes that the rack and pinion system is compatible with the different generations and different specifications of that specific generation. That is why Chrysler LHS Rack And Pinion is widely recognized in the supply of cars on the market because of its dense construction and application of helical gears though its operation is smooth it also implies on careful procedures of maintenance as it is liable to wear. Any problems may include; leakage of fluids or worn out gear thus it is important that the should be checked frequently. All in all, the Chrysler LHS Rack And Pinion is not only a mere addition to the comfort of the car but is also responsible for the safety and performance of the Chrysler LHS cars making it a worthy option for the lovers of luxury sedans.
Chrysler LHS Rack And Pinion Parts and Q&A
- Q: How to Maintain Rack And Pinion Bushings in Power Steering Systems on Chrysler LHS?A:Before beginning any bushing service, first take out the power rack and pinion from the vehicle. To begin, attach the Receiver, Special Tool 8523-2, to the cup of the Ball Joint Press, Special Tool C-4212F and tighten the set screw. Insert Special Tool 8523-1 onto the tip of the screw drive on the Ball Joint Press handle. Line up the power rack and pinion housing against the Receiver and use the screw drive to push the Driver housing into contact with the outer edge of the steering bushing, then keep pushing until the bushing is not visible in the rack and pinion housing. Repeat the previous step for the remaining bushing after you've backed off the screw drive without any power rack and pinion attached. When assembling the unit, use Special Tool C-4212F to hold the Receiver and install Special Tool 8523-2 into it, tighten the set screw, then add Special Tool 8523-1-the Driver. Place the rack and pinion housing against the Receiver without contacting the support ribs and begin putting the bushing into position in the housing's bottom. Tighten the screw drive until the Driver ends up touching the bushing retainer washer and continue to tighten lightly until the bushing fits into the recessed spot within the rack and pinion housing. With the Ball Joint Press screw drive, back away and then remove the power rack and pinion from the press, repeating this on the other bushing.
- Q: How to Install a Rack and Pinion Steering Gear on Chrysler LHS?A:The tie rod attachment must remain centered at the steering when you install any rack and pinion in the vehicle. Start by reinstalling the rack and pinion the reverse way from how you took it out and ensure the left front tire is lying straight ahead if your vehicle uses a 2.7 Liter engine. Put the right tie rod into position in the hole on the inner fender and attach the outer tie rod at the steering arm on the right strut, fastening it with a 37 Nm (27 ft. lbs.) nut. Repeat the above, but torque the wheel mounting lugs up to the specified 135 Nm (100 ft. lbs.) when you do the right side. Make sure the front wheels are touching the floor lightly and that's when you should mount the intermediate steering shaft on the rack and pinion. Use roll pin Installer (Special Tool 6831A) to set the roll pin properly at the center of the intermediate shaft flex joint. Slip the rack and pinion and intermediate shaft into the dash panel sealing boot, placing the rack and pinion's holes so they match with the crossmember's holes. Loose-fit the bolts for the left rack and pinion assembly onto the crossmember and tighten the right side mounting bracket bolts to 58 Nm (43 ft. lbs.) and the left side bolts to the same torque. If you loosened them earlier, tighten the bolts for the rack and pinion mounting bracket on the right side to 37 Nm (27 ft. lbs.). Before installing tie rods, ensure the tie rod spacer block in the rack and pinion box is in line with the bolt holes on the rack. Fasten the fluid lines to the proper places on the rack and pinion and tighten the nuts on each tube to 47 Nm (35 ft. lbs.). If your ATV has speed-proportional steering, hook the wiring into the solenoid control valve connector. Pin the center take-off into the rack and pinion and install the bolts through the tie rod assemblies, stretching washers between them and the rack and pinion. Tighten the bolts to 100 Nm (74 ft. lbs.) afterward and bend the retaining plate tabs. Attach the vacuum hose from the power Brake Booster to the intake manifold vacuum outlet with a clamp. Then, place the master cylinder on the power brake vacuum booster, using the manufacturer's torque specification of 28 Nm (250 inch lbs.) Attach the end of the wire to the brake fluid level switch inside the master cylinder fluid reservoir and set the in-line resonator at the Throttle Body. After that, put the inlet hose from the air cleaner housing to the throttle body. Bolt the cowl reinforcement in place with eight bolts to the A-pillar assemblies and the wiper module bolt. Properly attach the wiper module and cowl, making sure screws are tight and fastened correctly. After that, attach the Wiper Arms to the pivots and tighten the nuts before putting on caps. Lift the intermediate shaft onto the steering column shaft, hold it with the steering column coupler pinch bolt tightened to 28 Nm (21 ft. lbs.) and put the pinch bolt nut retaining pin in place. Unfasten the holding clamp from the steering wheel, put the battery ground cable onto the shock tower's ground stud and only add Mopar Power Steering Fluid or something similar to the reservoir. To refill and flush the power steering system, raise the vehicle, perform the initial operation procedure, remove old fluid, lower the vehicle and then adjust the front toe.


Related Chrysler LHS Parts
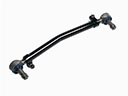 Chrysler LHS Drag Link
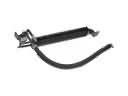 Chrysler LHS Power Steering Cooler
 Chrysler LHS Power Steering Hose
 Chrysler LHS Power Steering Pump
 Chrysler LHS Power Steering Reservoir
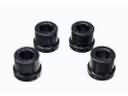 Chrysler LHS Rack & Pinion Bushing
 Chrysler LHS Steering Column Cover
 Chrysler LHS Steering Gear Box
 Chrysler LHS Steering Wheel
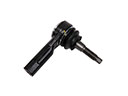 Chrysler LHS Tie Rod
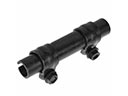 Chrysler LHS Tie Rod Adjusting Sleeve
 Chrysler LHS Tie Rod End