JeepParts
My Garage
My Account
Cart
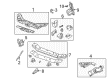
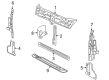
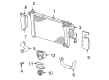
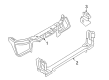
OEM Chrysler Radiator Support
Center Radiator Support- Select Vehicle by Model
- Select Vehicle by VIN
Select Vehicle by Model
orMake
Model
Year
Select Vehicle by VIN
For the most accurate results, select vehicle by your VIN (Vehicle Identification Number).
35 Radiator Supports found


Chrysler Lower Bracket Part Number: 68376655AA
$81.45 MSRP: $170.00You Save: $88.55 (53%)Ships in 1-2 Business DaysProduct Specifications- Other Name: Bracket - Radiator; Radiator Support Bracket, Lower
- Position: Lower
- Replaces: 68247609AA


Chrysler Side Rail, Front Driver Side Part Number: 55362307AF
$138.68 MSRP: $293.00You Save: $154.32 (53%)Ships in 1-2 Business DaysProduct Specifications- Other Name: Housing - Radiator; Fender Rail, Front Left; Closure Radiator
- Position: Front Driver Side
- Replaces: 55362307AE, 55362307AC, 55362307AD, 55362307AB


Chrysler Support Bracket Part Number: 68376692AA
$198.33 MSRP: $407.00You Save: $208.67 (52%)Product Specifications- Other Name: Bracket - Fascia Support; Radiator Support Bracket
- Replaces: 68247600AA


Chrysler Support Brace, Passenger Side Part Number: 68381131AA
$18.04 MSRP: $36.50You Save: $18.46 (51%)Product Specifications- Other Name: Bracket - Radiator Crossmember; Radiator Support Panel Reinforcement, Right
- Position: Passenger Side
- Replaces: 5155810AA


Chrysler Upper Tie Bar, Front Part Number: 55362294AC
$109.45 MSRP: $196.00You Save: $86.55 (45%)Ships in 1-2 Business DaysProduct Specifications- Other Name: Housing - Radiator; Radiator Support Tie Bar, Front Upper; Closure Radiator
- Position: Front Upper
- Replaces: 55362294AA, 55362294AB


Chrysler Support Brace Part Number: 68023328AA
$47.98 MSRP: $82.35You Save: $34.37 (42%)Ships in 1-3 Business DaysProduct Specifications- Other Name: Brace - Radiator Closure Panel; Radiator Support Panel Brace; Brace Radiator Closure Panel Right Or Left; Brace Radiator Closure Panel


Chrysler Side Rail, Front Passenger Side Part Number: 55362306AG
$175.62 MSRP: $259.00You Save: $83.38 (33%)Ships in 1-2 Business DaysProduct Specifications- Other Name: Housing - Radiator; Fender Rail, Front Right; Closure Radiator
- Position: Front Passenger Side
- Replaces: 55362306AF, 55362306AC, 55362306AB, 55362306AD, 55362306AE


Chrysler Radiator Support, Front Part Number: 68023326AE
$541.59 MSRP: $789.00You Save: $247.41 (32%)Ships in 1-3 Business DaysProduct Specifications- Other Name: Panel - Radiator Closure; Radiator Support Panel, Front; Panel Radiator Closure
- Position: Front
- Replaces: 68023326AC, 68023326AB, 68023326AD, 68023326AA

Chrysler Side Rail, Front Driver Side Part Number: 55364757AB
$46.81 MSRP: $297.00You Save: $250.19 (85%)Ships in 1-2 Business DaysProduct Specifications- Other Name: Housing - Radiator; Fender Rail, Front Left; Closure Radiator
- Position: Front Driver Side

Chrysler Radiator Support, Front Part Number: 68378862AA
$392.18 MSRP: $700.00You Save: $307.82 (44%)Ships in 1-3 Business DaysProduct Specifications- Other Name: Panel - Radiator Closure; Radiator Support Panel, Front
- Position: Front
- Replaces: 5116209AE, 5116209AK, 5116209AG, 5116209AD, 5116209AF, 5116209AL, 5116209AH, 5116209AI, 5116209AJ

Chrysler Lower Tie Bar, Front Part Number: 68292237AB
$62.99 MSRP: $92.75You Save: $29.76 (33%)Ships in 1-3 Business DaysProduct Specifications- Other Name: Crossmember - Radiator; Radiator Support Tie Bar, Front Lower
- Position: Front Lower

Chrysler Lower Tie Bar, Front Part Number: 5065240AH
$283.25 MSRP: $418.00You Save: $134.75 (33%)Ships in 1-3 Business DaysProduct Specifications- Other Name: Crossmember - Radiator; Radiator Support Panel Reinforcement, Front; Radiator Support Tie Bar, Front Lower; Crossmember
- Position: Front
- Replaces: 5065240AB, 5065240AG, 5065240AC, 5065240AE, 5065240AD, 5065240AF

Chrysler Radiator Support, Front Part Number: 68292241AB
$517.54 MSRP: $754.00You Save: $236.46 (32%)Ships in 1-3 Business DaysProduct Specifications- Other Name: Panel - Radiator Closure; Radiator Support Panel, Front; Panel Radiator Closure
- Position: Front
- Replaces: 68292241AA

Chrysler Radiator Support, Front Part Number: 68385108AA
$1150.73 MSRP: $1685.00You Save: $534.27 (32%)Ships in 1-3 Business DaysProduct Specifications- Other Name: Panel - Radiator Closure; Radiator Support Panel, Front
- Position: Front
- Replaces: 68247595AA


Chrysler Center Brace, Driver Side Part Number: 4814717AA
Product Specifications- Other Name: Bracket - Radiator Crossmember; Radiator Support Panel Reinforcement, Left; Radiator Support Tie Bar Brace, Left Upper; Upper Tie Bar Brace; Brace Radiator Crossmember
- Position: Driver Side

Chrysler Center Brace, Passenger Side Part Number: 4814716AA
Product Specifications- Other Name: Bracket - Radiator Crossmember; Radiator Support Panel Reinforcement, Right; Radiator Support Tie Bar Brace, Right Upper; Upper Tie Bar Brace; Brace Radiator Crossmember
- Position: Passenger Side


Chrysler Center Brace, Front Part Number: 4724905AC
Product Specifications- Other Name: Bracket - Radiator Closure Panel; Radiator Support Panel, Front Center; Radiator Support Bracket; Brace Radiator Closure Panel
- Position: Front Center


Chrysler Support Part Number: 4677698AA
Product Specifications- Other Name: Bracket - Radiator; Bracket Radiator Upper


Chrysler Upper Tie Bar, Front Part Number: 4805843AK
Product Specifications- Other Name: Crossmember - Front Support; Radiator Support Tie Bar, Front Upper
- Position: Front Upper
- Replaces: 4805843AJ, 4805843AG, 4805843AI, 4805843AH, 5139179AA, 5139179AB, 5139179AC, 4805843AD, 4805843AE, 4805843AF, 5139179AD


Chrysler Upper Tie Bar, Front Part Number: 5097909AA
Product Specifications- Other Name: Crossmember - Radiator; Radiator Support Tie Bar, Front Upper
- Position: Front Upper
- Replaces: 5174879AA
| Page 1 of 2 |Next >
1-20 of 35 Results
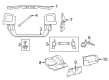
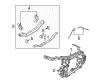
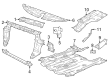
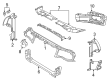
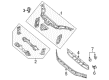
Chrysler Radiator Support
OEM parts sourced directly from Chrysler deliver superior quality, long lasting strength, and a precise fit you can trust. Each item goes through strict quality checks to ensure safety, toughness, and performance that matches your factory equipment. At JeepPartsDeal online shop, you'll get top-quality, budget-friendly OEM Chrysler Radiator Support for your vehicle. We focus on giving you a high standard without pushing up the price. Our full selection of genuine factory products comes backed by the original manufacturer's warranty. You'll love our fast delivery, seamless shopping experience, and convenient return policy, saving you all the hassle.
Chrysler Radiator Support locks the radiator in place for steady cooling and stress-free daily driving. Chrysler continued to gain a reputation for sound cars way back in 1925 and continued with Floating Power, which managed engine vibration, where the arresting airflow body advanced cabin comfort and smoother aerodynamics. Chrysler has driven value over decades in marrying spacious interiors with painless purchasing experiences families rely on. The first real minivan was one of the innovations that demonstrated how Chrysler pursued practical space and ride quality instead of empty flash. Smart utility that is the focus of it all is that each Chrysler driver can have a balanced ride without hassles. The company continued to optimize steering feel, noise management, and comfort in long-haul that can fit daily budgets. Radiator Support connects the engine bay binding radiator, the frame rails, aprons, the headlights, the hood, and fenders into a single unit of solid front core such that the heat is fast and panels remain aligned on rugged pavement. Radiator Support provides direct strength instead of weak brushes to keep checking of alignment fast and keep cooling effectiveness high. When a Radiator Support becomes worn, it becomes out of square, causing the radiator to sag and temperatures to increase; thus, replacing it with a new one will have the radiator back up to safe temperatures in a short period of time. Drivers who look at the Radiator Support when they do routine inspection save themselves warped panels and also prevent short life of the engine.
Chrysler Radiator Support Parts and Q&A
- Q: How to Install the Radiator Support Upper Crossmember on Chrysler Town & Country?A:First, set the radiator closure panel crossmember in place under the vehicle's body and insert its ends between the layers of metal in each radiator closure panel side, ensuring they fit over the paint breaks that mark the bolt heads. Afterwards, set up the bolts to secure the ends of the crossmember to the radiator closure panel, turning them to 19 Nm (14 ft. lbs. of torque). Fix the bolts that tie the radiator isolators to the crossmember and after that, attach the screw that holds the coolant recovery bottle to the bracket. After that, put in the bolt that holds together the housing for the air cleaner to the crossmember and the resonator for the air that enters the engine. Then, add the hood prop rod and put the hood latch over the holes in the net, pressing down on the holes if the hatch is not lined up. Secure the hood latch to the frame with bolts and clip the cable, then tighten those bolts to 13.5 Nm (10 ft. lbs.) torque. Lastly, put the shielding on the top of the radiator and test the hood latch's function and how it closes.
- Q: How to install a Radiator Support on Chrysler Aspen?A:The first step is to line up the upper crossmember in place. Following this, using a wrench, make sure the outer mounting bolts are tightly in place. Attach the nuts that join the latch to the radiator crossmember support and turn them to a torque of 31 Nm (23 ft. lbs.). Check the way the hood fits after this and change the placement if it is too high or too low. The next step is to fix the hood seal.


Related Chrysler Parts
 Chrysler Coolant Reservoir Cap
 Chrysler Thermostat
 Chrysler Coolant Reservoir
 Chrysler Coolant Reservoir Hose
 Chrysler Drive Belt
 Chrysler Fan Shroud
 Chrysler Radiator Drain Plug
 Chrysler Serpentine Belt
 Chrysler Thermostat Gasket
 Chrysler Transmission Oil Cooler
 Chrysler Transmission Oil Cooler Hose
 Chrysler V-Belt