JeepParts
My Garage
My Account
Cart
OEM Chrysler Voyager A/C Condenser
Air Conditioning Condenser- Select Vehicle by Model
- Select Vehicle by VIN
Select Vehicle by Model
orMake
Model
Year
Select Vehicle by VIN
For the most accurate results, select vehicle by your VIN (Vehicle Identification Number).
4 A/C Condensers found

Chrysler Voyager Condenser Part Number: 4809227AG
$192.82 MSRP: $318.00You Save: $125.18 (40%)Ships in 1-2 Business Days
Chrysler Voyager Condenser Part Number: 68339992AB
$317.14 MSRP: $480.00You Save: $162.86 (34%)Ships in 1-2 Business Days
Chrysler Voyager Condenser Part Number: 4809195AB
$50.23 MSRP: $63.68You Save: $13.45 (22%)Ships in 1-2 Business Days
Chrysler Voyager Condenser Part Number: 5016793AC
Chrysler Voyager A/C Condenser
Choose OEM A/C Condenser that meet Chrysler factory standards. Chrysler designs and tests every component for precision and durability. Each A/C Condenser follows strict manufacturing steps to lock in quality and fit. If your Chrysler Voyager matters to you, OEM parts make the smart choice. You'll get the exact look, feel, and performance you expect. Shop genuine Voyager parts at the highly competitive prices online. Enjoy a manufacturer's warranty, a hassle-free return policy, and rapid delivery. No more guesswork with off brands. Get genuine parts with exact fit and true factory performance. Shop with confidence today at JeepPartsDeal.com.
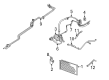
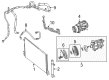
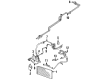
The Chrysler Voyager A/C Condenser is a widely known part since it is directly related to the vehicle's A/C system and typically highly dependable and effective. Located right in front of the radiator strategically, the A/C Condenser cools the gaseous refrigerant, turning it to liquid as it gets to the accumulator. Such a process is crucial in sustenance of an appropriate internal environment in the car as it drives meant for the Voyager making the ride comfortable in hot weather conditions. Available for compatibility with v Various Voyager models, the A/C Condenser signifies a dedication to manufacturing products that are long-lasting for different generations Therefore, Chrysler's focus on quality is seen. Besides the comfort factor, A/C Condenser play another part in that it helps in preventing the car from overheating also helps in improving the efficiency of the air conditioning system mounted on the car. However, it is spotlighting that the Chrysler Voyager A/C Condenser has a rather dense network of tubes that can enhance the cooling performance and is unique in the auto market. Although Chrysler Voyager has sold over 12 million units in total, the outstanding series is proof of the manufacturer's commitment to creating products such as A/C Condenser that meet high standards of construction. Therefore, there is much more in the Chrysler Voyager A/C Condenser than just a simple part; it is one of the structures upon which the brand relies to provide comfortable and safe drives in a Chrysler Voyager.
Chrysler Voyager A/C Condenser Parts and Q&A
- Q: How to Properly Handle A/C Condenser Removal and Installation on Chrysler Voyager?A:It's important to mark the places of the radiator and condenser air seals before removing the condenser because these direct air into the condenser and radiator. Take the refrigerant out of the refrigerant system. Unscrew the two wide screws on the panel that hold the front fascia and outboard edges of the sight shield onto the radiator panel, then remove the five smaller screws securing the front fascia grille inserts to the sight shield Remove the sight shield from the front of the radiator cross member, then take out two screws holding the Hood Latch unit. Afterward, move the latch out of the way, making sure to remember where it belonged. Unplug the transmission oil cooler hoses from the module on the left and also remove the nut from the discharge line fitting on the right and disconnect it from the condenser inlet port, discarding the seal. Cover the discharge line and condenser inlet with plugs or tape, undo the nut on the liquid line fitting at the condenser, remove it and discard the seal, covering the open liquid line and condenser outlet ports with plugs or tape. Lift up the condenser, transmission oil cooler and mounting brackets as a unit to disengage the locating pin from the lower mount rubber isolators and remove everything from the car. Unscrew the two holding bolts from each mounting bracket attached to the condenser and the one screw securing the left mounting bracket to the side of the transmission oil cooler, before removing the left bracket. To install, place the condenser on the right bracket and the transmission oil cooler at the same time and after that attach the left mounting bracket to the side of the condenser and transmission oil cooler. Secure the left bracket to the side of the transmission oil cooler with 5 Nm (45 in. lbs.) and then tighten the two screws securing each mounting bracket to the condenser, also to 5 Nm (45 in. lbs.). Lift the condenser, oil cooler and mounting brackets as a group into the vehicle, placing them over the locating pins built into the lower mount rubber isolators. When you do this, attach the two screws at the top of each bracket onto the cooling module and tighten them to 5 Nm (45 in. lbs.). Cover the condenser port and liquid line fitting with clean refrigerant oil and push in a new rubber O-ring seal, reconnect the pieces and tighten the nut to 23 Nm (17 ft. lbs.). Unplug the tape or remove the plugs from the condenser inlet and discharge port, grease a new O-ring shopping style with clean oil, put it on the discharge line's port and join the two together, tightening the nut to 23 Nm (17 ft. lbs.). Reattach both hoses to the transmission oil cooler fittings on the left, place the hood latch unit at the top of the front radiator side panel crossmember and tighten those screws to 14 Nm (123 in. lbs.). Align the radiator sight shield onto the radiator closure panel crossmember, secure it with the five small screws, tighten the insert screws for the front fascia grilles to 2 Nm (18 in. lbs.) and then install and tighten the two big screws that attach the front fascia and outboard sides of the sight shield to 6 Nm (53 in. lbs). Next, disconnect the engine cooling, evacuate the refrigerant and if the condenser is being replaced, pour in 30 milliliters (1 fluid ounce) of refrigerant oil that is suitable for the compressor in the vehicle. After that, secure all radiator and condenser air seals back in place.

Related Chrysler Voyager Parts
 Chrysler Voyager Blower Motor Resistor
 Chrysler Voyager A/C Accumulator
 Chrysler Voyager A/C Compressor Cut-Out Switches
 Chrysler Voyager A/C Expansion Valve
 Chrysler Voyager A/C Hose
 Chrysler Voyager A/C Service Cap
 Chrysler Voyager A/C Switch
 Chrysler Voyager A/C System Valve Core
 Chrysler Voyager Blower Control Switches
 Chrysler Voyager Blower Motor
 Chrysler Voyager Cabin Air Filter
 Chrysler Voyager Evaporator