JeepParts
My Garage
My Account
Cart
OEM Dodge Dakota Timing Chain
Engine Timing Chain- Select Vehicle by Model
- Select Vehicle by VIN
Select Vehicle by Model
orMake
Model
Year
Select Vehicle by VIN
For the most accurate results, select vehicle by your VIN (Vehicle Identification Number).
3 Timing Chains found


Dodge Dakota Timing Chain Part Number: 83507095


Dodge Dakota Timing Chain Part Number: J3242300


Dodge Dakota Timing Chain Part Number: 5019423AD
Dodge Dakota Timing Chain
Choose OEM Timing Chain that meet Dodge factory standards. Dodge designs and tests every component for precision and durability. Each Timing Chain follows strict manufacturing steps to lock in quality and fit. If your Dodge Dakota matters to you, OEM parts make the smart choice. You'll get the exact look, feel, and performance you expect. Shop genuine Dakota parts at the highly competitive prices online. Enjoy a manufacturer's warranty, a hassle-free return policy, and rapid delivery. No more guesswork with off brands. Get genuine parts with exact fit and true factory performance. Shop with confidence today at JeepPartsDeal.com.
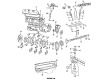
The cam shaft Located in the cylinder head while the crank shaft is located on the lower end of the block, the timing chain in Dodge Dakota vehicles helps to synchronize the rotational movement of the two in order to correctly synchronize the operations of the engine valves. Located in front of the engine, the 'Timing Chain' needs to be lubricated, it is common in high-capacity engines. Some of Dodge Dakota models have installed metal timing chains as seen with the trend starting from 1990s and up to date have preferred the given type of chain to the rubber timing belt because of the factthat they may not require rolling as often. In essence, timing chains are quite dependable, but they are precedent to lubrication related problems or difficulties with the tensioner and chain guides. Another sign that suggests that you have a faulty Timing Chain system is when there is noise coming from the front of the engine which is more of a rattle. A feature of the pushrod engines is that a short chain drive is used in them, which is less noisy and wears out less, this is quite appropriate for the Dodge Dakota model.
Dodge Dakota Timing Chain Parts and Q&A
- Q: How to Maintain and Fix a Timing Chain on Dodge Dakota?A:The first step in working with the timing chain is to remove the negative Battery Cable and empty the coolant system. Lift off the timing chain cover and turn the Crankshaft until the marks match #1 TDC. Remove the camshaft sprocket attaching bolt and take out both the timing chain and the crankshaft and camshaft sprockets. Put the crankshaft sprocket onto the crankshaft and use a screwdriver to compress the tensioner shoe, guaranteeing the holes in the shoe and bracket are even, then slide a pin into the shoe and unscrew the screwdriver. If you decide to change the tensioner assembly, remove all three tensioner to block bolts first and take the assembly out. To check the chain, take out the tensioner and put a scale next to it so you can measure motion. Use a torque wrench and a socket on the attaching bolt of the camshaft sprocket, turning the wrench according to the instruction so that the bolt stretches the slack, adding 1 Nm of torque while the cylinder head is installed or 20 Nm if it has not been installed. As soon as the torque is applied, keep the crankshaft steady, press a scale along the same link as the chain and use reverse torque to measure the chain move. Replace the timing chain if the movement is more than 3.175 mm. During installation, when using a new tensioner assembly, install it and tighten the bolts to 24 Nm. Place the camshaft and crankshaft sprockets on a bench so the timing marks are aligned, slide the timing chain around both and tighten the chain. Lift both sprockets and chain, confirming they are tight and nicely place them on the shafts so the timing marks line up properly. Insert the camshaft bolt and tighten it by 68 Nm. Once the tensioner pin is gone, line up the timing marks as before. Install the Timing Cover, add the coolant to the cooling system, link the negative cable to the battery and turn on the engine to look for leaks.
- Q: How to Remove and Replace a Timing Chain on Dodge Dakota?A:The first step is to unhook the negative Battery Cable and drain the cooling system. After frying the valve gaskets, take off the covers for both cylinder heads and then the radiator fan. Turn the engine until the timing mark on the crankshaft damper show that the timing chain cover is at TDC and the camshaft sprocket "V6" marks are in the 12 o'clock position for No. 1 exhaust stroke TDC. Please take off the Power Steering Pump and get rid of the left and right cylinder head access plugs to access the chain guide fasteners. Open the oil fill to reach the right tensioner arm fastener and after that, turn off the crankshaft damper and the timing chain cover. Pierce the primary chain tensioner and stick it with a pin, covering the oil pan hole to avoid the plate behind the left secondary chain tensioner from dropping into it. Lift the secondary chain tensioners and the Camshaft Position Sensor with care, careful not to damage the camshaft target wheel or leave it exposed to magnetic areas, as this might result in engine not running. It is important to never spin each shaft on its own so that no damage happens due to contact between the valve and the piston and ensure the negative cable is still disconnected. Take out the left and right camshaft sprocket bolts, use Special Tool 8428 Camshaft Wrench to secure the left camshaft steel tube and remove the left camshaft sprocket as you rotate the camshaft about 5 degrees clockwise to a central position. Do the same thing for the right camshaft sprocket. After removing the idler sprocket assembly bolt, move the idler sprocket assembly and crank sprocket together forward to take off the primary and secondary chains. After that, take off both pivoting tensioner arms and chain guides and remove the main chain tensioner.


Related Dodge Dakota Parts
 Dodge Dakota Oil Filter
 Dodge Dakota Cylinder Head
 Dodge Dakota Oil Pan
 Dodge Dakota Cam Gear
 Dodge Dakota Camshaft Bearing
 Dodge Dakota Crankshaft
 Dodge Dakota Crankshaft Pulley
 Dodge Dakota Cylinder Head Gasket
 Dodge Dakota Engine Mount Bracket
 Dodge Dakota Lash Adjuster
 Dodge Dakota Rocker Arm
 Dodge Dakota Valve Stem Seal