JeepParts
My Garage
My Account
Cart
OEM Dodge Magnum Timing Chain
Engine Timing Chain- Select Vehicle by Model
- Select Vehicle by VIN
Select Vehicle by Model
orMake
Model
Year
Select Vehicle by VIN
For the most accurate results, select vehicle by your VIN (Vehicle Identification Number).
3 Timing Chains found


Dodge Magnum Timing Belt Part Number: 4663635
$141.63 MSRP: $209.00You Save: $67.37 (33%)


Dodge Magnum Timing Chain Part Number: 4663674AD
$40.34 MSRP: $57.20You Save: $16.86 (30%)Ships in 1-2 Business Days


Dodge Magnum Timing Chain Part Number: 4892349AA
$276.65 MSRP: $315.00You Save: $38.35 (13%)Ships in 1-2 Business Days
Dodge Magnum Timing Chain
Choose OEM Timing Chain that meet Dodge factory standards. Dodge designs and tests every component for precision and durability. Each Timing Chain follows strict manufacturing steps to lock in quality and fit. If your Dodge Magnum matters to you, OEM parts make the smart choice. You'll get the exact look, feel, and performance you expect. Shop genuine Magnum parts at the highly competitive prices online. Enjoy a manufacturer's warranty, a hassle-free return policy, and rapid delivery. No more guesswork with off brands. Get genuine parts with exact fit and true factory performance. Shop with confidence today at JeepPartsDeal.com.
In Dodge Magnum particularly, The Timing Chain is as significant part of the vehicles because it controls the turning of the camshaft and crankshaft so that the engine valves will open at the right time and in appropriate sequences. Situated in front of the engine, the Timing Chain involves slobbering so as to function and is a feature present in large-displacing engines. While the rubber belt act in timing is known metal timing chains have become preferred since the early 1990s because they last longer and rarely need replacement. Pushrod engines fitted in Dodge Magnum models employ chains, not gears in order to effect power transmission due to the fact that gears are liable to the manufacture of noise and wear through torque reversals. In most cases, timing chains are used sparingly and therefore most problems originate from inadequate lubrication or with tensioner and chain guides. Signs of a faulty Timing Chain system that could be showing that the Magnum has a worn out timing chain includes a sound of rattles coming from the front of the engine.
Dodge Magnum Timing Chain Parts and Q&A
- Q: How to Remove and Install a Timing Chain on Dodge Magnum?A:Before you start, unplug the negative Battery Cable and drain the cooling system. Get rid of the upper Intake Manifold, the cylinder head covers, the vibration damper on the crankshaft and the timing chain cover. Whenever adjusting timing marks, first turn the crankshaft to rotate the engine and avoid harm to the valves and pistons. Make sure the crankshaft sprocket timing mark points to the mark that is 60° on the oil pump housing. The aircraft undergoes tests in the ATDC of the lead cylinder. When the timing chain is taken out and the cylinder heads are still installed, do not change the crankshaft position until the chain is put on the timing gears. Unscrew the retainer cap on the timing chain tensioner unit in the right cylinder head and remove it and the tensioner, disconnect and pull the Camshaft Position Sensor off the left cylinder head and pop out the timing chain guide access plugs on the cylinder heads. After the Camshaft sprocket bolts are taken out, the camshafts will turn clockwise. Unscrew the bolts holding the camshaft sprocket, remove both the sprocket and the damper, if equipped and move onto the other work. Take out the bolts holding the left camshaft sprocket in place and remove the sprocket, then uninstall the chain guide and the tensioner arm. Once that's done, take out the primary timing chain. You should remove the primary timing chain prior to removing the crankshaft sprocket. Place the crankshaft damper bolt, oil the bolt head with grease and insert Special Tools 5048-1, 5048-6 and 8539 between the sprocket and crankshaft nose as you prepare to remove the sprocket without moving the crankshaft. While performing installation, ensure you replace any worn sprockets or chain guides with new ones. Install the crankshaft sprocket and, if you removed them, the right and left side short chain guides and tighten the bolts holding everything together to 28 Nm. Apply engine oil to the timing chain and guides before fitting and then set the left side primary chain sprocket on the chain so that the timing mark is in between the two plated timing links. Hang the primary chain from the left sprocket into the left cylinder head so the camshaft sprockets can rest on the camshaft while you install. Set the left side camshaft sprocket on the camshaft hub barely holding it in place, realign the timing plate link with the crankshaft sprocket timing mark, slide the primary chain onto the water pump drive sprocket. Line up the camshaft sprocket's timing mark with the timing chain link on the timing plate and, with no pressure, set it over the camshaft. Make sure all chain timing links line up with the marks on the sprockets before installing the left side lower chain guide and tighten their bolts to 28 Nm. Ensure the O-ring of each chain guide rubber plug is correct and replace if broken, then fit the plugs, making sure to tighten them to 20 Nm. Purge the oil in the timing chain tensioner by putting the check ball side of the tensioner into the shallow end of Special Tool 8186 and depressing the tensioner slowly until all oil is removed. Lift the cylinder plunger of Special Tool 8186 all the way in, apply downward force to reset the tensioner and then release. Place the tensioner on Special Tool 8186 so the recess in the tensioner bottoms is exactly against the top of the Special Tool and watch out for any damage or cuts on the tensioner O-ring. Insert the reset chain tensioner into the left cylinder head, put the tensioner retaining plate in place and tighten all the bolts to 12 Nm. Place the camshaft damper on the specified cylinder bank of the camshaft hub. Attach a 3/8" square drive extension to the intake camshaft drive center using a breaker bar and rotate the camshaft until its hub joins with the damper and sprocket attaching holes. Attach the bolts for the left side sprocket, tighten them to 28 Nm, then turn the left side camshaft and fasten the right side sprocket bolts, again tightened to 28 Nm. If loose timing chain is found, turn the engine clockwise, use a flat-bladed pry tool to push the tensioner into action and ensure it is indeed active. Start with the camshaft position sensor and attach the electrical part to it and then set up the timing chain cover, crankshaft vibration damper and cover for the cylinder head. Finish with the upper intake manifold. Pour refrigerant into the cooling system and link the negative battery cable once more. During installation, support the crankshaft sprocket with Special Tools 6780-1 and 8179 until its bottom reaches the step flange and check that it's not rotating. Be sure the installed sprocket measures between 38.55 and 39.60 mm from the engine top. After that, fit the main timing chain.
- Q: How to Service and Repair a Timing Chain on Dodge Magnum?A:The timing chain needs to be serviced and repaired after you disconnect the negative Battery Cable. After that, drain the cooling system and take out the coolant pressure container. Get the lower splash shield off by unbolting it from the hoist with the retaining bolts and removing the shield itself. It is important to remove the accessory Drive Belts and the crankshaft vibration damper before you lower the vehicle. After that, loosen the timing chain cover bolts and remove the timing chain cover. Throw out the timing chain cover gasket, then pull out the front crankshaft oil seal from the cover.


Related Dodge Magnum Parts
 Dodge Magnum Dipstick
 Dodge Magnum Timing Belt
 Dodge Magnum Cam Gear
 Dodge Magnum Crankshaft Pulley
 Dodge Magnum Dipstick Tube
 Dodge Magnum Harmonic Balancer
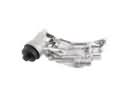 Dodge Magnum Oil Filter Housing
 Dodge Magnum Oil Pump Gasket
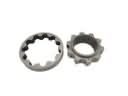 Dodge Magnum Oil Pump Rotor Set
 Dodge Magnum Pushrod
 Dodge Magnum Timing Chain Tensioner
 Dodge Magnum Valve Stem Seal