JeepParts
My Garage
My Account
Cart
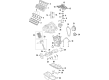
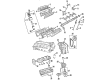
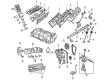
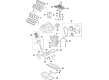
OEM Dodge Ram 2500 Piston
Engine Pistons- Select Vehicle by Model
- Select Vehicle by VIN
Select Vehicle by Model
orMake
Model
Year
Select Vehicle by VIN
For the most accurate results, select vehicle by your VIN (Vehicle Identification Number).
30 Pistons found


Dodge Ram 2500 Piston Part Number: 68005277AB
$427.64 MSRP: $644.00You Save: $216.36 (34%)


Dodge Ram 2500 Connecting Rod Part Number: 53022257AE
$221.23 MSRP: $328.00You Save: $106.77 (33%)Dodge Ram 2500 Connecting Rod Part Number: 53022258AE
$243.53 MSRP: $318.00You Save: $74.47 (24%)Ships in 1-2 Business Days
Dodge Ram 2500 Piston Part Number: 4778876AB
$199.41 MSRP: $228.00You Save: $28.59 (13%)Ships in 1-2 Business Days
Dodge Ram 2500 Piston Part Number: 68067507AA
$206.24 MSRP: $237.00You Save: $30.76 (13%)Ships in 1-2 Business Days
Dodge Ram 2500 Piston Part Number: 4778875AC
$178.11 MSRP: $262.00You Save: $83.89 (33%)Ships in 1-2 Business DaysDodge Ram 2500 Piston Part Number: 4778873AB
$178.11 MSRP: $262.00You Save: $83.89 (33%)Ships in 1-2 Business Days


Dodge Ram 2500 Piston Part Number: 5086011AB

Dodge Ram 2500 Piston Part Number: 5086010AB


Dodge Ram 2500 Piston Part Number: 53021539AD


Dodge Ram 2500 Piston Part Number: 53021538AD


Dodge Ram 2500 Piston Part Number: 5139059AA
Dodge Ram 2500 Piston Part Number: 68067512AA
Dodge Ram 2500 Piston Part Number: 68067511AA

Dodge Ram 2500 Piston Part Number: 5086011AC

Dodge Ram 2500 Piston Part Number: 5086010AC
Dodge Ram 2500 Piston Part Number: 5019615AA
Dodge Ram 2500 Piston Part Number: 5019614AA

Dodge Ram 2500 Piston Part Number: 4746629

Dodge Ram 2500 Piston Part Number: 53022257AC
| Page 1 of 2 |Next >
1-20 of 30 Results
Dodge Ram 2500 Piston
Choose OEM Piston that meet Dodge factory standards. Dodge designs and tests every component for precision and durability. Each Piston follows strict manufacturing steps to lock in quality and fit. If your Dodge Ram 2500 matters to you, OEM parts make the smart choice. You'll get the exact look, feel, and performance you expect. Shop genuine Ram 2500 parts at the highly competitive prices online. Enjoy a manufacturer's warranty, a hassle-free return policy, and rapid delivery. No more guesswork with off brands. Get genuine parts with exact fit and true factory performance. Shop with confidence today at JeepPartsDeal.com.
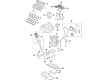
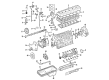
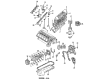
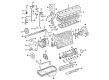
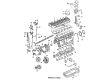
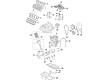
The Piston found in Dodge Ram 2500 vehicles has the responsibility of transforming the power developed by the combustions into the energy is necessary to cause movement of the vehicle. This element plays a significant role through the internal combustion engine by converting pressure exerted by expanding gases into forces that can move the crankshaft. Pistons of Dodge Ram 2500 are made using aluminium alloys with consideration to weight and strength, though some high performance models feature forged or billet pistons. There has been the use of different pistons in Dodge Ram 2500 vehicles mainly including trunk pistons for petrol and diesel engines which offers side support and contains a clearance for the oil ring. Besides, crosshead pistons are necessary for bigger diesel engines in order to provide better and smoother oil circulation as well as to minimize mechanical friction. These features make the pistons in the Dodge Ram 2500 to have different designs to enable it function efficiently when it's operating under different conditions.
Dodge Ram 2500 Piston Parts and Q&A
- Q: How to Install Piston and Connecting Rod Assemblies into the Bore on Dodge Ram 2500?A:It is best to install piston rings first and only after that fit in the piston and connecting rod assemblies. Soak the piston head and rings in clean engine oil, place a ring compressor on them and tighten it so the rings stay in position. Place the bearing on the connecting rod and cover the bearing with clean engine oil. Insert the Special Tool 8507 Connecting Rod Guides into the bolt threads of each connecting rod. A raised "F" or arrow is placed on each piston pin bore by the manufacturer, making it clear that the piston must be installed so the mark or arrow points toward the front of the engine on both sides. Wash the center of the cylinder and apply engine oil to it. Crank the engine so that the journal on the Crankshaft is in the center of the piston bore and then slide the rod and piston into the bore, making sure the connecting rod guides rest on the crankshaft journal. As you tap the piston downward, watch the rod as it slides onto the rod journal. The connecting rod bolts are Torque to Yield Bolts and should be replaced after one use, at any time they are removed or tightened. After applying engine oil to the rod bolts and the bearing areas, place the Rod Bearing and cap, tightening the bolts to 21 Nm (15 ft. lbs.) plus a 90° turn. Mount the cylinder (or cylinder heads), ALL covers, the Intake Manifold and Oil Pan with their necessary gaskets/windage trays. Set the amount of engine oil into the crankcase, accurately and link the negative cable to the battery.
- Q: How to Safely Remove and Replace a Piston in an Engine on Dodge Ram 2500?A:The piston must be disconnected and replaced after the Battery Cables are disconnected, the cylinder head is removed, the Oil Pan is taken off and the suction tube is loosened. Turn the Crankshaft with Miller Tool 7471-B so all pistons are located below top dead center. Scrape or carefully brush away carbon ridge patterns found at the top of the bore before taking out the pistons and if wear ridges exist, use a ridge reamer to remove them without trimming off too much of the wall. Mark the cylinder number at the top and front of the piston, ensuring the mark isn't closer than 5 mm to the outer edge, then stamp the cylinder number on both the connecting rod and cap. Make sure to gently unbolt both the connecting rod and its caps and then use a hammer handle to push both the piston and connecting rod through the cylinder bore. Put the piston/rod assemblies in a rack and replace any removed piston with one of the same number. Do not clean your pistons or pins in bead blast or with acid; instead, put them in some clean solvent, then rinse with hot water and blow dry with compressed air. Letting the pistons sit overnight helps soften carbon, so give the broken piston ring a turn to clear the ring grooves with water before you clean them again. Treat the connecting rods in the same way as well. Check the pistons for signs of damage or overwear anywhere: at the top, the ring area, on the skirt and pin bore; measure the skirt diameter and replace the piston if it is over the limit. Check if there is any damage in the upper groove. Then, judge the place for the intermediate ring by measuring a new piston ring and replacing the piston if the clearance exceeds 0.095 mm. If when testing with a new oil ring there's more than 0.128 mm clearance in the oil groove, you should replace the piston. Check to make sure the pin bore isn't larger than 40.012 mm and look for damage or signs of wear on the piston pin, measuring the diameter; if the pin is below 39.990 mm, change it out. Look at the connecting rods to ensure the I-Beam section is clear of dents and measure the length of the pin bore with a gauge; replace the rod if it is over 40.042 mm. During installation, apply clean engine oil to both the cylinder bores and the piston skirts, place the rings in position with the piston ring compressor and drop the piston and rod into the cylinder bore so the mark on the piston is facing forward. Press the piston about 50 mm below the block and line the rod and the crankshaft region together by moving the rod slowly. Apply some grease on the threads and the part under each connecting rod bolt head and be sure the number on the rod cap faces toward the oil cooler. With the rod installed, install the cap and bolts and secure them in three stages to 35 Nm, then move to 70 Nm and end with 100 Nm. Spin the crankshaft to test for freedom and determine the clearance beside the connecting rod and crankshaft. After that, secure the suction tube and oil pan, attach the cylinder head, use a new filter, fill the oil tank, reattach the battery's negative cables and ignite the engine.


Related Dodge Ram 2500 Parts
 Dodge Ram 2500 Cam Gear
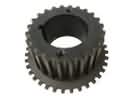 Dodge Ram 2500 Crankshaft Gear
 Dodge Ram 2500 Crankshaft Pulley
 Dodge Ram 2500 Crankshaft Seal
 Dodge Ram 2500 Crankshaft Thrust Washer
 Dodge Ram 2500 Engine Mount
 Dodge Ram 2500 Harmonic Balancer
 Dodge Ram 2500 Oil Pan Gasket
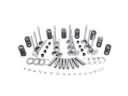 Dodge Ram 2500 Rocker Shaft Spring Kit
 Dodge Ram 2500 Timing Chain Tensioner
 Dodge Ram 2500 Timing Cover Gasket
 Dodge Ram 2500 Variable Timing Sprocket