JeepParts
My Garage
My Account
Cart
OEM Dodge Ram 3500 A/C Compressor
Air Conditioning Compressor- Select Vehicle by Model
- Select Vehicle by VIN
Select Vehicle by Model
orMake
Model
Year
Select Vehicle by VIN
For the most accurate results, select vehicle by your VIN (Vehicle Identification Number).
9 A/C Compressors found


Dodge Ram 3500 Compressor Part Number: 55055339AH
$588.91 MSRP: $887.00You Save: $298.09 (34%)Ships in 1-3 Business Days

Dodge Ram 3500 Compressor Part Number: 55111411AH
$654.85 MSRP: $957.00You Save: $302.15 (32%)Ships in 1-3 Business Days
Dodge Ram 3500 Compressor Part Number: 55055540AM
$326.47 MSRP: $690.00You Save: $363.53 (53%)Ships in 1-3 Business Days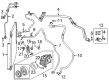
Dodge Ram 3500 Compressor Part Number: 57009385AA
$433.11 MSRP: $656.00You Save: $222.89 (34%)Ships in 1-2 Business Days
Dodge Ram 3500 Compressor - A/C Part Number: 57009571AA
$572.51 MSRP: $765.00You Save: $192.49 (26%)Ships in 1-2 Business DaysDodge Ram 3500 Compressor Part Number: 55056095AB

Dodge Ram 3500 Compressor - A/C Part Number: 55056336AD
Dodge Ram 3500 Compressor Part Number: 55036561AB

Dodge Ram 3500 Compressor Part Number: 55036799AB
Dodge Ram 3500 A/C Compressor
Choose OEM A/C Compressor that meet Dodge factory standards. Dodge designs and tests every component for precision and durability. Each A/C Compressor follows strict manufacturing steps to lock in quality and fit. If your Dodge Ram 3500 matters to you, OEM parts make the smart choice. You'll get the exact look, feel, and performance you expect. Shop genuine Ram 3500 parts at the highly competitive prices online. Enjoy a manufacturer's warranty, a hassle-free return policy, and rapid delivery. No more guesswork with off brands. Get genuine parts with exact fit and true factory performance. Shop with confidence today at JeepPartsDeal.com.
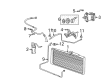
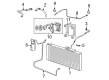
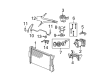
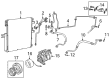
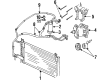
The A/C Compressor in Dodge Ram 3500 vehicles plays the role of evaporating the air and blowing it over the vehicle's dashboard for cooling the cabin and also to eliminate humidity from the air. The way it works is that it takes in refrigerant in a gaseous state and pumps it over to the condenser where the gas is converted into liquid state with the process accompanied by the release of heat. Looking at the below figure, it is clear that this function is driven by the vehicles crankshaft through a belt, underlining the significance of the compressor for the rest of the A/C system. Several versions of the A/C Compressors have been installed in Dodge Ram 3500 models in the past years with the aim of improving efficiency and durability. Any problems concerning the A/C system, with specific reference to pressure, points to the compressor or the valves that are affiliated to it and therefore proper maintenance enables fully convenient temperature for use within the Dodge Ram 3500 to be maintained.
Dodge Ram 3500 A/C Compressor Parts and Q&A
- Q: How to Service and Repair a Sanden A/C Compressor Clutch on Dodge Ram 3500?A:Prior to replacing the A/C compressor clutch, remove the accessory belt and disconnect the negative Battery Cable, always making sure the refrigerant level has been maintained. Unplug the engine wire harness connector from the clutch field coil wire harness connector on top of the compressor and then remove the bolts securing the compressor to its mounting bracket. Keep the clutch plate still (use Special Tool C-4489 or an equivalent) and remove the nut, followed by removing the clutch plate together with the shims. To remove the snap ring using snap ring pliers (Special Tool C-4574 or another similar model) and place the lip of the pulley and bearing puller (Special Tool C-6141-1 or its equivalent) along with the shaft protector (Special Tool C-6141-2 or equivalent), into the snap ring groove. Don't use too much force when withdrawing the compressor shaft with the puller center bolt. Put through-bolts (Special Tool C-6461 or similar) into the puller flange and tighten them by turning the center bolt of the puller clockwise until the pulley assembly comes loose. Disconnect the screw and retainer from the wire harness of the clutch field coil and then remove the snap ring that holds in the clutch field coil with your snap ring pliers. Before you install the clutch, make sure the snap ring is properly in its groove to stop the clutch from failing. Lock the clutch field coil onto the compressor with a new snap ring, having the bevel face the outside and the eyelets facing the correct way. Screw the retainer onto the clutch field coil and tighten the screw on the wire harness lead to 2.2 N.m (20 in.lbs.). Sit the pulley and bearing assembly on the front side of the A/C compressor and spin the installer to be sure it goes all the way in, then tighten the installer nut to fully install it. Simply use the snap ring pliers to hook on a new snap ring and secure the pulley and bearing assembly. If you choose to use the old clutch plate and pulley and bearing parts, put the original shim back; if using new pieces, use 1.0, 0.50 and 0.13 millimeter (0.040, 0.020 and 0.005 inch) shims from the new hardware. Join the clutch plate to the compressor shaft, securely hold the clutch plate in place with a spanner wrench and add the secure nut, fastening it tightly to 20 N.m (15 ft.lbs.). With the work tightened, place a feeler gauge to find the air gap between the clutch plate and the pulley and bearing assembly and then adjust the shims to obtain the proper gap. Once done with the A/C compressor, install the bolts that hold the compressor to the bracket, plug the engine harness connector back into the A/C compressor clutch coil, place the accessory Drive Belt and reconnect the negative battery cable.
- Q: How to Remove and Replace a Visteon A/C Compressor Clutch on Dodge Ram 3500?A:Put the A/C clutch field coil on the front of the A/C compressor with the wires lined up and the coil's tabs properly placed or the coil may be damaged during the replacement. Place the field coil positioning tabs on the same level as the front recessed area of the compressor and attach the clutch field coil with a two jaw puller, compressor field coil installer (Kit 9349 Special Tool 9352) and compressor field coil installer spacer (Kit 9349 Special Tool 9353). After that, connect the clutch field coil wire lead and connector to the A/C compressor, secure it with a plastic retaining clip and screw and set the screw torque to 4 Nm (35 in. lbs.). Set the pulley and bearing assembly in line with the A/C compressor so the tapping is simple, as a distinct noise signals when it sits flat. With Special Tool 9355 (from Kit 9349) and a hammer, set the pulley and assembly into its place, making it bottom against the housing, to stop the bearing and ensure the snap ring is correctly positioned to avoid clutch failure. Slide the snap ring into place with Snap Ring Pliers 9764 or another similar tool. Guarantee that enough clearance is given for the wire and connector tying the clutch to the clutch field coil. Choose the manufacturer's original shims when fitting a new clutch; if there was none installed in the previous setup, try the 1.0, 0.50 and 0.13 millimeter shims instead. Slide the clutch shims on the compressor shaft and use the compressor clutch holding fixture (9351 in Kit 9349) to install the bolt joining the clutch plate to the A/C compressor, making sure the clutch plate is still while you tighten the bolt to 15 Nm (133 in. lbs.). Place a feeler gauge between the clutch plate and the pulley and bearing assembly and adjust the shims until you get a gap of 0.35 to 0.75 millimeter (0.014 to 0.030 inch). Place the compressor into its mounting bracket, tighten the bolts to 23 Nm (17 ft. lbs.), connect the engine wire harness to the compressor clutch field coil connector, lower your vehicle, fit the accessory Drive Belt, reconnect the negative Battery Cable and perform the Clutch Break-in Procedure.


Related Dodge Ram 3500 Parts
 Dodge Ram 3500 A/C Accumulator
 Dodge Ram 3500 A/C Compressor Cut-Out Switches
 Dodge Ram 3500 A/C Condenser
 Dodge Ram 3500 A/C Expansion Valve
 Dodge Ram 3500 A/C Hose
 Dodge Ram 3500 A/C Service Cap
 Dodge Ram 3500 A/C System Valve Core
 Dodge Ram 3500 Blower Motor
 Dodge Ram 3500 Blower Motor Resistor
 Dodge Ram 3500 Evaporator
 Dodge Ram 3500 Heater Core
 Dodge Ram 3500 HVAC Pressure Switch