JeepParts
My Garage
My Account
Cart
OEM Dodge Ram 3500 Thermostat
Engine Coolant Thermostat- Select Vehicle by Model
- Select Vehicle by VIN
Select Vehicle by Model
orMake
Model
Year
Select Vehicle by VIN
For the most accurate results, select vehicle by your VIN (Vehicle Identification Number).
10 Thermostats found


Dodge Ram 3500 Thermostat Part Number: 68067109AB
$91.64 MSRP: $137.00You Save: $45.36 (34%)

Dodge Ram 3500 Thermostat Part Number: 5086739AB
$159.47 MSRP: $238.00You Save: $78.53 (33%)Ships in 1-2 Business Days

Dodge Ram 3500 Thermostat Part Number: 5014568AA
$126.90 MSRP: $189.00You Save: $62.10 (33%)Ships in 1-2 Business Days
Dodge Ram 3500 Thermostat Part Number: 5015708AC
$145.99 MSRP: $215.00You Save: $69.01 (33%)Ships in 1-2 Business Days
Dodge Ram 3500 Thermostat Part Number: 68534176AA
$177.43 MSRP: $262.00You Save: $84.57 (33%)
Dodge Ram 3500 Thermostat Part Number: 52028185AC
$18.30 MSRP: $26.80You Save: $8.50 (32%)

Dodge Ram 3500 Thermostat Part Number: 52028898AJ
$69.58 MSRP: $91.75You Save: $22.17 (25%)


Dodge Ram 3500 Thermostat Housing Part Number: 5015713AA

Dodge Ram 3500 Thermostat Part Number: 5015090AD

Dodge Ram 3500 Thermostat Part Number: 53041078AC
Dodge Ram 3500 Thermostat
Choose OEM Thermostat that meet Dodge factory standards. Dodge designs and tests every component for precision and durability. Each Thermostat follows strict manufacturing steps to lock in quality and fit. If your Dodge Ram 3500 matters to you, OEM parts make the smart choice. You'll get the exact look, feel, and performance you expect. Shop genuine Ram 3500 parts at the highly competitive prices online. Enjoy a manufacturer's warranty, a hassle-free return policy, and rapid delivery. No more guesswork with off brands. Get genuine parts with exact fit and true factory performance. Shop with confidence today at JeepPartsDeal.com.
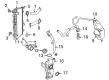
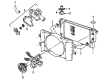
The Thermostat is a very important component in Dodge Ram 3500 vehicles, mainly because it regulates the temperature of the engine for it to work correctly. Sitting close to the radiator, the Thermostat is a closed loop control unit whose function is to feel temperature and control the circulation of coolant to keep the engine optimal temperature. In their performance through time, Dodge Ram 3500 has implemented different Thermostat types that are categorized in mechanical, which are the bimetallic strip & the wax pellet Thermostat. These devices work more like an engine that increases or decreases size in relation to heat so as to regulate engine temperatures. Such development of these Thermostats has empowered others that improve the efficiency as well as the comfort that the operation of the vehicle boasts of.
Dodge Ram 3500 Thermostat Parts and Q&A
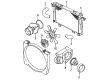
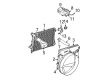
- Q: How to Maintain a Thermostat on Dodge Ram 3500?A:Since loosening the radiator drain is dangerous while the coolant is pressurized, check that it isn't loose when you service your thermostat. Pour the coolant into a clean vessel if it's still clean and make sure the new thermostat works for the vehicle and its engine. The thermostat housings on 3.9L, 5.2L and 5.9L engines are held in place with a gasket that helps stop them from sticking as they are removed. First, break the negative battery connection and let all the fluid drain from the cooling system, lowering the coolant to below the thermostat. Air-conditioned vehicles need the support bracket near the rear of the generator taken off, with note that the generator must be partially removed during this process. Remove next the accessory Drive Belt and the nuts that hold the generator to the chassis, but don't disconnect the wiring. If your vehicle has a 4Wd system, unplug the wiring for the 4Wd indicator lamp. Reach the thermostat gasket by getting the generator out of the way. When using constant tension hose clamps, pick up special Clamp tool number 6094 or Hpc20 from Snap-On for larger sizes and always be sure to wear safety glasses. Original equipment clamps with the same letters or numbers should be the only ones you replace constant tension clamps with. Open the upper hose clamp and remove the hose from the thermostat housing and reposition the wiring harness behind the housing so you have access while working. After that, unscrew the bolts behind the housing and take out the housing, gasket and thermostat, putting the old gasket aside. First, clean any dirt from the spots where the Intake Manifold and thermostat housing mate, then put the thermostat (upper side down) into its groove, cover it with the gasket and put it into the thermostat housing. Make sure the word Front is visible on the thermostat housing when it's facing the vehicle's front and then secure the housing to the intake manifold with the two bolts, tightening them to 23 Nm (200 inch lbs.) torque. Attach the radiator upper hose to the thermostat housing, taking care that the serpentine accessory drive belt is properly positioned to keep the engine from overheating because of wrong Water Pump rotation. For vehicles that are air-conditioned, set up the generator, then bolt it in at 41 Nm (30 ft. lbs.) torque. After that, set up the support bracket, tighten its bolts to 64 Nm (30 ft. lbs.) torque. Install the belt again, insert the radiator fluid, reattach the negative Battery Cable and start the engine, looking for any leaks as the engine is warming up.
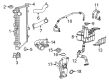
- Q: How to Install a Thermostat for a 5.7L Engine on Dodge Ram 3500?A:Set the thermostat and house into place at the front of the cover for the 5.7L engine, install the housing bolts and tighten securely to 13 Nm (112 in. lbs.). After that, fit the radiator hose to the thermostat housing. After that, add the coolant to the cooling system, connect the negative Battery Cable and turn the engine on to heat it up as you watch out for leaks.


Related Dodge Ram 3500 Parts
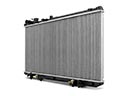 Dodge Ram 3500 Radiator
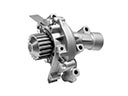 Dodge Ram 3500 Water Pump
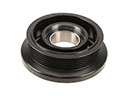 Dodge Ram 3500 A/C Idler Pulley
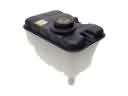 Dodge Ram 3500 Coolant Reservoir
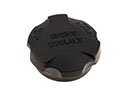 Dodge Ram 3500 Coolant Reservoir Cap
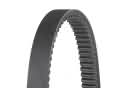 Dodge Ram 3500 Drive Belt
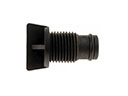 Dodge Ram 3500 Radiator Drain Plug
 Dodge Ram 3500 Radiator Hose
 Dodge Ram 3500 Thermostat Gasket
 Dodge Ram 3500 Water Hose
 Dodge Ram 3500 Water Pump Gasket
 Dodge Ram 3500 Water Pump Pulley