JeepParts
My Garage
My Account
Cart
OEM Dodge Viper Brake Booster
Brake Power Booster- Select Vehicle by Model
- Select Vehicle by VIN
Select Vehicle by Model
orMake
Model
Year
Select Vehicle by VIN
For the most accurate results, select vehicle by your VIN (Vehicle Identification Number).
3 Brake Boosters found

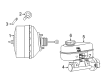
Dodge Viper Brake Booster Part Number: 68193554AB
$310.44 MSRP: $466.00You Save: $155.56 (34%)Ships in 1-3 Business Days


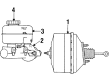
Dodge Viper Brake Booster Part Number: 4763952AB

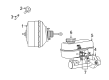
Dodge Viper Brake Booster Part Number: 5093050AA
Dodge Viper Brake Booster
Choose OEM Brake Booster that meet Dodge factory standards. Dodge designs and tests every component for precision and durability. Each Brake Booster follows strict manufacturing steps to lock in quality and fit. If your Dodge Viper matters to you, OEM parts make the smart choice. You'll get the exact look, feel, and performance you expect. Shop genuine Viper parts at the highly competitive prices online. Enjoy a manufacturer's warranty, a hassle-free return policy, and rapid delivery. No more guesswork with off brands. Get genuine parts with exact fit and true factory performance. Shop with confidence today at JeepPartsDeal.com.
This is a very vital component that greatly improves the performance as well as the safety of the entire Dodge Viper models. This brake booster is famous for its dependability; it lessens the amount of pressure that is needed for the brake pedal, with the help of vacuum created in vacuum chamber that augments the hydraulic pressure from the master cylinder. Due to this innovative design, drivers may apply slight pressure on the brake pedal to experience the premier level of stopping power besides the occasion of high-performance episodes or normal driving on the road. Besides, the Dodge Viper Brake Booster is useful for all models of the brand, thus helping each modification of the legendary sports car to gain more efficient brakes. Due to its two forms, namely vacuum and hydraulic boosters, it is apparent that Dodge has gone a long way in ensuring that the car's brake booster is modified in compatible manners with the various configurations of the Viper thus optimizing the experience of the driver. Two diaphragms are used in the Civic Type R, mainly offering more power-assist, which is important during hustling and bustling. The Dodge Viper Brake Booster is not only a performance part but also has high significance to the overall safety of the driver due to supplying a substantial and solid brake feel to the car. Also in a market where performance and reliability shapes the consumers' decisions, the Dodge Viper brake booster stands out as a great brand value addition that boosts the performance of the Dodge Viper.
Dodge Viper Brake Booster Parts and Q&A
- Q: How to Properly Install a Brake Booster on Dodge Viper?A:When putting in the power brake booster, place a new gasket at the rear of the unit. Put the mounting studs on the back of the brake booster through the dash panel's holes, then attach the booster securely to the dash. Put the four nuts in place that join the power brake booster and pedals to the dash panel and tighten them all to 28 Nm (21 ft. lbs.). Rub lubriplate or a similar lubricant on the part of the brake pedal pin that makes contact. Insert the rod from the power brake booster into the pedal pin and add a new retainer clip, not an old one. Connect one vacuum hose from the Intake Manifold to the check valve that is on the booster. Set the master cylinder into place so that you don't reuse the original stop lamp switch; whenever the switch is taken out or its position is changed, another new switch should replace it and be adjusted. Install a fresh brake lamp switch and make the necessary adjustments. Attach the negative cable from the battery, drain the brake system as required and look over the operation of the brakes and stop lamps.
- Q: How to Maintain and Fix a Brake Booster on Dodge Viper?A:The vacuum brake booster should be serviced by removing the brake tubes from the master cylinder and then unfastening the two nuts that attach it. Take the master cylinder away from the mounting studs on the booster and unhook the vacuum supply hose at the booster after removing the hose from the vacuum booster check valve, keeping the check valve with the booster. Using a small screwdriver, adjust the center part on the power brake booster's input rod to the brake pedal pin clip underneath, release the old clip and dispose of it, remembering to install a new one. Then, underneath the dash in the steering column and pedal bracket area, remove all four nuts that secure the vacuum booster to the vehicle dash panel. Once the studs on the booster slip out from underneath the dash panel, move the booster unit out, not separating the power brake assembly. When installing, insert a gasket between the vacuum booster and the dash panel, line the studs with the openings in the dash panel and mount the vacuum booster firmly on the cowl panel. Set the torque on all four nuts to 29 Nm (250 inch lbs.), grease the brake pedal bearing point, put the new connector clip between the input rod and pedal pin and double-check that the stop lights are working. Attach the vacuum hose from the Intake Manifold to the check valve on the vacuum booster, sit the master cylinder on the studs of the power brake unit and put the push rod in line with the master cylinder piston before pushing the master cylinder against the power brake booster. Attach the master cylinder to the power brake unit using torqued bolts of 28 Nm (250 inch lbs.). Before bonding the primary and secondary brake tubes, bleed the master cylinder assembly. After that, attach the brake tubes to the master cylinder, using 17 Nm (145 inch lbs.) torque for the nuts.


Related Dodge Viper Parts
 Dodge Viper ABS Control Module
 Dodge Viper Brake Caliper
 Dodge Viper Brake Disc
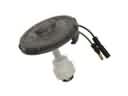 Dodge Viper Brake Fluid Level Sensor
 Dodge Viper Brake Line
 Dodge Viper Brake Master Cylinder
 Dodge Viper Brake Pad
 Dodge Viper Brake Proportioning Valve
 Dodge Viper Hydraulic Hose
 Dodge Viper Parking Brake Cable
 Dodge Viper Speed Sensor
 Dodge Viper Wheel Stud