JeepParts
My Garage
My Account
Cart
OEM 2004 Dodge Dakota A/C Condenser
Air Conditioning Condenser- Select Vehicle by Model
- Select Vehicle by VIN
Select Vehicle by Model
orMake
Model
Year
Select Vehicle by VIN
For the most accurate results, select vehicle by your VIN (Vehicle Identification Number).
2 A/C Condensers found

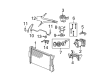
2004 Dodge Dakota Condenser Part Number: 55055866AG
Product Specifications- Other Name: Condenser - A/C; A/C Condenser; Condenser A/C
- Replaces: 55055866AD, 55055866AC, V8505866AD
- Item Weight: 5.30 Pounds
- Item Dimensions: 29.4 x 21.3 x 2.0 inches
- Condition: New
- Fitment Type: Direct Replacement
- SKU: 55055866AG
- Warranty: This genuine part is guaranteed by Mopar's factory warranty.

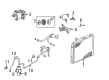
2004 Dodge Dakota Condenser Part Number: 55055892AF
Product Specifications- Other Name: Condenser - A/C; A/C Condenser; Condenser A/C
- Replaces: 55055892AB, 55055892AC, 55055892AD
- Item Weight: 6.70 Pounds
- Item Dimensions: 30.9 x 20.3 x 2.1 inches
- Condition: New
- Fitment Type: Direct Replacement
- SKU: 55055892AF
- Warranty: This genuine part is guaranteed by Mopar's factory warranty.
2004 Dodge Dakota A/C Condenser Parts and Q&A
- Q: How to Remove and Install an A/C Condenser on 2004 Dodge Dakota?A: First, you should disconnect and isolate the negative battery cable before removing the refrigerant from the system's A/C condenser. With all the nuts removed on the radiator cap, pull the assembly out and take it apart. Afterward, unscrew the nut holding the discharge line fitting at the condenser inlet and separate the discharge line, discarding the seal at the fitting. Cover the openings for the discharge line and condenser inlet with plugs or tape, remove the nut holding the liquid line fitting to the condenser outlet and then disconnect the liquid line, throwing the seal from the fitting away. For security, cover the liquid line fitting and the outlet port on the condenser using plugs or tape as you repeat this section. If fitted, take out the two bolts that keep the fluid cooler attached to the radiator and put it out of harm's way. With the condenser undone from the radiator with two bolts, lift it out of the engine compartment. While installing, if you are changing the A/C condenser, remember to include 30 milliliters (1 fluid ounce) of the proper refrigerant oil to the system for the A/C compressor. Place the A/C condenser behind the radiator, seat and lock the upper mounting tabs to the radiator brackets, then secure the condenser with two nuts tightened to 5 Nm (45 in. lbs.). If you have a fluid cooler for automatic transmissions, join it to the radiator and bolt it in place with the two bolts, each tightened to 5 Nm (45 in. lbs.). Unscrew the tape or plug from the port on the liquid line fitting and from the condenser outlet, lubricate a fresh rubber O-ring with clean refrigerant oil, then set it on the fitting-always ensure the new O-ring is the right type of seal suitable for R-134a refrigerant in your system. Screw in and secure the tail end of the liquid line fitting onto the condenser's outlet port; the nut should be tightened to 22 Nm (16 ft. lbs.). Pull out the tape or plugs from the discharge line fitting and condenser inlet port, add clean refrigerant oil to a rubber O-ring seal and install it on the discharge line fitting, making sure it's the proper O-ring. Clamp the discharge line to the condenser inlet port and turn the clamp nut until the tension reaches 22 Nm (16 ft. lbs.). Join the radiator and condenser seal with the radiator support panel on the right and clip it into place using four pushpins, after which you may finish the reinstallation of the negative battery link. Lastly, remove the entire refrigerant system from your home and charge it properly.
Related 2004 Dodge Dakota Parts
 2004 Dodge Dakota Blower Motor Resistor
 2004 Dodge Dakota Blower Motor
 2004 Dodge Dakota Heater Core
 2004 Dodge Dakota A/C Accumulator
 2004 Dodge Dakota A/C Compressor
 2004 Dodge Dakota A/C Hose
 2004 Dodge Dakota A/C Switch
 2004 Dodge Dakota Blower Control Switches
 2004 Dodge Dakota Evaporator