JeepParts
My Garage
My Account
Cart
OEM 2005 Jeep Liberty Brake Line
Brake Hose- Select Vehicle by Model
- Select Vehicle by VIN
Select Vehicle by Model
orMake
Model
Year
Select Vehicle by VIN
For the most accurate results, select vehicle by your VIN (Vehicle Identification Number).
6 Brake Lines found


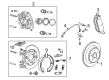
2005 Jeep Liberty Flex Hose, Rear Passenger Side Part Number: 52128514AE
$104.92 MSRP: $159.00You Save: $54.08 (35%)Product Specifications- Other Name: Line - Brake; Brake Hydraulic Hose, Rear Right; Brake Hydraulic Line, Rear Right; Brake Hose; Brake Line; Brake Tube; Hose Brake; Hydraulic Hose
- Position: Rear Passenger Side
- Replaces: 52128514AC, 52128514AD
- Item Weight: 1.70 Pounds
- Item Dimensions: 38.0 x 11.3 x 3.3 inches
- Condition: New
- Fitment Type: Direct Replacement
- SKU: 52128514AE
- Warranty: This genuine part is guaranteed by Mopar's factory warranty.

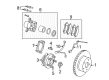
2005 Jeep Liberty Flex Hose, Front Passenger Side Part Number: 52128312AC
$46.94 MSRP: $118.00You Save: $71.06 (61%)Ships in 1-2 Business DaysProduct Specifications- Other Name: Line - Brake; Brake Hydraulic Hose, Front Right; Hydraulic Hose; Brake Hose; Brake Line
- Position: Front Passenger Side
- Replaces: 52128312AB, 52128312AA
- Item Weight: 0.80 Pounds
- Item Dimensions: 23.3 x 2.9 x 1.5 inches
- Condition: New
- Fitment Type: Direct Replacement
- SKU: 52128312AC
- Warranty: This genuine part is guaranteed by Mopar's factory warranty.

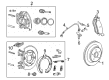
2005 Jeep Liberty Flex Hose, Rear Driver Side Part Number: 52128515AC
$422.47 MSRP: $851.00You Save: $428.53 (51%)Ships in 1-2 Business DaysProduct Specifications- Other Name: Line - Brake; Brake Hydraulic Hose, Rear Left; Brake Hydraulic Line, Rear Left; Hydraulic Hose; Brake Hose; Brake Line; Brake Tube
- Position: Rear Driver Side
- Replaces: 52128515AB
- Item Weight: 1.90 Pounds
- Item Dimensions: 11.9 x 2.8 x 1.8 inches
- Condition: New
- Fitment Type: Direct Replacement
- SKU: 52128515AC
- Warranty: This genuine part is guaranteed by Mopar's factory warranty.

2005 Jeep Liberty Flex Hose, Rear Center Part Number: 52128310AB
$177.77 MSRP: $564.00You Save: $386.23 (69%)Ships in 1-2 Business DaysProduct Specifications- Other Name: Line - Brake; Brake Hydraulic Hose, Rear Center; Hydraulic Hose; Brake Hose; Brake Line
- Position: Rear Center
- Item Weight: 0.80 Pounds
- Item Dimensions: 19.0 x 2.3 x 1.5 inches
- Condition: New
- Fitment Type: Direct Replacement
- SKU: 52128310AB
- Warranty: This genuine part is guaranteed by Mopar's factory warranty.
2005 Jeep Liberty Flex Hose, Front Driver Side Part Number: 52128311AC
Product Specifications- Other Name: Line - Brake; Brake Hydraulic Hose, Front Left; Hydraulic Hose; Brake Hose; Brake Line
- Position: Front Driver Side
- Replaces: 52128311AA, 52128311AB
- Item Weight: 2.40 Pounds
- Item Dimensions: 24.1 x 2.6 x 1.4 inches
- Condition: New
- Fitment Type: Direct Replacement
- SKU: 52128311AC
- Warranty: This genuine part is guaranteed by Mopar's factory warranty.

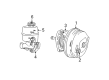
2005 Jeep Liberty Pressure Metering Valve Part Number: 52128965AD
Product Specifications- Other Name: Line - Brake Line Union; Brake Proportioning Valve; Block Brake Line Union
- Item Weight: 1.80 Pounds
- Item Dimensions: 8.0 x 7.6 x 4.5 inches
- Condition: New
- Fitment Type: Direct Replacement
- SKU: 52128965AD
- Warranty: This genuine part is guaranteed by Mopar's factory warranty.
2005 Jeep Liberty Brake Line Parts and Q&A
- Q: How Should You Service and Repair Brake Lines on 2005 Jeep Liberty?A: Brake hose and line service and repair should be carried out with a metal brake tube, but double-wall steel tube can be used to make an emergency repair if the original factory parts are not obtainable. You need specific bending equipment for metal brake tubes because it can easily get twisted or bent improperly and to make an ISO flare, special flaring tools are necessary. First, remove the damaged portion with a Tubing Cutter and then use a reamer to flare the edges of the cut part. Mount the new nut to the tube and then place the tube in the flaring tool. Cover the tube's end with the gauge form and move it into the flaring tool jaws, sliding until the tube touches the notched area in the gauge corresponding to its diameter. Close the tool bar on the tube, fasten the plug onto the gauge and slide the compression disc over the gauge so the tapered flaring screw is in the recess. Twist the handle until the plug gauge fits squarely on the tool's jaws to produce the inverted flare and take out the plug gauge to finish the flare. When flaring ISO tubing, cut the damaged section and follow with removing any inside burrs. Place the tube nut on the thread, position the tube inside the flaring tool again flush with the bar and tighten the bar. Dead center the fitting on the flaring tool yoke screw and after lubricating it, screw the fitting onto the tool bar until it seats firmly.
Related 2005 Jeep Liberty Parts
 2005 Jeep Liberty Brake Caliper
 2005 Jeep Liberty Speed Sensor
 2005 Jeep Liberty Wheel Stud
 2005 Jeep Liberty ABS Control Module
 2005 Jeep Liberty Brake Booster
 2005 Jeep Liberty Brake Caliper Bracket
 2005 Jeep Liberty Brake Caliper Piston
 2005 Jeep Liberty Brake Disc
 2005 Jeep Liberty Brake Dust Shield
 2005 Jeep Liberty Brake Master Cylinder
 2005 Jeep Liberty Hydraulic Hose
 2005 Jeep Liberty Parking Brake Shoe