JeepParts
My Garage
My Account
Cart
OEM Chrysler Concorde Crankshaft
Crank Shaft- Select Vehicle by Model
- Select Vehicle by VIN
Select Vehicle by Model
orMake
Model
Year
Select Vehicle by VIN
For the most accurate results, select vehicle by your VIN (Vehicle Identification Number).
5 Crankshafts found


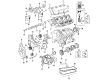
Chrysler Concorde Crankshaft Part Number: 4663638
$1000.64 MSRP: $1485.00You Save: $484.36 (33%)Ships in 1-2 Business Days
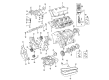
Chrysler Concorde Crankshaft Part Number: 4792333
$121.61 MSRP: $154.16You Save: $32.55 (22%)Ships in 1-2 Business Days
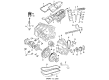
Chrysler Concorde Crankshaft Part Number: 4792176

Chrysler Concorde Crankshaft Sensor Part Number: 4556224

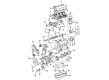
Chrysler Concorde Crankshaft Part Number: 4792692AB
Chrysler Concorde Crankshaft
Choose OEM Crankshaft that meet Chrysler factory standards. Chrysler designs and tests every component for precision and durability. Each Crankshaft follows strict manufacturing steps to lock in quality and fit. If your Chrysler Concorde matters to you, OEM parts make the smart choice. You'll get the exact look, feel, and performance you expect. Shop genuine Concorde parts at the highly competitive prices online. Enjoy a manufacturer's warranty, a hassle-free return policy, and rapid delivery. No more guesswork with off brands. Get genuine parts with exact fit and true factory performance. Shop with confidence today at JeepPartsDeal.com.
Chrysler Concorde Crankshaft Parts and Q&A
- Q: How to Remove and Install a Crankshaft in an Engine on Chrysler Concorde?A:The first step is to take the engine out from the vehicle and set it on an engine stand. Take out the old engine oil using a drain pan, change the Oil Filter and remove the Oil Pan and oil pick-up tube after that. After that, remove the bracket for the accessory Drive Belt, the upper Intake Manifold and the cylinder head covers. Uncover the Timing Chain, replace the primary chain, remove both tensioners, the crankshaft sprocket, oil pump and the rear crankshaft oil seal retainer. After that, remove the structural windage tray. Move the crankshaft so you can take out the connecting rod cap and remember to mark the connecting rod bearing caps with a permanent ink marker or scribe tool, since they don't fit every engine. Prevent the damage of the connecting rods by not using a number stamp or punch. Be careful to take out the bearing caps and the bolts that hold them before you remove the main bearing caps. Do not damage the bearings when you remove the crankshaft. Use engine oil to coat the upper main bearing halves and then install the crankshaft, so the coated and grooved side of the thrust washer is turned toward where the crankshaft will press against it during operation. Push the crankshaft towards the front to install the front thrust washer and then press it back to set the rear thrust washer, each lubricated. Apply engine oil to the lower main bearings, slide in the main bearings and caps and make sure you grease the main bearing cap bolts before installation. Do up the main cap bolts on the inside to 20 Nm + 1/4 Turn, then measure the crankshaft for play and install the rods and check their side clearance. Place the windage tray in position, give the bolts a coat of oil and tighten by 27 Nm + 1/4 turn. Put all of the oil seals, sprockets and chain onto the crankshaft, then screw the main tie bolts to 28 Nm. After everything is checked, reinstall the engine and add the needed amount of oil to the crankcase.

Related Chrysler Concorde Parts
 Chrysler Concorde Camshaft
 Chrysler Concorde Camshaft Seal
 Chrysler Concorde Dipstick Tube
 Chrysler Concorde Engine Mount Bracket
 Chrysler Concorde Intake Valve
 Chrysler Concorde Lash Adjuster
 Chrysler Concorde Oil Pump Gasket
 Chrysler Concorde Piston
 Chrysler Concorde Rod Bearing
 Chrysler Concorde Timing Cover Gasket
 Chrysler Concorde Valve Stem Seal
 Chrysler Concorde Variable Timing Sprocket