JeepParts
My Garage
My Account
Cart
OEM Chrysler PT Cruiser Axle Shaft
Car Axle Shaft- Select Vehicle by Model
- Select Vehicle by VIN
Select Vehicle by Model
orMake
Model
Year
Select Vehicle by VIN
For the most accurate results, select vehicle by your VIN (Vehicle Identification Number).
13 Axle Shafts found


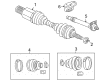
Chrysler PT Cruiser Axle Assembly, Front Passenger Side Part Number: 4668936AC
$349.93 MSRP: $544.36You Save: $194.43 (36%)Ships in 1-2 Business Days
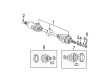
Chrysler PT Cruiser Axle Assembly, Front Passenger Side Part Number: RL085064AC
$370.80Ships in 1-2 Business Days


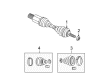
Chrysler PT Cruiser Axle Assembly, Rear Part Number: 5272914AG
$151.82 MSRP: $224.00You Save: $72.18 (33%)

Chrysler PT Cruiser Axle Assembly, Rear Part Number: 4656440AM


Chrysler PT Cruiser Axle Assembly, Rear Part Number: 5272965AA
Chrysler PT Cruiser Axle Assembly, Rear Part Number: 5272914AH
Chrysler PT Cruiser Axle Assembly, Rear Part Number: 4656440AN
Chrysler PT Cruiser Axle Shaft
Choose OEM Axle Shaft that meet Chrysler factory standards. Chrysler designs and tests every component for precision and durability. Each Axle Shaft follows strict manufacturing steps to lock in quality and fit. If your Chrysler PT Cruiser matters to you, OEM parts make the smart choice. You'll get the exact look, feel, and performance you expect. Shop genuine PT Cruiser parts at the highly competitive prices online. Enjoy a manufacturer's warranty, a hassle-free return policy, and rapid delivery. No more guesswork with off brands. Get genuine parts with exact fit and true factory performance. Shop with confidence today at JeepPartsDeal.com.
The Axle Shaft in Chrysler PT Cruiser vehicles is a very important part that connects the differential with the drive wheels in a manner that each wheel may rotate independently with a view of increasing tractions. These steel shafts like the solid axles used for trucks and older models of automobiles and halfshafts, for the vehicles with the independent suspension system. The differential and also the axle shafts are housed by the solid axles while half shaft transmit power from the transaxle to the wheels. Load from heavy duty, obstacles on the road or worn splines can affect the shafts causing noise and vibration further leading to loss of lubricant. Maintenance and repair of the bearings, seals, and the differential are recommended often to achieve proper efficiency and safety of the vehicle.
Chrysler PT Cruiser Axle Shaft Parts and Q&A
- Q: How to Remove and Install an Axle Shaft on Chrysler PT Cruiser?A:Before anything else, seal the boot around the axle shaft correctly to help prevent contaminants from getting into the C/V joint and assist the axle shaft by supporting the driveshaft from both ends during the procedure. Loosen the negative terminal from the battery and pause on gated park before putting the car on a lift. Take off the wheel and tire together, then separate the cotter pin, nut lock and spring washer from the build-up outer C/V joint stub axle. Slip the driveshaft to hub and bearing retaining nut and washer from the shaft and if you have ABS, separate the front wheel Speed Sensor. Take off the nut and bolt from the ball joint stud connected to the Steering Knuckle, so you don't harm the sealing area. Loosen the ball joint stud from the steering knuckle by pushing down on the lower Control Arm without harming the C/V joint. Gently lift out the driveshaft with pressure on the driveshaft; if there are problems separating the outer stub axle from the hub and bearing, insert Puller, Special Tool 6790, to do the task for you. Lift the outer end of the driveshaft and then punch the inner tripod joints free from the side gears of the transaxle to remove the retaining ring. Take hold of the main tube and interconnecting shaft and pull the inner tripod joint off its side on the transaxle as fluid drips out. When installing, wash the pivot and oil seal surfaces on the tripod, put a tiny amount of transmission lube on the spline and fit the tripod into the gear with your hands, ensuring you engage the retaining ring right. Free the outer C/V joint from dirt and then push the driveshaft into the front hub before mounting the steering knuckle onto the ball joint stud. Attach the knuckle to the ball joint stud bolt and nut, set to 95 Nm (70 ft. lbs.) and then remove dirt from the driveshaft outer stub axle threads, add the washer and put on the hub nut to a torque of 244 Nm (180 ft. lbs.). After that, fit the spring washer, nut lock and cotter pin, assemble the front wheel and tire again, tighten all lug nuts to 128 Nm (100 ft. lbs.), notice the level in the transaxle assembly, bring the vehicle to ground level and attach the negative battery terminal using a fastener.
- Q: How to Service and Repair the Axle Shaft on Chrysler PT Cruiser?A:For working on front-wheel-drive vehicles, use safety precautions by paying attention to the lever of the parking brake which is loaded with about 19 pounds of spring force. Pull the cable from the negative side of the battery and let the air bag system capacitor discharge for two minutes before moving on. After unclamping the cover for the air cleaner, put it aside and obstruct the car's wheels so that movement is not allowed. Take out the screws that hold the center console and the transmission Shift Knob to view the parking brake lever output cable. Push the cable handle upward to cause a pin punch to go through the lever mounting bracket, securing the automatic adjustment device. Pull out both rear Parking Brake Cables from the equalizer, hoist the vehicle and remove both rear tire and wheel sets. Take off the drum brake flex hoses and drums on cars with rear drum brakes; if disc brakes are used, get rid of the caliper caliper guide pin bolts and flex hoses and hang the calipers out of the way. Take the rotor, dust cap and hub and bearing nut off the vehicle and remove the hub and bearing. In most rear disc brake models, the parking brake shoes come out together as one assembly. Take off the parking brake cables from the brake support plates or disc brake adapters and remove the trailing arm brackets and axle from your car. Check the axle carefully for damage, tighten all fasteners to the right degree and check for either broken welds or bushings that have worn out. As you reinstall, place the trailing arm forward brackets on the axle, making sure the thru-bolts go in the outside first. Center the Axle Beam on a transmission jack, line up the trailing arms with marks and attach the mounting bolts, tightening them to 54 Nm (40 ft. lbs.). First, install rubber isolators on the Coil Springs and ensure they are facing down, then put the springs on the axle spring perches and finally screw in the lower bolts on the shock, not overtightening them (use a torque reading of 88 Nm or 65 ft. lbs.). Attach the cushion retainers for the stabilizer bar and add the watts link bell crank, after which you should tighten the bolt to 149 Nm (110 ft. lbs.). Secure the Spindle and support plate or disc brake adapter and first apply some Mopar Stud & Bearing Mount Adhesive to all the threaded bolts. Then, tighten everything to 95 Nm (70 ft. lbs.). Fit the wheel speed sensors and secure them, next, guide the parking brake cables through the trailing arm and install and secure the routing brackets. Guide the parking brake cables onto the brake support plate or disc brake adapter so the locking fingers spread out. Add a new retaining nut and reattach the hub and bearing, tightening to 217 Nm (160 ft. lbs.). Afterward, screw on the dust caps. In drum brake vehicles, put on the Brake Drums; in disc brake vehicles, fasten the rotors and calipers, torquing guide pin bolts of the calipers to 22 Nm (192 inch lbs.). Attach the flex hoses tightly, restore the wheels and corresponding tires and use a torque wrench to tighten each wheel nut to 135 Nm (100 ft. lbs.). Slightly lower the car, link the brake cable to the equalizer and pull out the pin punch from the parking brake lever so movement is automatic. Pull and release the parking brake lever and make sure the rear wheels spin freely. Attach the center console, shift knob and air cleaner cover, link the battery's negative terminal and have the vehicle on an alignment rack while tightening the trailing arm to mounting bracket pivot thru-bolts using a torque wrench to 122 Nm (90 ft. lbs.). Then, adjust the rear wheel alignment if necessary.


Related Chrysler PT Cruiser Parts
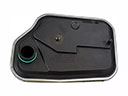 Chrysler PT Cruiser Automatic Transmission Filter
 Chrysler PT Cruiser Automatic Transmission Shift Levers
 Chrysler PT Cruiser Automatic Transmission Shifter
 Chrysler PT Cruiser Clutch Cable
 Chrysler PT Cruiser Clutch Fork
 Chrysler PT Cruiser Clutch Release Bearing
 Chrysler PT Cruiser Clutch Slave Cylinder
 Chrysler PT Cruiser CV Boot
 Chrysler PT Cruiser Flywheel
 Chrysler PT Cruiser Torque Converter
 Chrysler PT Cruiser Transmission Pan
Browse Chrysler PT Cruiser Axle Shaft by Years
2010
2009
2008
2007
2006
2005
2004
2003
2002
2001