JeepParts
My Garage
My Account
Cart
OEM Dodge Ram 2500 Van A/C Clutch
Air Conditioning Clutch- Select Vehicle by Model
- Select Vehicle by VIN
Select Vehicle by Model
orMake
Model
Year
Select Vehicle by VIN
For the most accurate results, select vehicle by your VIN (Vehicle Identification Number).
1 A/C Clutch found

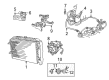
Dodge Ram 2500 Van Clutch Part Number: 5093765AA
Dodge Ram 2500 Van A/C Clutch
Choose OEM A/C Clutch that meet Dodge factory standards. Dodge designs and tests every component for precision and durability. Each A/C Clutch follows strict manufacturing steps to lock in quality and fit. If your Dodge Ram 2500 Van matters to you, OEM parts make the smart choice. You'll get the exact look, feel, and performance you expect. Shop genuine Ram 2500 Van parts at the highly competitive prices online. Enjoy a manufacturer's warranty, a hassle-free return policy, and rapid delivery. No more guesswork with off brands. Get genuine parts with exact fit and true factory performance. Shop with confidence today at JeepPartsDeal.com.
Dodge Ram 2500 Van A/C Clutch Parts and Q&A
- Q: How to replace the A/C Clutch on Dodge Ram 2500 Van?A:Before changing the A/C compressor clutch, take the battery's negative cable off and then pull off the serpentine drive belt. Unconnect the clutch coil wire harness from the rest of the compressor, remove the clutch plate and use a plastic hammer to loosen the shims if needed. Don't try to pry anything between the clutch plate and the clutch pulley to prevent ruining them. After that, use snap ring pliers to remove the snap ring holding the compressor clutch pulley and use a 3 jaw puller and Shaft protector # 2134A to take off the clutch pulley assembly from the compressor. Take out the screw and retainer from the clutch coil lead wire of the compressor front housing and pull off the compressor clutch wire harness connectors from the thermal limiter switch. Notice the position of the clutch field coil assembly before taking it off, removing the snap ring and then removing the entire assembly from the front of the compressor. Examine the clutch pulley's friction rings on its outside edge and the friction ring on the front plate assembly. If there is excessive wear or scoring, replace them. Too much oil on the friction parts and on the compressor's shaft and nose means the shaft seal is leaking and the compressor should be replaced. Look at the clutch pulley bearing for any rough parts or excessive grease seepage and change it if required. To install, put the back of the clutch field coil against the front housing of the compressor and secure its locating pin onto the indentation. Put the clutch field coil snap ring so the bevel end faces out before inserting it all the way in to avoid clutch problems. Fix the retaining clip of the clutch coil lead wire harness to the compressor and tighten the screw, afterward attach the connectors of the compressor clutch wire harness. Place the clutch pulley assembly over the compressor in a clean way, then install the clutch pulley assembly snap ring with the smooth side facing out. Apply 0.07 millimeter thick shims to the compressor shaft, bring the mating splines together and fit the clutch plate. Retain the snap ring on the front rotor and position it so the bevel is visible from the front. Measure the space between the clutch plate and pulley using a feeler gauge and use shims to make the gap between 0.35 and 0.65 millimeters. Tighten the nut on the compressor shaft to 17.7Nm, check the air gap after tightening, spin the pulley again just to check, replace the serpentine belt and reconnect the negative cable on the battery.

Related Dodge Ram 2500 Van Parts
 Dodge Ram 2500 Van A/C Accumulator
 Dodge Ram 2500 Van A/C Compressor
 Dodge Ram 2500 Van A/C Compressor Cut-Out Switches
 Dodge Ram 2500 Van A/C Condenser
 Dodge Ram 2500 Van A/C Expansion Valve
 Dodge Ram 2500 Van A/C Hose
 Dodge Ram 2500 Van Blower Control Switches
 Dodge Ram 2500 Van Blower Motor
 Dodge Ram 2500 Van Blower Motor Resistor
 Dodge Ram 2500 Van Evaporator
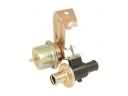 Dodge Ram 2500 Van Heater Control Valve
 Dodge Ram 2500 Van Heater Core