JeepParts
My Garage
My Account
Cart
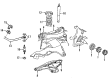
OEM Dodge Ram 3500 Control Arm
Suspension Arm- Select Vehicle by Model
- Select Vehicle by VIN
Select Vehicle by Model
orMake
Model
Year
Select Vehicle by VIN
For the most accurate results, select vehicle by your VIN (Vehicle Identification Number).
20 Control Arms found


Dodge Ram 3500 Lower Control Arm, Front Part Number: 68078374AA
$183.60 MSRP: $403.00You Save: $219.40 (55%)Ships in 1-2 Business Days


Dodge Ram 3500 Lower Control Arm, Front Part Number: 4670383AB
$237.58 MSRP: $361.00You Save: $123.42 (35%)Ships in 1-2 Business Days


Dodge Ram 3500 Upper Control Arm, Front Part Number: 52121586AF
$181.28 MSRP: $267.00You Save: $85.72 (33%)Ships in 1-3 Business Days


Dodge Ram 3500 Lower Control Arm, Front Driver Side Part Number: 52121517AE
$260.78 MSRP: $394.00You Save: $133.22 (34%)Ships in 1-2 Business Days


Dodge Ram 3500 Upper Control Arm, Front Part Number: 52013797AC
$261.72 MSRP: $389.00You Save: $127.28 (33%)
Dodge Ram 3500 Upper Control Arm Part Number: 52106799AA
$213.03 MSRP: $270.05You Save: $57.02 (22%)Ships in 1-2 Business Days

Dodge Ram 3500 Lower Control Arm Part Number: 52038753AC


Dodge Ram 3500 Upper Control Arm, Front Part Number: 52106776AE


Dodge Ram 3500 Upper Control Arm, Front Part Number: 52038730

Dodge Ram 3500 Lower Control Arm Part Number: 52113678AA

Dodge Ram 3500 Lower Control Arm Part Number: 52106778AA


Dodge Ram 3500 Upper Control Arm Part Number: 52106678AA

Dodge Ram 3500 Lower Control Arm Part Number: 52037649
Dodge Ram 3500 Lower Control Arm Part Number: 52037648

Dodge Ram 3500 Lower Control Arm, Front Part Number: 52013798AB
Dodge Ram 3500 Upper Control Arm Part Number: 52038751AD

Dodge Ram 3500 Lower Arm Part Number: 52038753AD
Dodge Ram 3500 Control Arm
Choose OEM Control Arm that meet Dodge factory standards. Dodge designs and tests every component for precision and durability. Each Control Arm follows strict manufacturing steps to lock in quality and fit. If your Dodge Ram 3500 matters to you, OEM parts make the smart choice. You'll get the exact look, feel, and performance you expect. Shop genuine Ram 3500 parts at the highly competitive prices online. Enjoy a manufacturer's warranty, a hassle-free return policy, and rapid delivery. No more guesswork with off brands. Get genuine parts with exact fit and true factory performance. Shop with confidence today at JeepPartsDeal.com.
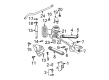
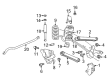
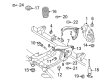
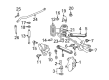
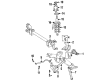
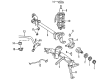
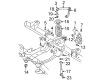
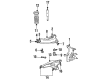
The Control Arm is located in Dodge Ram 3500 vehicles and connects the frame with the wheels facilitating suspension pieces such as shocks and springs. These arms turn in accordance to road conditions and provide the function of movement of the wheels up and down. The control arms come in different types, while all of them bear the bushing at the point of contact with the frame, and ball joints at the connection with the knuckle or axle. Newer Ram 3500 models might be having sturdier control arm made of cast iron or aluminum for more efficient performance. The control arms serves the very critical role of ensuring right orientation of the wheels, balance and traction of the car and how its tires wears therefore are critical components of a car.
Dodge Ram 3500 Control Arm Parts and Q&A
- Q: How to service and repair the right control arm on Dodge Ram 3500?A:Lift and secure the car and then remove the exhaust system at the manifolds plus the rubber exhaust brackets at the Muffler before you begin. Take care of the wiring and then remove the transmission crossmember. Place one jack beneath the muffler, so the exhaust hangs low and then undo the bolt and nut fastening the upper suspension arm to the frame. After that, remove the bolt and nut from the upper suspension arm at the bracket and take the arm off the vehicle. During installing, attach the upper suspension arm at the axle and the frame rail, insert the bolts and secure them with your fingers for now. Attach the rubber mounts to the muffler and the exhaust at both manifolds and put in the transmission crossmember. Take away the supports and put the car on all wheels again, then tighten the nuts at the axle bracket and the frame bracket to 163 Nm (120 ft. lbs.).
- Q: How to Maintain the Control Arm on Dodge Ram 3500?A:Start by supporting and raising the vehicle, removing the wheel and tire and after that, take off the Brake Caliper assembly and the rotor. After that, take out the cotter pin and nut from the tie rod and use Puller C-3894-A to remove the Tie Rod End from the Steering Knuckle. Then, remove the stabilizer bar link from the suspension arm and prop up the lower arm's outboard side so the jack is in front of the shock mount. First, take out the cotter pin and nut, then separated the Ball Joint with Remover C-4150A. Release the suspension arm from the lower shock bolt, remove the jack, release the tension in the spring and rubber isolator and take out the spring and rubber isolator. After that, loosen and take out the suspension arm bolts attached to the crossmember. During installation, place the suspension arm on the crossmember and attach the bolts and nuts firmly, though not fully tight. Put the rubber isolator over the spring and push the spring into the upper spring seat. Pull the lower suspension arm up with a jack and place the spring inside the mount on the arm. Put in the lower shock bolts after backing off the lower shock bolt protectors and tighten both to 142 Nm (105 ft. lbs.). Bolt the steering knuckle to the lower ball joint, tighten the lower ball joint nut to 136 Nm (110 ft. lbs.) and install the other side's cotter pin. Secure the stabilizer bar link to the lower suspension arm by first inserting the grommet through the hole and tightening the retainer and nut to 37 Nm (27 ft. lbs.). Replace the end of the tie rod on the steering knuckle, fasten the nut with 108 Nm (80 ft. lbs.) of torque and fit the cotter pin inside. Bolting down the caliper and brake rotor should be followed by fitting the wheel and tire. When the car is supported, move it downward, tighten the suspension arm crossmember nuts firmly to 169 Nm (125 ft. lbs.) and remove the support.


Related Dodge Ram 3500 Parts
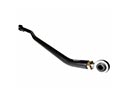 Dodge Ram 3500 Track Bar
 Dodge Ram 3500 Coil Springs
 Dodge Ram 3500 Ball Joint
 Dodge Ram 3500 Bump Stop
 Dodge Ram 3500 Control Arm Bumper
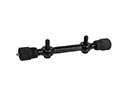 Dodge Ram 3500 Control Arm Shaft Kit
 Dodge Ram 3500 Shock Absorber
 Dodge Ram 3500 Steering Knuckle
 Dodge Ram 3500 Sway Bar Bracket
 Dodge Ram 3500 Sway Bar Bushing
 Dodge Ram 3500 Sway Bar Link
 Dodge Ram 3500 Sway Bar Link Bushing
Browse Dodge Ram 3500 Control Arm by Years
2010
2009
2008
2007
2006
2005
2004
2003
2002
2001
2000
1999
1998
1997
1996
1995
1994