JeepParts
My Garage
My Account
Cart
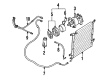
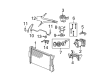
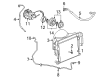
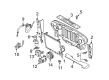
OEM Jeep A/C Clutch
Air Conditioning Clutch- Select Vehicle by Model
- Select Vehicle by VIN
Select Vehicle by Model
orMake
Model
Year
Select Vehicle by VIN
For the most accurate results, select vehicle by your VIN (Vehicle Identification Number).
45 A/C Clutches found


Jeep Clutch Part Number: 5083076AA
$482.61 MSRP: $611.79You Save: $129.18 (22%)Ships in 1-2 Business DaysProduct Specifications- Other Name: Clutch - A/C Compressor; A/C Compressor Clutch; Clutch A/C Compressor


Jeep Clutch Kit Part Number: 68068755AA
$28.22 MSRP: $83.65You Save: $55.43 (67%)Ships in 1-2 Business DaysProduct Specifications- Other Name: Clutch - A/C Compressor; A/C Compressor Clutch; Repair Kit; A/C Compressor Clutch Overhaul Kit includes snap rings, washers, screws, and bolts.
- Replaced by: 68068755AB


Jeep Clutch & Pulley Part Number: 68057094AA
$394.11 MSRP: $559.00You Save: $164.89 (30%)Ships in 1-2 Business DaysProduct Specifications- Other Name: Clutch - A/C Compressor; A/C Compressor Clutch; Clutch Overhaul Kit A/C Compressor

Jeep Hub Assembly Part Number: 68084834AC
$249.73 MSRP: $379.00You Save: $129.27 (35%)Product Specifications- Other Name: Pulley - A/C Compressor; A/C Compressor Clutch Pulley; Pulley Assembly; Clutch Plate & Hub Assembly; Pulley
- Replaces: 68084834AB, 68084834AA

Jeep Clutch Kit Part Number: 5140428AA
$5.30 MSRP: $36.75You Save: $31.45 (86%)Ships in 1-2 Business DaysProduct Specifications- Other Name: Clutch Package - A/C Compressor; A/C Compressor Clutch; Hardware Kit; Clutch Overhaul Kit A/C Compressor with Snap Rings, Washers, Screws, Pulley Bolt.

Jeep Coil - A/C Clutch Part Number: 5140461AB
$122.73 MSRP: $257.00You Save: $134.27 (53%)Ships in 1-2 Business DaysProduct Specifications- Other Name: COIL-AIR CONDITIONING CLUTCH

Jeep Pulley Part Number: 68542124AA
$27.84 MSRP: $40.00You Save: $12.16 (31%)Ships in 1-3 Business DaysProduct Specifications- Other Name: Pulley - A/C Compressor; A/C Compressor Clutch Pulley; A/C Compressor Clutch

Jeep Coil - A/C Clutch Part Number: 68225278AC
$211.12 MSRP: $315.00You Save: $103.88 (33%)Ships in 1-2 Business DaysProduct Specifications- Other Name: COIL-AIR CONDITIONING CLUTCH
- Replaced by: 68225278AD

Jeep Clutch & Pulley Part Number: 68526045AA
$94.15 MSRP: $139.00You Save: $44.85 (33%)Ships in 1-3 Business DaysProduct Specifications- Other Name: Clutch - A/C Compressor; A/C Compressor Clutch; Clutch

Jeep Clutch Plate & Hub Assembly Part Number: 68526082AA
$57.27 MSRP: $84.25You Save: $26.98 (33%)Ships in 1-3 Business DaysProduct Specifications- Other Name: Pulley Kit - A/C Compressor; A/C Compressor Clutch Pulley; A/C Compressor Clutch; Pulley

Jeep Pulley Part Number: J8133193
$72.46 MSRP: $107.00You Save: $34.54 (33%)Ships in 1-3 Business DaysProduct Specifications- Other Name: Pulley, Drive
Jeep Clutch Plate & Hub Assembly Part Number: 68526048AA
$69.11 MSRP: $102.00You Save: $32.89 (33%)Ships in 1-2 Business DaysProduct Specifications- Other Name: Pulley Kit - A/C Compressor; A/C Compressor Clutch Pulley; A/C Condenser; A/C Compressor Clutch; Pulley
Jeep Coil - A/C Clutch Part Number: 68526047AB
$30.39 MSRP: $43.70You Save: $13.31 (31%)Ships in 1-2 Business DaysProduct Specifications- Other Name: COIL-AIR CONDITIONING CLUTCH


Jeep Clutch Coil Part Number: 68526047AA
$30.39 MSRP: $43.70You Save: $13.31 (31%)Ships in 1-3 Business DaysProduct Specifications- Other Name: Coil - A/C Clutch; A/C Compressor Clutch Coil; A/C Compressor Clutch


Jeep Clutch & Pulley Part Number: 4882005
Product Specifications- Other Name: Clutch - A/C Compressor; A/C Compressor Clutch; Clutch; Clutch A/C Compressor


Jeep Clutch Kit Part Number: 5066225AA
Product Specifications- Other Name: Clutch Kit - A/C Compressor; A/C Compressor Clutch; Repair Kit; Hardware Kit; Clutch; Clutch Overhaul Kit A/C Compressor
Jeep Clutch & Pulley Part Number: 68058044AB
Product Specifications- Other Name: Pulley - A/C Compressor; A/C Compressor Clutch
- Replaces: 68058044AA

Jeep Clutch Part Number: 5014092AA
Product Specifications- Other Name: Clutch - A/C Compressor; A/C Compressor Clutch; Clutch A/C Compressor Shim Package; Clutch A/C Compressor

Jeep Hardware Kit Part Number: 68068755AB
$56.71 MSRP: $83.65You Save: $26.94 (33%)Product Specifications- Other Name: Clutch - A/C Compressor; A/C Compressor Clutch; Clutch Overhaul Kit A/C Compressor: Snap Rings, Washers, Screws, Pulley Bolt.
Jeep Clutch - A/C Compressor Part Number: 68526081AB
$84.24 MSRP: $124.00You Save: $39.76 (33%)Product Specifications- Other Name: CLUTCH-A/C COMPRESSOR
- Replaced by: 68526081AE
- Replaces: 68526081AA
| Page 1 of 3 |Next >
1-20 of 45 Results
Jeep A/C Clutch
OEM parts sourced directly from Jeep deliver superior quality, long lasting strength, and a precise fit you can trust. Each item goes through strict quality checks to ensure safety, toughness, and performance that matches your factory equipment. At JeepPartsDeal online shop, you'll get top-quality, budget-friendly OEM Jeep A/C Clutch for your vehicle. We focus on giving you a high standard without pushing up the price. Our full selection of genuine factory products comes backed by the original manufacturer's warranty. You'll love our fast delivery, seamless shopping experience, and convenient return policy, saving you all the hassle.
Jeep A/C Clutch controls the compressor operation and provides cool cabins without robbing the engine of its power when the engine needs it. Out of wartime hardiness came Jeep, a steel frame, open-air body, go-anywhere attitude that draws drivers even now who will make their way to the trailhead rather than spend time at the valet parking lot. Jeep continued to add options such as Selec-Terrain, voice recognition, in-car updates, driver aids, and at the same time maintains the square posture and straight windows that proclaim freedom at each turn. Jeep is a symbol of mechanical honesty, close owner group, and a guarantee that once the monotony of pavement is found it simply shifts a gear and drives off. Similar to the suspension, the A/C Clutch is designed to absorb the same shock as the suspension, only becoming engaged when the current is requested to lock the hub with the serpentine pulley, forcing the engine to drag only when all the horsepower is needed, such as when climbing or crawling. As current flows, the A/C Clutch closes in milliseconds, propelling refrigerant forward, and as current ceases it opens equally quickly, eliminating belt glaze and maintaining steady fuel burn. The rough bearing pack, heat-resistant wiring, and balanced rotor of the A/C Clutch ensure that it continues to work beyond the river ford or traffic jam and provides a consistent vent and less noisy idling. The A/C Clutch provides a similar performance since any Jeep could conceivably overcome speed bumps in the suburbs and a flooded fire road the next, its climate control should be equally adaptable.
Jeep A/C Clutch Parts and Q&A
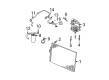
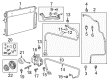
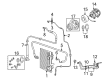
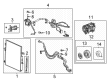
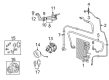
- Q: How to Install an A/C Clutch on Jeep Grand Cherokee?A:Set the dowel pin on the back of the field coil (2) with the hole in the compressor's front and then mount the field coil on top of the compressor, making sure the lead is not trapped. A new snap ring should be installed to keep the compressor clutch field coil attached to the A/C compressor and the bevel should face outward with the eyelets placed either right or left of the dowel pin position. Use Snap Ring Pliers 9764 or similar (1) to install the snap ring (4), so the field coil stays secure and is pushed all the way down. During installation, make sure you do not harm the friction surfaces and, whenever necessary, gently rap the pulley with the wooden tap (2). A new snap ring is required to hold the pulley and bearing in place and the bevel needs to be facing upward. Once more, you should use Snap Ring Pliers 9764 or any similar tool (1) to install the snap ring (2) that holds the assembly to the A/C compressor. If you keep the old clutch plate and its assembly, fit the previous shims back on the compressor shaft; if you changed the parts, use a pile of 2.54 mm (0.010 in.) thin shims in their place. Attach the clutch plate to the A/C compressor in front and tighten the bolt on the compressor shaft to 19 Nm (168 in. lbs.). After you have tightened, check the air gap in several spots to make sure it is within 0.35 - 0.60 mm (0.014 - 0.024 in.), changing the number of shims as needed. Run the lead from the compressor clutch field coil wire behind bracket (2), then install the electrical connector (1). Attach the compressor to the engine, bolt it into place, link the engine wire harness to the clutch field coil, belt the compressor to the engine's drive and reconnect the negative cable to the battery.
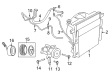
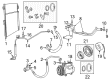
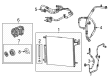
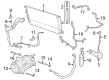
- Q: How to Maintain the A/C Clutch on Jeep Wrangler?A:You should begin by cutting off the battery negative wire and taking off the serpentine drive belt. After that, take out the bolt securing the clutch to the compressor shaft, keeping the clutch in position with a band-type oil filter wrench. Use a plastic mallet to lightly tap the clutch plate until it slides off the splines and remove the clutch plate and shim(s), trying not to drop any of them. Use something other than a screwdriver when working between the clutch plate assembly and pulley. Slide off the compressor clutch pulley assembly after inserting snap ring pliers to unclip the external snap ring. Take out the hex retainer bolt, then separate the retainer and screw from the clutch coil lead wire harness bolted to the compressor front housing. Unsnap the clip from the outside near the clutch coil and the whole clutch will release while you remove it with snap ring pliers. To insert the clutch field coil, lock the dowel pin on its end into position in the hole in the compressor housing. Connect the clutch coil lead wire harness to the retaining clip and tighten the screw. Make sure that the clutch field coil and snap ring are set so that the bevel faces out and the holes are facing down as you should. Slide the snap ring all the way in to prevent the clutch from failing. Attach the pulley assembly to the compressor with either a block of wood or your fingers and place the retaining snap ring with the bevel facing out. Should you use the old clutch plate and pulley assembly, attach the old shim(s) to the new one; otherwise, stick on new shim(s) that match the total thickness of the old ones at the shaft's shoulder. Fasten the clutch plate assembly to the shaft, check the thickness gap between the clutch plate and pulley face and measure it to ensure it is between 0.35 and 0.65 mm (0.014 and 0.026 in.). First, turn the shims to fit the correct gap, then squeeze the bolt onto the compressor shaft and tighten it to 13 N.m (115 in. lbs.). After that, replace the accessory drive belt and attach the negative battery cable.


Related Jeep Parts
 Jeep Cabin Air Filter
 Jeep Blower Motor
 Jeep Blower Motor Resistor
 Jeep A/C Accumulator
 Jeep A/C Compressor
 Jeep A/C Compressor Cut-Out Switches
 Jeep A/C Expansion Valve
 Jeep A/C Hose
 Jeep A/C Service Cap
 Jeep A/C System Valve Core
 Jeep Ambient Temperature Sensor
 Jeep HVAC Pressure Switch