JeepParts
My Garage
My Account
Cart
OEM Jeep Front Cross-Member
Front Engine Cross Member- Select Vehicle by Model
- Select Vehicle by VIN
Select Vehicle by Model
orMake
Model
Year
Select Vehicle by VIN
For the most accurate results, select vehicle by your VIN (Vehicle Identification Number).
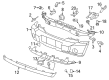
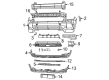
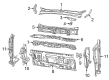
57 Front Cross-Members found


Jeep Lower Crossmember, Front Part Number: 5115402AH
$303.64 MSRP: $448.00You Save: $144.36 (33%)Ships in 1-3 Business DaysProduct Specifications- Other Name: Crossmember - Front Side Rail; Radiator Support Panel, Front; Crossmember Front Side Rail Bracket Attaching; Crossmember Front Side Rail Lower
- Position: Front
- Replaces: 5115402AE, 5115402AG, 5115402AD, 5115402AC, 5115402AB, 5115402AF, 5115402AA


Jeep Impact Bar, Front Upper Part Number: 68439592AA
$477.47 MSRP: $695.00You Save: $217.53 (32%)Product Specifications- Other Name: C Member - Front Support; Bumper Impact Bar, Front Upper; Crossmember Front Support
- Position: Front Upper


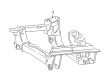
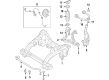
Jeep Engine Cradle, Front Part Number: 68438645AG
$1219.43 MSRP: $1780.00You Save: $560.57 (32%)Ships in 1-3 Business DaysProduct Specifications- Other Name: Crossmember - Front Suspension; Engine Cradle, Front; Crossmember
- Position: Front
- Replaces: 68438645AD, 68438645AE

Jeep Engine Cradle, Front Part Number: 4877621AD
$873.45 MSRP: $1910.00You Save: $1036.55 (55%)Ships in 1-3 Business DaysProduct Specifications- Other Name: Crossmember - Front Suspension; Suspension Subframe Crossmember, Front; Crossmember; Cradle Front Suspension
- Position: Front
- Replaces: 4877621AA, 4877621AB, 4877621AC

Jeep Seat Crossmember, Front Part Number: 56052087AB
$115.57 MSRP: $171.00You Save: $55.43 (33%)Ships in 1-2 Business DaysProduct Specifications- Other Name: Crossmember - Front Seat Retention; Crossmember Front Seat Retention
- Position: Front

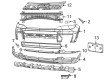
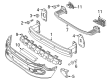
Jeep Impact Bar, Front Part Number: 68402961AC
$118.97 MSRP: $176.00You Save: $57.03 (33%)Ships in 1-3 Business DaysProduct Specifications- Other Name: Crossmember - Bumper; Bumper Impact Bar, Front
- Position: Front
- Replaces: 68402961AB

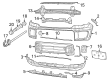
Jeep Impact Bar, Front Part Number: 68459328AB
$154.09 MSRP: $228.00You Save: $73.91 (33%)Ships in 1-3 Business DaysProduct Specifications- Other Name: Crossmember - Bumper; Bumper Impact Bar, Front
- Position: Front

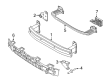
Jeep Impact Bar, Front Part Number: 55360190AN
$169.95 MSRP: $252.00You Save: $82.05 (33%)Ships in 1-3 Business DaysProduct Specifications- Other Name: Crossmember - Front Support; Frame Crossmember, Front; Front Crossmember; Crossmember Front Support
- Position: Front
- Replaces: 55113328AB, 55360190AG, 55360190AH, 55360190AM, 55360190AE, 55113328AA, 55360190AD, 55360190AJ, 55360190AK, 55360190AF, 55360190AL

Jeep Impact Bar, Front Part Number: 68455839AA
$254.93 MSRP: $375.00You Save: $120.07 (33%)Ships in 1-3 Business DaysProduct Specifications- Other Name: Beam - Front Bumper; Bumper Impact Bar, Front
- Position: Front

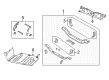
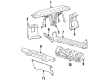
Jeep Crossmember, Front Upper Part Number: 68254316AA
$219.80 MSRP: $324.00You Save: $104.20 (33%)Ships in 1-3 Business DaysProduct Specifications- Other Name: Crossmember - Dash; Cowl Crossmember, Front Upper; Crossmember Dash
- Position: Front Upper
- Replaces: 68246284AA


Jeep Impact Bar, Front Part Number: 68455903AA
$240.20 MSRP: $354.00You Save: $113.80 (33%)Product Specifications- Other Name: Beam - Front Bumper; Bumper Impact Bar, Front
- Position: Front

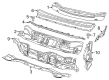
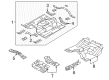
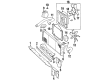
Jeep Crossmember, Front Part Number: 68081974AK
$256.06 MSRP: $377.00You Save: $120.94 (33%)Ships in 1-3 Business DaysProduct Specifications- Other Name: Plenum - Dash; Cowl Crossmember, Front; Crossmember Dash
- Position: Front

Jeep Engine Cradle, Front Part Number: 52059463AF
$286.76 MSRP: $422.00You Save: $135.24 (33%)Ships in 1-3 Business DaysProduct Specifications- Other Name: Crossmember - Front Suspension; Engine Cradle, Front
- Position: Front
- Replaces: 52059463AE, 52059463AC, 52059463AD

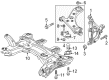
Jeep Engine Cradle, Front Part Number: 68371783AB
$423.65 MSRP: $617.00You Save: $193.35 (32%)Product Specifications- Other Name: Crossmember - Front Suspension; Suspension Subframe Crossmember, Front; Crossmember; Crossmember Front Suspension
- Position: Front
- Replaces: 68371783AA


Jeep Engine Cradle, Front Part Number: 68265148AA
$466.02 MSRP: $679.00You Save: $212.98 (32%)Ships in 1-3 Business DaysProduct Specifications- Other Name: Xmember - Front Suspension; Suspension Subframe Crossmember, Front; Crossmember; Crossmember Front Suspension
- Position: Front

Jeep Suspension Crossmember, Front Part Number: 68292230AI
$530.14 MSRP: $773.00You Save: $242.86 (32%)Ships in 1-3 Business DaysProduct Specifications- Other Name: Crossmember - Front Suspension; Suspension Subframe Crossmember, Front; Crossmember; Crossmember Front Suspension
- Position: Front
- Replaces: 68292230AH, 68292230AG, 68292230AF, 68292230AE


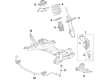
Jeep Lower Crossmember, Front Part Number: 55255200
Product Specifications- Other Name: Crossmember - Front Lower; Crossmember Front Suspension
- Position: Front Lower


Jeep Lower Tie Bar, Front Part Number: 55174978
Product Specifications- Other Name: Crossmember - Front Suspension; Crossmember Front Suspension
- Position: Front


Jeep Engine Cradle, Front Part Number: 52089493AI
Product Specifications- Other Name: Crossmember - Front Suspension; Engine Cradle, Front; Crossmember; Cradle Front Suspension
- Position: Front
- Replaces: 52089493AH, 52089493AE, 52089493AG, 52089493AF

Jeep Impact Bar, Front Lower Part Number: 68247223AA
$327.44 MSRP: $482.00You Save: $154.56 (33%)Product Specifications- Other Name: Crossmember - Front Support; Bumper Impact Bar, Front Lower; Crossmember Front Support
- Position: Front Lower
| Page 1 of 3 |Next >
1-20 of 57 Results
Jeep Front Cross-Member
OEM parts sourced directly from Jeep deliver superior quality, long lasting strength, and a precise fit you can trust. Each item goes through strict quality checks to ensure safety, toughness, and performance that matches your factory equipment. At JeepPartsDeal online shop, you'll get top-quality, budget-friendly OEM Jeep Front Cross-Member for your vehicle. We focus on giving you a high standard without pushing up the price. Our full selection of genuine factory products comes backed by the original manufacturer's warranty. You'll love our fast delivery, seamless shopping experience, and convenient return policy, saving you all the hassle.
Jeep Front Cross-Member holds the front end firmly united and keeps the ride sophisticated and wheels straight. Jeep began in 1945 as a laborer and went off-road with open tops once in the civilian market, square shoulders, a smile that challenges to be tried, and a badge that still reminds you of rock-hard steel, the Selec-Terrain knob that snaps to snow to mud, swift voice commands, wireless updates, and a chat room of owners who are willing to share adventure maps after a hard day on the ridgelines. Jeep creates community by not patronizing its drivers, challenging them to cross streams, scrape-skid plates, pull tow straps, and wave at passersby, and the digital gauges in its models glow with straight line icons, doors are taken out with hand tools, and all its models are promised to work the same way; in which case, dirt, snow and sand are nothing more than different flavors of the same playground. Front Cross-Member is positioned directly underneath the driveshaft and is made out of dense steel, which cannot be easily bent, secures engines and transmission in place and ensures that the geometry of the suspension is kept in check. Trails speak the truth and Jeep demonstrates itself when the Front Cross-Member takes in rock hits, dispensing the force, and allowing the steering to remain accurate. In the daily commutes, Jeep is an advantage because the Front Cross-Member dampens vibration hence there is no vibration in the dashboards, tires wear well, and cornering is solid and not sloppy. Front Cross-Member is another element that provides the crash protection and is designed to create a strict shield that deflects the impact forces to the cabin and prevents the intrusion of the drivetrain in the front.
Jeep Front Cross-Member Parts and Q&A
- Q: How to install a Front Cross-Member on Jeep Grand Cherokee?A:The first step is putting the engine cradle sway bar in and after that, you should put the lower control arms in. With the engine cradle in place, get the bolts in the engine cradle slots and bolt them. Line up the cradle with the marks created earlier and secure the engine using 203 Nm (150 ft. lbs.) at the front and 122 Nm (90 ft. lbs.) at the back. Add the steering gear where needed and place the engine fully on its mounts, using all 111 Nm (82 ft. lbs.) of force on the engine mount bolts. For 4WD vehicles, assemble the front differential into the vehicle and fasten the bolts; tighten the rear and right differential bolts to 102 Nm (75 ft. lbs.) the same as the front differential bolts, but just 54 Nm (40 ft. lbs.). Once the propeller shaft is installed, set the right halfshaft onto the differential and then hook the electrical connector and vent hose if the car has them. In addition to the lower clevis bolts, put in the knuckles and tighten the halfshaft nut to 251 Nm (185 ft. lbs.) if you have half shafts. Install the knuckle so the lower ball joint goes inside, secure with the lower ball joint nut tightened to 81 Nm (60 ft. lbs.), then install the upper ball joint and its nut, both tightened to 81 Nm (60 ft. lbs.). Put the outer tie rod end on the steering knuckle and tighten the ball stud nut to 75 Nm (55 ft. lbs.). Secure the two speed sensor connectors and clicked on the side clamps and then add the rotors. Check and add fluid to the front differential, put on the front skid plates and adjust the wheel alignment when required.
- Q: How to Install a Front Cross-Member for Service and Repair on Jeep Patriot?A:Before installing the front cross-member, make sure the lower control arms are in and the rear hold-down bolts are fastened (3). After that, place the front pivot bolts (2) and make sure the crossmember is well supported before hoisting it onto the vehicle. Attach the bolts (1 and 2) and place the engine cradle on the marks made earlier, after which tighten the bolts to 190 Nm (140 ft. lbs.). Replace the steering gear and attach the bolts (1) by hand, setting the torque at 61 Nm (45 ft. lbs.). Set the stabilizer bar in the new place (2) and attach all of the bushing bolts using a torque setting of 61 Nm (45 ft. lbs.). Attach the lines to the power steering unit and set the bolts in the support bracket at 8 Nm (70 ft. lbs.). Attach the lower ball joint stud (6) to the knuckle (3) and thread a NEW ball joint stud pinch bolt (4) into it. Then, tighten the NEW nut (5) onto the pinch bolt to a torque of 82 Nm (60 ft. lbs.). Set in the crossmember running along the length of the roadster (4) and then attach the front wheels (1). When all the vehicle's weight is on the suspension, tighten the front control arm bushing bolts to 123 Nm (91 ft. lbs.) and adjust wheel alignment if needed. Now, set up the rear roll mount (4) and apply the three bolts (3) on the crossmember, making sure the tightness is 153 Nm (112 ft. lbs.). Secure the lab switch through bolt (2) so that it is tightened to 65 Nm (48 ft. lbs. of torque). Set the belly pan in place by fastening it with three front screws (4) and three rear screws (2) and with push pin fasteners in the center.


Related Jeep Parts
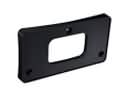 Jeep License Plate
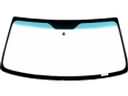 Jeep Windshield
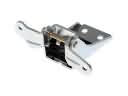 Jeep Door Hinge
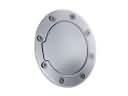 Jeep Fuel Door
 Jeep Windshield Wiper
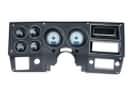 Jeep Dash Panel
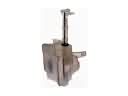 Jeep Windshield Washer Fluid Reservoir
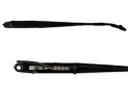 Jeep Wiper Arm
 Jeep Wiper Blade
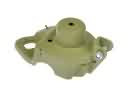 Jeep Coil Spring Bracket
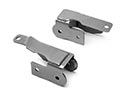 Jeep Control Arm Bracket
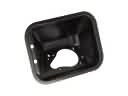 Jeep Fuel Filler Housing